
How Hackers Spy on People with a Man in the Middle Attack
How Hackers Spy on People with a Man in the Middle Attack
Welcome back everyone! Recently, we’ve been discussing ARP quite a bit, so I figured I’d take this opportunity to cover a fundamental ARP based attack, the Man in the Middle. We’re going to cover how this attack works and then we’re going to launch this attack on our test network. So, let’s discuss how this attack works.
The Anatomy of a Man in the Middle Attack
A Man in the Middle is just what is sounds like. We’re going to insert ourselves into the middle of a connection. Let’s take a look at a diagram of a MitM attack, then we’ll dissect it further:

We can see in the diagram above that the attacker has killed the victim’s original connection to the server. The victim and server now think they are connected to each other, when they’re actually both connected to the attacking machine. Neither ends of the connection know that anything is wrong, and the attacker can see all unencrypted traffic that flows between them. This attack can be used to do a whole slue of attacks. The attacker and spy on the victim (which is what we’re going to do here), they can send fake information to the victim as the server, and they can catch any passwords that the victim uses to log into the server.
Side Note: Since ARP is a layer 2 protocol, it can only be used in LANs. Therefore, ARP based MitM attacks can only be performed on a LAN
Now that we know the end result of a MitM, let’s discuss the technology behind it. When hosts use ARP, they are trying to resolve IP addresses to MAC addresses. When a host has the MAC address of another host, it will use that address to send data across a LAN. These associations of IP to MAC addresses are stored in the MAC address table of the host. If we can manage to replace the MAC address associated with a certain IP address with our own, that host will send all data meant for that IP to us instead. Now image if we do this for two hosts and replace the MAC address associated with the other host with ours. All data that goes between those two hosts would then be sent to us instead.
Now that we know the ins and outs of MitM attacks, let’s move on to launching the attack!
Step 1: Find Your Victim and the Gateway
If we’re going to be launching an attack, we’ll need to find a victim. You could find victim on your LAN via a ping scan or an ARP scan (just to name a few). We also need to default gateway. Since we’re on a LAN, we’re going to spy on our victims activity on the Internet. This means that we’ll need to launch our MitM between them and the default gateway of the network, that way all data from the victim intended for the Internet must go through us first. I’ve already selected my victim (10.0.0.15), and we can find our default gateway by using the route command:
 We can see by the highlighted output of the route command that our default gateway is 10.0.0.1. Now that we have our victims IP addresses, we’re almost ready to launch our attack.
Step 2: Enable IP Forwarding
Now one of the main issues with ARP based MitM attacks is that since all the data is being sent to the attacker, it won’t get to it’s destination. This will effectively kill the victim’s Internet access and will generate quite a bit of suspicion! We need to make it so that the data can pass through the attacking system instead of bouncing off of it. Doing this will allow our attack to seamlessly come together with minimal suspicion from the victims.
In order to enable IP forwarding, we need to write a “1” to a file under the /proc directory. Let’s take a look at the command that will enable IP forwarding for us:
Step 3: Launch the MitM
We’re going to be using a tool by the name of arpspoof in order to launch our attack. First things first, let’s take a look at the help page for this tool:
 Alright, it looks like we need to use -t and -r in order to specify our victims. We also need to use -i to specify the network interface we want to send our attack out of (in our case, wlan0). Now that we know what flags we need to give, let’s take a look at the command to launch our attack, and some of the output that it will give:
 Here we can see that we’re sending ARP replies that say our MAC address is tied to both the victim’s IP addresses. We’ve successfully launched a Man in the Middle attack! Now that we have this attack going, let’s use it spy on their web surfing.
Step 4: Sniff the Victim’s Activity
We’re going to be using a tool named urlsnarf in order to sniff the victims web activity. Let’s take a look at the command we’ll need to use to start this sniffing:
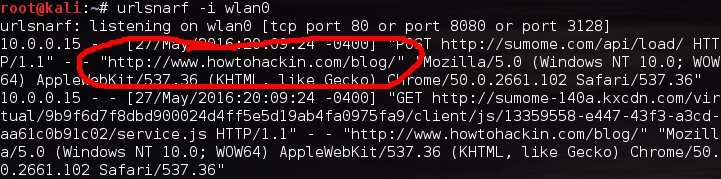 We can see in the highlighted output above that our victim at 10.0.0.15 is browsing on none other than howtohackin.com/blog! Let’s give a brief wrap-up and end this lesson.
Today, we not only learned the anatomy of a MitM attack, we learned how to perform one and how to utilize it to spy on a victim’s web activity. This attack is very common on LANs and, given the proper circumstances, can be very effective in successfully hacking a target. I’ll see you all in the next article!
Welcome back everyone! In the last article we took a brief look at recon as a whole, but we didn’t really focus on any particular aspect of it. Today, we’re going to dive into the rabbit hole that is port scanning. We’re going to cover two different types of port scans, but this time we’re going to explain the process behind them. Before we do that, we’ll need to talk about the TCP three-way handshake, and it’s role in our scanning. So, without further adieu, let’s get started!
The TCP three-way Handshake
When making a connection to a port, there are multiple protocols that are used to handle and manage that connection. A protocol is simply a set of rules that both hosts use. This ensures that all hosts know how to properly send and receive data to and from each other. One of the two protocols responsible for transporting data is TCP. In order to initiate a connection, a three-way handshake is performed.
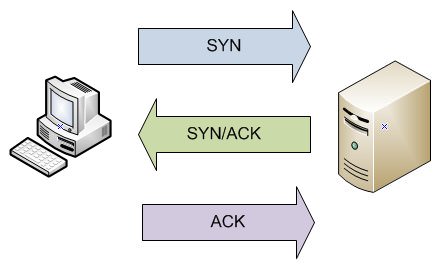
First, the host attempting the connection sends a packet with the SYN flag. SYN stands for synchronize, and means that one host is requesting to synchronize with another. After the SYN packet is sent, the second host must check that the proper authorizations are in place for this connection to be made. If all the requirements are met, then the second host sends a packet with the SYN and ACK flags. The SYN flag again stands for synchronize, while the ACK flag stands for acknowledge. This packet means that the second host acknowledges the original SYN flag, and sends it’s own SYN flag to confirm the connection. Finally, the first host sends a single ACK flag back to the second host, completing the handshake and establishing the connection.
Now that we know about the TCP three-way handshake, let’s move on to talking about our standard port scan. We’re going to be discussing the same form of basic scan we did in the previous article, so we can have a better understanding of it before moving on to a more complex scan.
Explaining the Basic Port Scan
In the last article, we used nmap to perform a very basic port scan. We didn’t really explain this port scan very deep, so we’re going to cover it today.. Remember that three-way handshake we just talked about? Well in order to understand port scanning, we need to know it very well. We’re not going to perform another basic port scan today, as we’ve already demonstrated it.
When we perform a basic port scan, or any port scan for that matter, we have to run through the TCP three-way handshake for every port we want to scan. The type of scan all depends on how we perform the handshake. A basic port scan runs through the entire handshake for every port. While this method does it’s job perfectly well, it makes quite a bit of noise. This means that every connection attempt will be logged by the victim, and this log can be tracked back to us. The basic port scan isn’t anything special, it’s more of an introduction to the next type of scan we’re going to discuss, the stealth scan.
Explaining the Stealth Scan
So far, we’ve explained the TCP three-way handshake, and it’s role in a basic port scan. There are many flags that can be used in a handshake, but we’ve only discussed SYN and ACK. In order to understand the stealth scan (otherwise known as the half-open scan) we need to know about a third flag, RST. RST stands for reset. This flag will terminate any handshake immediately. This can give us hackers an edge for evading those pesky logs!
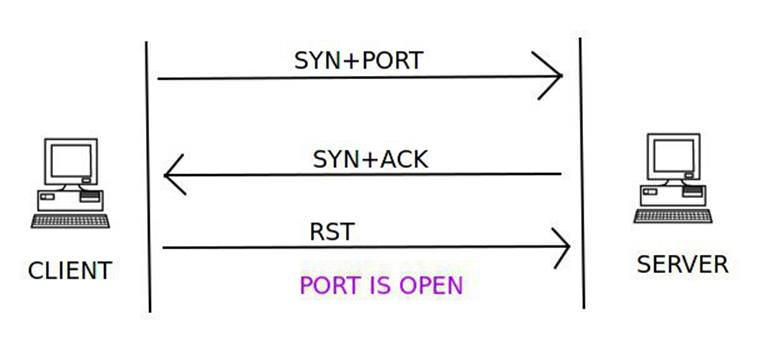
During a SYN scan, the attacker performs the basic TCP three-way handshake as normal. The attacker starts with a SYN packet, and waits for the victims response. If the victim responds with a SYN-ACK, the port is open, and if they respond with an RST-ACK, the port is closed. After receiving the victims response, the attacker sends an RST packet instead of the regular ACK. By terminating the connection before it is complete, it is far less likely that it will be logged as an attempt to connect. This can help us fly under the radar during active recon.
Now that we understand the concept of stealth scanning, let’s perform one using nmap. Nmap supports many, many scan types, including stealth scans. If we want to utilize a stealth scan, we have to give the -sS flag before our target IP address. Let’s go ahead and perform our scan now, we’ll only be scanning ports 1-100:
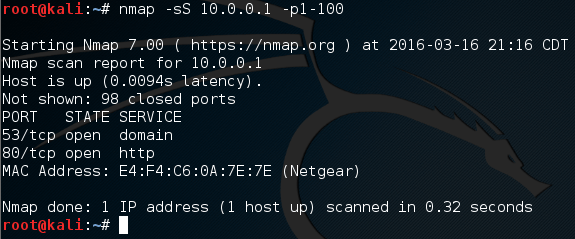
There we go, our scan worked! But in order to better understand this concept, let’s open up wireshark and see our packets as they are transported:

We can see here that there are many packets going to and coming from our attackers IP (10.0.0.19). In this screen shot we can see that our attacker has sent SYN packets to many different ports on our victim. Now that we’ve seen the SYN packets being sent, let’s take a look at some of the victim’s response packets, as well as some of the attackers RST packets:

We can see here that the victim was responding with RST-ACK packets and some SYN-ACK packets. Upon closer inspection, we can see that this SYN-ACK packet comes form port 80 of our victim. This port was also reported as open during our scan! Immediately after the SYN-ACK from port 80, we see that the attacker sent an RST packet to terminate the connection before it was fully established, this let’s us slip by without being logged for attempting a connection. There we have it, we successfully performed and dissected a stealth port scan!
We covered quite a bit here, so I hope the concepts got across well. I know it may seem like this is moving a bit slow, but we really need to understand what is happening and learn the mechanics behind it. We’re here to become hackers, not script kiddies. The next two articles will be a Ruby crash course. It will prepare us with all the knowledge we need in order to build our own port scanner. I’ll see you there!
I used to be where you are – most likely a technical person not fully enjoying what you do at your day job and wanting to make the move to a job that you would actually enjoy in the security field.
For me specifically, that was conducting vulnerability assessments, penetration testing, hacking, auditing or anything in the IT Security field.
On the About Me page I described a little bit about how I got where I am. Now I’m going to share with you exactly what I would do if I could do it all over again, but first I’m going to answer a few popular questions about the industry.

Is a Computer Science degree necessary to be a pentester?
So you want to learn how to hack and think you need a degree. If you have the time and the money to pursue a degree in computer science, by all means take the opportunity and pursue it. While it is not necessary to have this degree, it would be one of the optimal paths to take under perfect conditions to get your foot in the door at an entry-level position.
You might be pursuing or have other technical degrees already that could substitute nicely. I personally had a Computer Information Systems (CIS) degree when I set out on my journey.
To go a bit further I decided to get a Masters in Information Security and Assurance, but this isn’t necessary for everyone. If you were coming from a non-technical field though, a switch to a more technical masters program could be just the path for you.
Don’t let the BS and MS degree talk deter you though if getting one isn’t an option. Technical degrees are always an option as well.
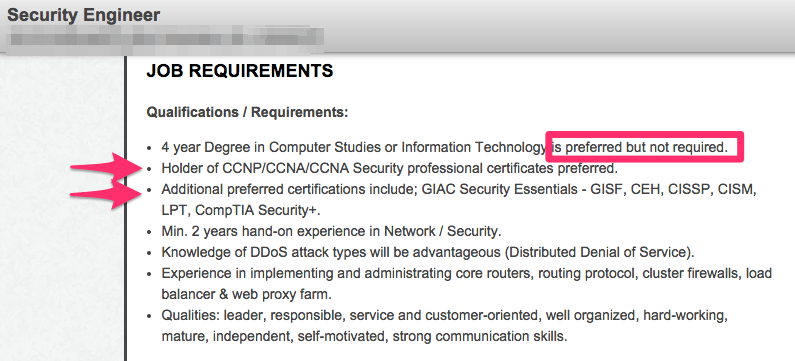
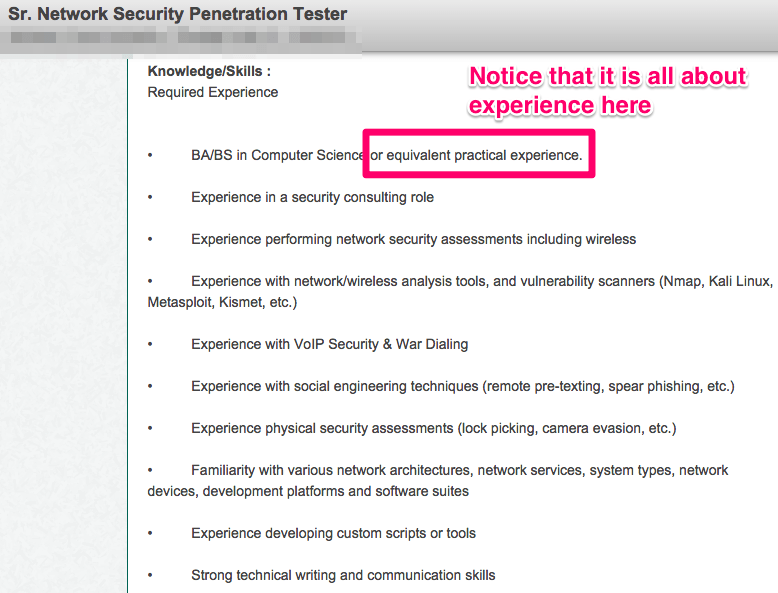
While you will always find that companies are looking for a degree, if you have the right experience and certifications it surely wouldn’t hold you back at all.
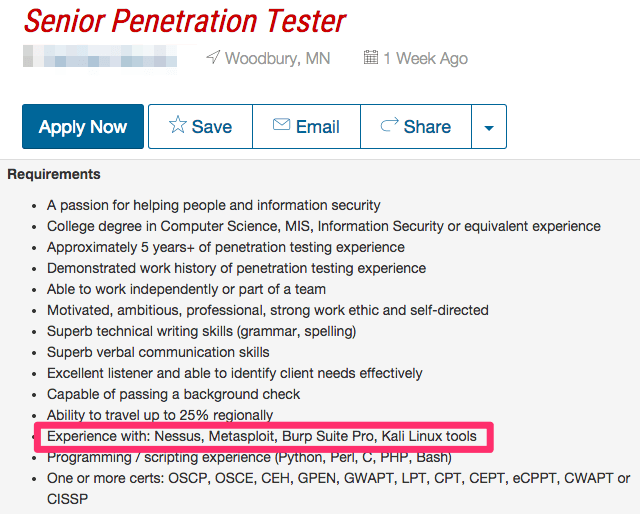
Let’s take a look at two sample information security job postings:
Does where I go to school matter?
In my opinion, it doesn’t matter where you obtain your degree. You would just use this as a stepping stool to gain some fundamentals (Join our list to start getting those fundamentals now) and get your foot in the door so that potential clients feel comfortable with you. Sometimes they will actually ask for your resume and a degree looks good on there.
Surprisingly, Vo Tech and Community Colleges often have programs that are just as good as the more prestigious schools. Many times, you can get just as good an education for half the cost and in half the time.
What matters most though is the amount and type of experience that you will be able to gain along the way as was hinted in the graph above.
You should note that even the most expensive college or university does not necessarily have the best educational programs for this particular field. At this point in time this field is in its infancy, which also means that this is actually a great time to get into the field before it becomes crowded.
Most computer science programs available today place the majority of emphasis on programming, although I foresee them moving heavily in the cyber security direction over time, including Pentesting.
Some schools now even have cyber security degrees, so if you know for sure that this is the area you want to be in then I would take a hard look at that.
That large programming aspect of the computer science programs will also be very beneficial to you later without a doubt.
Which certifications should I have?
Certain certifications will be indispensable when it comes to getting your foot in the door, especially if you pick the right ones.
It may seem like putting the cart before the horse by getting one of these before you get the experience and it is, but having one will give you a leg up over another candidate who doesn’t have one.
It is also very doable to get one in a relatively short period of time, unlike a degree.
This is why if you already have a Bachelor’s degree I wouldn’t recommend going back to get a computer science degree, but instead going after some of the sought after certifications such as: SANS – GPEN, GWPT, GSEC, GAWN; Offensive Security – OSCP, OSWP, OSCE, OSEE; EC-Council – C|EH, ECSA, ECSA L|PT.
There are also others that you can find with a simple Google search or by looking at job postings online.
While it’s not necessary that you obtain all of these certifications, you will want to be able to prove that you have the required experience to perform the job and some of these certifications will help you do just that.
You’ll also want to consider some networking certifications such as Network to start, or even better the CCNA. You will commonly see the CCNA certification listed on pentesting job requirements.
These certifications will go a long way towards helping you obtain a penetration-testing job and can be just the thing that propels you ahead of another candidate vying for the same job.
These certifications will go a long way towards helping you obtain a penetration-testing job and can be just the thing that propels you ahead of another candidate vying for the same job.

What experience should I have?
Don’t make the mistake of getting a ton of certifications and forgetting that above all else experience is king. You may make it to the interview, but when the interviewer starts asking about experience, things could start to go downhill fast for you.
While you may not need experience for some entry-level positions, it is critical to get some if you expect to succeed and for a leg up on other entry-level applicants.
A solid understanding of networks is also critical for you. You don’t have to be an expert and can learn along the way, but you need to have a somewhat solid overview of how they work.
I was given an IP address in an interview some years back and asked what the broadcast address was. You need to be able to answer simple questions like this, so if you can’t you probably need more training in this area.
Building a home lab network environment is critical for a penetration tester and will allow you to get a better understanding of penetration testing, hacking, networking and help you meet the experience requirement you will need.
You will also want to become well versed in working and testing Web Applications and Cloud technologies such as SaaS. Web Application testing is very hot right now and you might have already noticed this while looking at some of the new pentesting positions available.
Because everything is moving out to the Cloud, companies are actively looking for people with the specific skills to test these applications and being advanced in this area can help you stand out from the competition.
Another great way to get experience is by reaching out to people in the industry already and working for them for free in your spare time.
This will give you documentable work experience beyond your own home lab and you may even get an opportunity to work with that company as well.
What skills do I need and is a networking background required?
You must know the fundamentals. That being said, I part ways with some in the industry here as some believe you need many years of experience as a network administrator or security engineer etc. first before moving on to pentesting. I actually believe that this isn’t a requirement and think you can learn both concurrently depending on your skill level and willingness to learn. They complement each other.
If you are dedicated you can read both types of books, take both types of classes and experiment with both sides of the same coin. Learning how to pentest doesn’t prevent you from concurrently learning how networks work.
However, learning how to pentest and hack without learning how networks work is never going to happen for you, so go get those fundamentals down.
Do I need to know how to code?
While you don’t need to be an advanced level coder to penetration test, it would be very wise to start learning some basic scripting in order for you to hack together some tools that you need.
The key here is to get some basic things to work, not to build out some huge application. You might have specific needs according to a penetration test that you are conducting and may need to tweak an already existing application or build your own.
You may commonly run into a Metasploit module that doesn’t meet your needs at the moment and you may need to either modify one or write it from scratch in ruby.

Most penetration testers can code in many languages because after you learn one language it isn’t difficult to branch out to others.
In my opinion you should focus on learning Ruby or Python because most of the code and job prerequisites you will come across will be written in one of the two. Both are often used in the penetration world and are the de facto standards. Build it once and then use it forever.
As you gain experience, you can start to branch out to some other languages as well. This knowledge base will make you more attractive in interviews and make you a much better pentester.
Start by watching some YouTube videos and then go and modify or try to recreate those applications on your own.
What is the best way to find a job?
The best way to find a job is to first look at your current employer to see if you can tweak your position or move to another in the company. The next best route would be to intern somewhere if you can.
If you can’t do it those ways you can always start your search by going to job searching sites such as the Federal Government (USAJobs.gov), CareerBuilder, Monster.com, Indeed.com and Dice.com.
Be on the lookout for titles such as Information Security Analyst, Information Security Auditor, Information Security Engineer, IT Security Consultant, and of course Penetration Tester. Of course you can search for common keywords such as Kali, Nessus, Wireshark, Metasploit, Burp Suite and nmap.
These will always vary and change over time, but you should be able to come up with a few different combinations and find some openings without issue.
Companies are looking for people who are willing to learn and do what it takes to get the job done.
If you don’t have a specific skill but are willing to pick it up along the way then it doesn’t matter at all. Presenting yourself to the company that way will significantly increase your chances of obtaining the position.
When interviewing for my first position, I personally had some good education but the direct experience wasn’t there. However, the company decided to take a chance on me based on my willingness to learn and get the certifications I obtained.
How much money do pentesters make?
As with any job this depends on many variables, but I’ve included a general range for you here:

It isn’t uncommon for entry-level positions to be between 55k-70k, mid-level to be between 70k-100k and senior level to be between 100k-140k.


If I had to do it all over again this is what I would do:
Step #1: I would evaluate my day job
I would evaluate my current position at my job and see if there was any way that I could gain some experience right where I am.
If there were a way to focus on some networking fundamentals or administration fundamentals I would start there. Many of you are already in technical positions, so take a look around, start reading more networking/hacking/pentesting books and see how you can apply it all to your current position.
Step #2: Set up my home lab
At the same time as I’m evaluating my day job, I would be setting up a virtual lab at home (download the step-by-step ebook) to start studying how everything works. To see how I would do that you can take a look at this page here.
In the process I would start looking at some basic videos on networking, hacking, pen testing, Ruby and Python. I’d utilize SecurityTube (http://www.securitytube.net/) and YouTube for this. As my skills got better and my knowledge base expanded I would also expand on this home lab network as well so I could run more tests.
Step #3: I would get web application testing down
After I got pretty confident on how things work in my own home lab I would be looking for other web applications and networks to learn on. OWASP, the Open Web Application Security Project, has an awesome complete list of vulnerable websites that you can learn on. You can find that list here:

Step #4: I would become the go-to security guy
After I became more confident I would then proceed to utilize what I’ve been learning at my current position with permission.
After I got some basic fundamentals down or if I already had the fundamentals down I would let my manager know that I would be happy to evaluate the current security situation in my own time if he/she would allow me.
I would try to position myself as the security guy on the team and make it my responsibility to learn all that I could. This would get my resume looking pretty good when it comes to experience and allow me to get even more much needed experience.
Step #5: Get a mentor
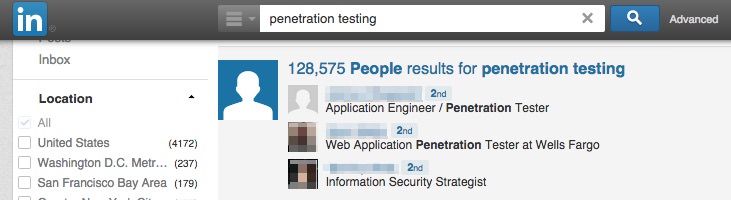
If it weren’t possible to get some experience at my current job, I would start by doing a cursory search of LinkedIn looking for people who are current penetration testers, security engineers or analysts, and reach out to them to do unpaid internships. I would let them know that I would help out in any way I could.
The great thing about LinkedIn is that the people that you find in your search will be 1st and 2nd connections to you, which is great as it will make it easier to connect to them and they are most likely in your area as well.
Some other searches to try:
IT Security Consultant
Information Security Engineer
Information Security Analyst
Information Security Auditor
Information Security Engineer
Information Security Analyst
Information Security Auditor
This internship could help you get your foot in the door at the company or at the very least you will gain experience that you can now put on your resume.
Step #6: Get certified in something
I would look at getting a certification to supplement the experience that I am getting. I would focus on ONE sought after certification that I am able to get based on my current experience and the experience requirements of the certification.
I would spend the rest of my time trying to gain that valuable experience that I need as nothing is going to replace it.
The four certifications that I would choose from at the beginning are the OSCP, CISSP, CEH or GPEN. This is completely my opinion and you probably have a different list.
Most penetration testers will tell you that a OSCP, CISSP, CEH OR GPEN certification will not make you a penetration tester, that only experience will, and that is absolutely true.
Only your experience and skill will make you a penetration tester. However, most wouldn’t deny that companies actively make their interview/hiring decisions based on certifications. The four certifications were chosen based on my quick research online of job postings.
To see what certifications companies were looking for, I searched for penetration testing or info security jobs and looked at the first 50 that I came by.
Of course this isn’t very scientific – I was only looking for the top 4 mentioned certifications and there should be a larger sample size – but I went with 50. The results actually surprised me but here they are:

If you do this test yourself you will get different results because of a different sample, but you will most likely see fairly similar results.
I did not expect the CISSP to be mentioned as often as it was for penetration testing positions, but it just goes to show how popular that certification is in the eyes of employers no matter what spectrum of IT Security you land on.
Some of you may argue that the OSCP certification is the best of these to get and I wouldn’t argue with you. Again, this isn’t scientific and I don’t have an opinion at all, but this should give you an idea of what companies are looking for.
Of course there were other certification mentions such as the CCNA, but I decided to go with the top four mentioned here. I encourage you to take a look at these jobs and see what they are looking for as well.
Now, let’s take a look at what the hit will be like for your wallet.
OSCP
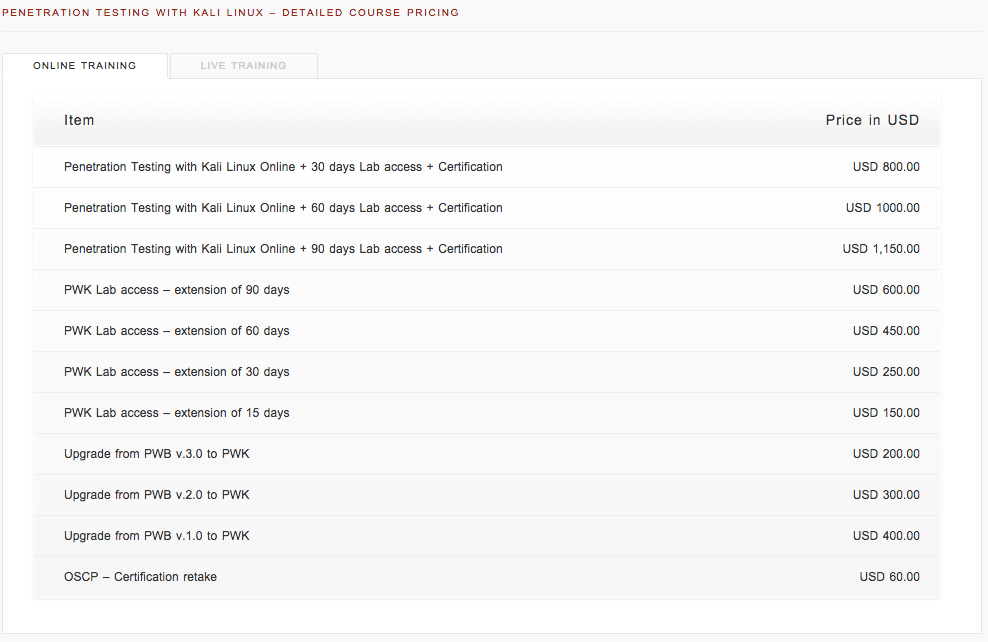
CISSP

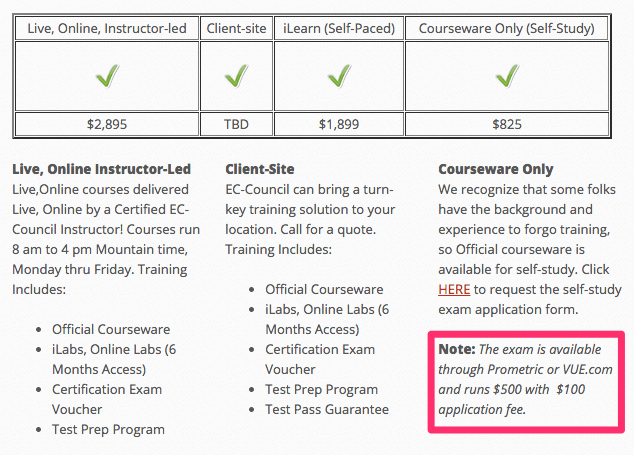
CEH
GPEN


The objective for us right now is to get to a point where we can get that experience, and these certifications are still some of the more popular certifications that a HR Manager at some company will be looking for.
We can educate ourselves on our own and we will, but other than our own hard work nothing will get you where you want to be quicker than being forced to learn at your day job.
Lets take a look at some experience requirements for these certs:
OSCP
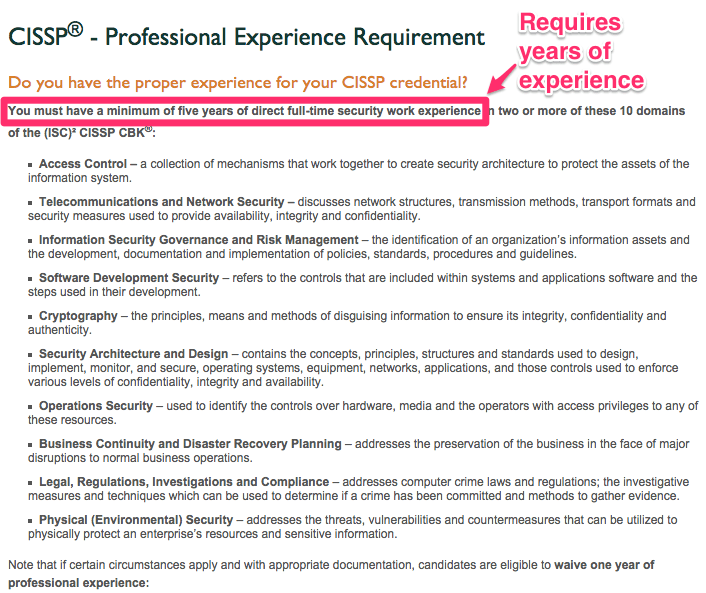
CISSP
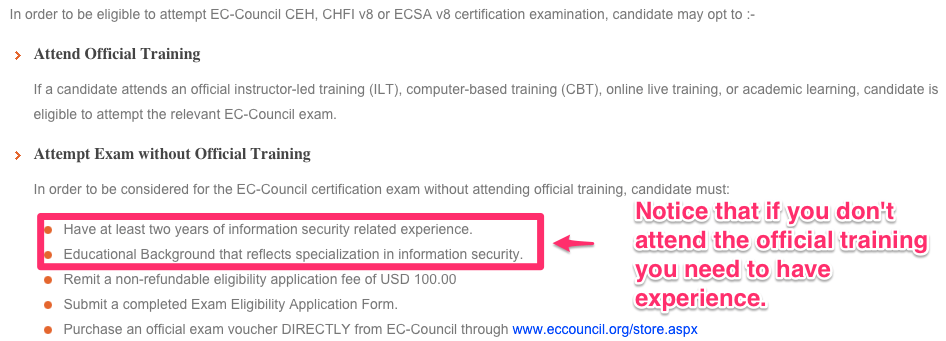
CEH
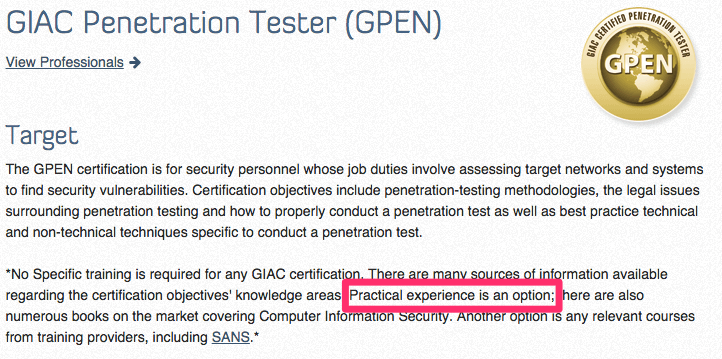
GPEN
We can see that the CISSP certification requirement is heavy, so if you don’t meet the experience requirements I would come back to it at a later date. I actually did that myself. I started with a couple others such as C|EH before later getting the CISSP. Another CISSP option is by becoming an associate and getting the experience along the way until you reach the requirements for the full certification.
After getting some certifications, I considered getting even more until I realized that it really just doesn’t matter all that much. It is just my personal opinion that certifications should be used as a tool to get you where you need to be, but after you are there, experience alone is king.
It would be awesome if you got all of these certifications, but nothing beats having the right experience and that is now where I focus most of my time.
It is important however that you get a few certifications just to demonstrate your competency both from a job standpoint and client standpoint. At the end of the day though, clients and employers will primarily be looking for you to have relevant past experience of conducting these tests in the field.
Certifications are mainly good to get your foot in the door at a security firm so just pick one and run with it!
Step #7: I would Capture The Flag and take challenges
At Hack This Site (https://www.hackthissite.org) there are many free challenges that you can take. It doesn’t get much better than that. I would start basic and work my way up from there. After I did a few of these I would move on to Capturing The Flag events.
At CTF Time (https://ctftime.org/event/list/) there are a ton of online and offline Capture The Flag events that you can be a part of.
When I felt my skills were up to the task I would try my best to be a part of a team and get involved in some of these events. For me this would be both a good time and give me the ability to practice in a scenario that is closer to “real-world”.
Step #8: Look for entry-level positions
At the beginning I would be looking to get my foot in the door, understanding that I may take a hit on pay for a bit while I gain the much needed experience so that I can transition to another field.
If you truly see this as your passion you should be willing to take less in order to make a move into something you love and the money will follow. “Choose a job you love, and you will never have to work a day in your life.” – unknown
People will always need and be looking for pentesters, so after you have gotten your experience, certifications etc. the employers will start looking for you rather than the other way around.
You will always feel as though you need more certifications, more experience and someone to knight you. You don’t; just go get started and get into the industry.
I’ve put together a package of things to help you execute on these steps:
- Ebook to help you set up your own pentesting lab.
- Ebook to help you customize that pentesting lab.
- Sample LinkedIn email I would send to start connecting and get experience
- How to get through the interview process
- I created a decision tree to show you the most optimal route for you to take to become a pentester.
Welcome back everyone! In the past few articles, we covered the basics of Ruby and built our own port scanner. This was to solidify the mechanics behind port scanning. Now that we have that concept down, it’s time to move on to host discovery (otherwise known as network enumeration). Host discovery is as simple as it sounds, we’re going to discover hosts. Before we do that, we’ll need a definition as to what exactly a host is.
Well, a host is a computer connected to a network. It’s that simple. The idea of host discovery is the process of finding out what hosts are on the network. This is used when you don’t know where your target is. If you’re on the same LAN as your target, but don’t know their local IP address, you can implement one of the two tactics we’re going to cover here today in order to find them.

As I previously stated, we’re going to be demonstrating two different kinds of discovery tactics. We’re going to cover ping scans, and ARP scans. We’ll start with ping scans, as they are the easiest to understand, and then we’ll ease our way into ARP scans. Let’s get started with ping scans!
Tactic 1: Ping Scans
We briefly covered ping scans in the first recon article, but now we’re going to go a bit more in depth. A ping is when one host on a network sends an ICMP (Internet Control Message Protocol) request to another host. This request is used to determine if a connection can be established between the two hosts. It’s worth noting that many firewalls will block ICMP (ping) requests, so ping scans are not recommended.
But, if no firewalls are in place, we can systematically send pings to every IP address that may be on the network. We’re going to be using nmap to perform our ping scan. If you remember from the first article, we used the -sn flag to disable port scanning. which effectively launches a ping scan. We’re only going to be scanning for other hosts on our subnet. A subnet is a logical network that is a smaller part of a bigger network. A single network can consist of multiple subnets. Since we’re only scanning for hosts on our subnet, we need to know the subnet mask. We can find this information by looking at the output of the ifconfig (Interface configuration) command. We’re only going to view the last 10 lines of the output, as this contains the information we need:

We can see that our local IP is 172.16.20.175 and our subnet mask is 255.255.252.0. Now that we have these, we can feed them into nmap to scan our subnet! Let’s take a look at the command we’re going to use to launch our scan:
Alright, we can see here that we’ve launched nmap, we’ve given the -sn flag to signify a ping scan, and we’ve given our local IP followed by our subnet mask represented in CIDR notation as /22. You may notice the > nmap.txt at the end of the command. This will make a new file called nmap.txt and will write all the output to it. Doing this means that we don’t have to scan more than once to see the results! Let’s take a look at the last 9 lines of the nmap.txt file and see some of our ping scan results:
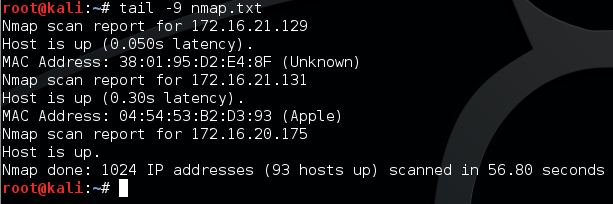
Here we can see that our ping scan returned quite a few hosts. There are many more in this file, but we’ve only viewed the last 3 results. Now that we know how a ping scan works, let’s move on to a more subtle way to scan for internal hosts, the ARP scan.
Tactic 2: ARP Scans
ARP (Address Resolution Protocol) is used to resolve an IP address to a MAC address. The IP address is the logical address of the host, and the MAC address is the address of the actual, physical NIC of the host. If we want to find what IPs are on the network, we can send out ARP requests to every IP and see which ones respond. My personally favorite tool for launching ARP scans is netdiscover, so we’re going to use that.
Since we already found out the subnet information earlier, we can use it here too. First, we need to find out what flags/switches netdiscover needs in order to scan. We can usually access a help page by giving the -h or –help flags. Netdiscover uses -h. We’re going to filter out any unnecessary output by using the grep command. We’re only going to display lines that contain the words “network” or “range”. Let’s take a look at this command and it’s filtered output:

Here we can see the switches that we need to give. We need to give -i followed by the network device (interface) that we want to use, which in this case is wlan0. We also need to give the -r flag, followed by the range of IPs to scan. It’s important to note that netdiscover can only scan /8, /16, or /24 ranges. Since our last range was /22, we’re just going to move it up to /24. Now that we know what flags/switches and information we need, let’s take a look at the command we’ll use to launch our ARP scan:
Now, let’s execute this command, wait a few seconds, and look at the output:

We can see here that netdiscover has successfully captured 113 ARP requests/replies. These packets contain all the information needed to see what hosts are on our network. Here we can only see the first three results, as there was much more.
We covered some pretty handy things here. We covered ping scans in depth, and then we covered the basics of ARP scans. Since ARP scans are preferred over ping scans, we’re going to need a deeper understanding of how they work, so we’re going to build our own ARP scanner! We’re going to build it in Python with the Scapy library. This means that the next few articles will teach the basics of Python and the basic usage of Scapy. I’ll see you there!
About Gamemaker gafoor.2


No comments