
Pythem –Web and Network Applications Penetration Testing Framework
Pythem –Web and Network Applications Penetration Testing Framework
Pythem is a network and web applications penetration testing framework that can perform various penetration tests, divided into following categories
- Network MITM and DoS
- Exploitation and Reverse Engineering
- Bruteforce
- Generic Utilities
Network MITM and DoS covers various attacks against networks and web applications including scanning, traffic sniffing, traffic redirecting, data analysis, spoofing, webcrawl, and denial of service attacks. Spoofing attacks include ARP spoofing, DNS spoofing, and DHCP spoofing. Scanning feature allows scanning the networks and applications to gather information like live hosts, open ports, and OS information. The data analysis is performed using a feature called Pforensics. Pforensics performs data packets capturing and analysis of the content shared in those packets between hosts. The webcrawl utility helps in finding server response for various potentially vulnerable links of the target web applications. Exploitation and reverse engineering allows exploiting network vulnerabilities related to TCP and standard input (stdin) communication channel. Bruteforce is another feature of Pythem that performs bruteforce attack on network hosts and web applications to harvest credentials. The generic utilities of Pythem include coding and decoding strings.
Pythem Installation Guide
Pythem is a Python framework that works on Linux OS. The framework has the following dependencies that need to be installed before installing Pythem.
sudo apt-get install -y build-essential python-dev python-pip tcpdump python-capstone libnetfilter-queue-dev libffi-dev libssl-dev
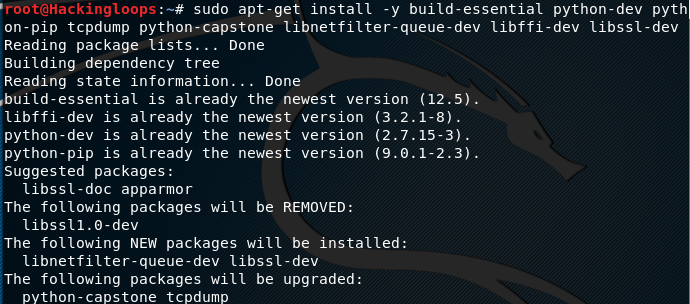
It is recommended to update the system before installing these packages.
sudo apt-get update
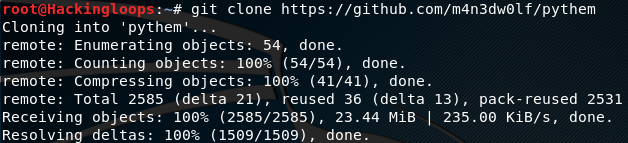
After installing the dependencies, clone Pythem framework using the following command.
git clone https://github.com/m4n3dw0lf/pythem
In the next step, move to the pythem directory to run the setup file to complete the installation process.
cd pythem
python setup.py install
How Pythem Works
The following command opens the Pythem interface in the terminal.
./pythem
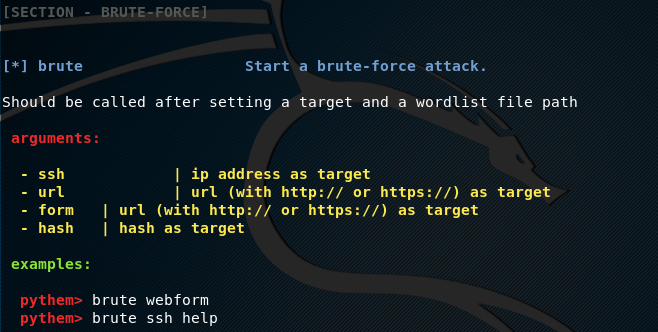
To showcase all the Pythem utilities, type the help command in the terminal
help
The help command shows all the Pythem utilities and their usage instructions, just like the following example screenshot.
Pythem Parameters
Pythem framework supports following parameters during network and web applications penetration tests.
target
interface
gateway
domain
file
filter
script
interface
gateway
domain
file
filter
script
Each parameter has a specific use. For example the target parameter is used to define the host or target web application during the scanning or crawling process. The interface parameter is used to set the communication channel (wireless, Ethernet). Similarly, the file parameter is used in scenarios like bruteforce attacks where some files are used as an input parameter.
Web Application Example
Let’s suppose we want to scan a target web application to find out potentially vulnerable links. This can be achieved by using the webcrawl option in Pythem. In order find out the syntax for webcrawl option, we can use the webcrawl help command in the following format.
webcrawl help
In order to define the target web application, we use target parameter in the following format.
set target <target web application>
To initiate the search process, use the start argument as shown below.
webcrawl start
The above command fetches all the links including the potentially vulnerable links as shown in the following screenshot.
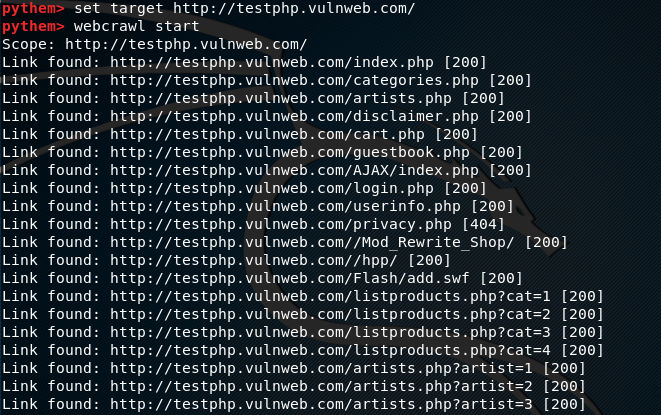
The potentially vulnerable links can further be analyzed with other tools to exploit the target applications.
Network Example
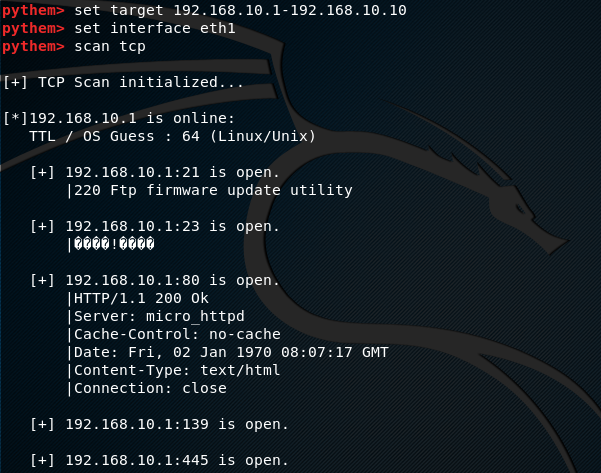
Let’s suppose we want to scan a network to find out all the live hosts, ranging between 192.168.10.1-192.168.10.10 IP addresses. The scan process should also gather information about the open ports for each live host in the network. This task can be achieved by using the Pythem scan feature. To scan the example network, we need to define the target IP range in the following format.
set target 192.168.10.1-192.168.10.10
We also need to define the interface (eth1 in our case) to view the scan details.
set interface eth1
Pythem scan feature supports three modes of scanning i-e tcp, arp, and manual scanning. We can use tcp mode using the following syntax.
scan tcp
The above command starts TCP scanning to find out the hosts status in given IP range. The framework also finds out some useful information like open ports, OS, and server information.
Conclusion
Pythem is a decent framework that can be used to scan and exploit network vulnerabilities. Apart from network penetration testing, the framework is capable of performing web applications penetration tests.

Introduction to Network Security
Network security controls serve to protect the underlying networking infrastructure from unauthorized access, malfunction, exploitation, misuse ..etc. Creating a secure networking environment guarantees the authenticity of network traffic while maintaining both software and hardware technologies.
Implementing and managing network security are two very important processes that need to be large in scale and therefore include all the defensive networking layers. In other words: each networking layer should have its own specific security policies and controls. To connect to any part of a certain network, authorized users should go through an authentication procedure as a preventative measure to block and contain malicious traffic.
Following through the newest network security updates is fundamental for organizations to maintain the necessary level of security across their infrastructure. Staying up to date with security trends and having a good understanding of modern threats facing networks is very important to the overall security posture. However, thorough control of any is often difficult to be achieved and it is therefore better for organizations to focus their resources on bigger threats and prioritize their operations. Security helps networks to survive in an internet full of threats and as a result secure networks will create a safer internet.
Best Network Security Measures
Implementing Antivirus and Antimalware Software Where Necessary: This type of software is the main defensive measure against common malware variants such as ransomware, spyware, worms, viruses, and trojans, and advanced persistent threats. What makes malware one of the fundamental threats to networks is their ability to spread across all the network devices in no time giver the right environment. Networks need to contain antimalware software across all devices for the regular detection of threats and proactive removal.
Data Loss Prevention: The most valuable asset within a network is the data held within its connected devices. It is a number one priority for network administrators and security engineers to detect and prevent any confidential data from being leaked out of any device due to any internal or external factor. Data may be physically or logically removed from the organization either intentionally or unintentionally.
Firewalls: Firewalls are often referred to as the first defensive layer for networks against outsider threats. The internet holds a cluster of both healthy and defective traffic and it is quite the priority to filter your traffic if you want to protect your network. You can do so by creating policies and firewall rules that would permit or block traffic depending on what you deem to be malicious.
Virtual Private Networks: Connecting from a device to a network can leave your packets vulnerable to interception or sniffing. To avoid such scenarios, it is recommended to implement a virtual private network to add a layer of security.
How Cyber Attacks Compromise Networks
Big scale cyber attacks often start small by infecting a lower-end device and then escalating privileges to go further within the same network. To better secure a network it is necessary to see matters from the attacker’s point of view and think of how to find a way in given the information that is available to the public.
Attackers are most likely going to carry out their initial attacks using traditional methods. Think of them like trial attacks to test the waters. As a first step an attacker will probably send a malicious attachment over the email targeting the human element or trying out automated exploits. If the users within the target network lack the fundamental or often times the necessary security knowledge they might fall into these attacks because of the fear of missing out (fomo). Fomo is a human factor that is often exploited by strategic attackers. They would tailor this irresistible offer from a “big firm” in the form of a plausible email with downloadable attachments or clickable links. Employees who were not made aware of social engineering will often fall victim to this because they do not want their organization to miss out on this offer.
Wireless attacks can also be an entry point for attackers and they can be carried out in a variety of forms. Attackers can compromise their target WIFI networks through known vulnerabilities within the right range of the network. Intrusion Prevention Systems (IPS) that consist of multiple security layers will be the best option to defend against this type of attacks.
Popular Network Attack Techniques
We mentioned earlier that an attacker might only need to exploit one single device to start with and gain access to the whole network through privilege escalation. While that is a common entry point that is often used to carry out attacks, there there are multiple types of network attacks that cut across all platforms and software categories. Here’s a list of some generally known techniques that are used to execute a network attack:
Spoofing (Identity or IP Address): Using this technique, the attacker manipulates IP datagrams and tries to modify the IP address’ header layer along with the packets that carry the information form the attacking device. If this goes successful, the attacker will gain a level of anonymity that would help cover their tracks and often help establish credibility in the right scenario.
Man-in-the-middle attacks (MITM): In computer security, a man-in-the-middle attack is considered as an attempt to hijack the communication between two parties within a network on the level of TCP/IP protocols. The hijacker monitors and controls the communication by rerouting data to a device of their choice. The main motivation of this technique will be to deceive target by making them think that the data they are receiving is being sent from a certain plausible source.
Trojans Attacks: Trojans are a type of malware that disguises itself as a valid piece of software. When they are executed om a target device they usually enact a list of harmful processes that would compromise it, monitor it, control it in real time, and often times mirror the attack to other devices within the network.
Sniffing: In the context of network security, packet sniffing is the type of attacks that allows the attacker to intercept data as it circulates through and within a network. Capturing the travelling data is often carried out by executing sniffing software on any layer of the network. if the sniffer is positioned in an aggregation point of a network, the whole traffic will be monitored.
Distributed/Denial-of-Service (DDoS/DoS): DDoS attacks are damaging in nature and they are not typically motivated by monetary incentives. This type of attacks floods the target network with traffic to occupy all of its resources and make it go down. When all the physical network components and all the bandwidth is consumed by fake requests, the real request will be futile.
Pharming: This cyber attack redirects a network’s traffic to a forged website that is made to look like a legitimate one. Pharming can be conducted either by changing the hosts file on a victim’s computer or by exploiting a vulnerability in the DNS server software.
Social Engineering: For attackers, social engineering is a way of non-technical deception they use in order to gain access to their target assets. Attackers here usually rely on users’ interactions by deceiving them to jump on what they have to offer and ignore standard security practices. The attacker pretends to be an authorized person coming forward with an offer or warning them about non-existing threats. This will often lead the victims to some engineered traps that may install backdoors on their network.
How to Assess your Networks for Vulnerabilities
Network security assessments can be helpful to determine the steps you need to take to prepare your network perimeter for the potential inside and outside threats. For a successful overall security assessment, here are some steps that should help you get started:
Locate applications and other IT resources and their processes: Document and analyze your entire IT infrastructure and identify which information can be at risk during incidents that can cause privacy issues.
Get a perspective of your network from the outside: Taking a look at your network from the outside as an unwanted guest or an authorized administrator will make you more accustomed to your network and give you at least a perspective of how attackers can plan and carry out an attack on your network.
Scan your network for open ports, vulnerabilities, and outdated services: Perform regular/periodic scans that are both intensive and exhaustive in nature. The purpose of these scans will be to detect open ports, the services that run on them, and get an insight on what vulnerabilities can be exploited to gain access and carry out the patching process accordingly.
Track the capabilities and limits of your network security measures and protocols: Almost all private business networks come equipped with default firewalls and detection systems. However, only relying on these security measures will not be enough to pinpoint all potential threat. Understanding what your network gear and software is capable of and what are its limitations will make you in the loop on where to allocate your resources. You also need to have tabletop exercises to measure the effectiveness of your security measures.
Inspect your internal network for insider threats and deficiencies: Insider threats are as dangerous and common as outside threats so it is mandatory to not prioritize a type over the other. Insiders can be malicious intentionally or unintentionally and therefore you need to enforce proper measures to contain inside threats.
Review your wireless technologies, Wi-Fi, Bluetooth, RFID..etc: Wireless technologies and removable media come with their own security risks and vulnerabilities. For every new gadget or technology you decide to add to your environment you need to understand that they increase your level of risk around your organization and devise your policies subsequently.
Educate users about social engineering attacks and assess their awareness: Humans are the weakest security link and they will continue to be so if they are not educated about the risks they present if they don’t comply with security best practices. Their security awareness should be put to the test on the regular to make sure they are always on alert.
Tips to Minimize Network Security Risks
Containing and preventing attacks on your network can be a daunting task if the budget for security is not a significant one. However, there are some very important steps that every organization should take if they want to minimize their risks:
Use encryption on all your network access points: Encrypting network access points should be the first step to be taken. Attackers can easily take down your systems if they find a network access point that is not encrypted. If your router has a web management interface you should disable remote network access to it and change all default credentials.
Protect all your devices with security software: Without some type of antimalware technology running on your servers and endpoint devices you are putting your whole network at risk and minimizing your chances of detecting persistent threats. Pay close attention to your servers as they are the devices that receive, send, and process data on the regular. Implement antiviruses, firewalls, and intrusion detection systems wherever necessary.
Perform third party penetration tests on the regular: Third party penetration tests work wonders and they will give you a thorough idea of how your network security holds up to real attacks. These tests will usually come with a list of remediation tasks you need to do to step up your security practices.
Use VPN for remote access: Some business operations will require remote access to your network which will present a major threat to your overall security. To manage these interactions securely it is better to have them carried out through virtual private network technologies.
Update all software and Firmware: Make sure to always be on the loop when it comes to your software/hardware vendors’ updates and their newest releases. Whether it is router firmware or your antivirus technologies, you should check your vendors’ websites occasionally to make sure that your assets are running the latest firmware and versions.
In today’s post we’ll learn how to associate a behavioral persona to an email account with the help of an OSINT technique.
For those of you who are not very familiar with the concepts involved, OSINT stands for “Open-Source INTelligence” and basically refers to collecting publicly available information on the Internet for further analysis. On the other hand, a behavioral persona represents what a user does rather than what he or she is, for example: “Bob is a married lawyer who uses Dropbox, LinkedIn and Facebook, and he has a Gmail account.”

A Privacy Issue Concerning Emails
Nowadays, it is not very uncommon that web apps will leak the fact that their users’ usernames or email accounts exist in their database. Let’s say for example they are okay assuming there’s no risk that anybody will know that bob@genericdomain.com is a user of a certain extramarital dating site.
Think a bit about it. A malicious attacker can easily guess if a given email account is registered into such vulnerable applications by just interacting with the authentication mechanism.
They will just try to log in with a wrong email or password and see how it responds.
| Use Case | Message |
|---|---|
| Nonexistent email | No account was found for this email |
| Existent email with wrong password | The password is not correct, please try again |
These illustrative examples literally tell us if this or that user is registered into the system. However, not every potentially vulnerable application responds that way; some times, they leak the information by sending the browser an HTTP status code other than 200, or by redirecting to another page from which the leaking information can be extracted.
Why Would Apps Do That?
A usability design decision is often the reason why, and probably to a certain extent, big players like Microsoft or Google had an impact on how developers and designers are writing apps today.
| Service | Use Case | Message |
|---|---|---|
| Outlook | Nonexistent user | That Microsoft account doesn’t exist |
| Gmail | Nonexistent user | Couldn’t find your Google Account |
Web devs might well think:
If they did it why can’t we did it?
But be aware of hackers. Even though the messages above are user-friendly, and certainly help understand users what exactly is going on, it may not be the right thing to do in terms of web security, especially if the site is particularly targeted to an audience.
Companies should protect the data of apps addressed to people of a particular religion, race, health condition, sexual orientation or political ideology. The same thing goes for dating sites, gambling sites, and any other type of app that could reveal private behavioral patterns of its users.
More specifically, here are some threats about leaking emails:
- Users’ accounts can potentially be accessed by brute force
- Valid email accounts can be extracted for spamming purposes
- OSINT can be performed to deduce a user’s persona from the sites they are registered
What Is the Solution?
From a developer’s perspective the answer is not to provide any specific clues about what is running under the hood, as it is shown below.
| Use Case | Message |
|---|---|
| Nonexistent email | The credentials provided are not valid |
| Existent email with wrong password | The credentials provided are not valid |
Twitter is an example where usability is sacrificed for the sake of security:
| Service | Use Case | Message |
|---|---|---|
| Nonexistent user | The email and password that you entered did not match our records |
The solution is really simple actually: Users just shouldn’t be able to log in the app when providing a wrong email/password pair. Error messages must be displayed in such a way that nobody can know what’s wrong with what went wrong.
Introducing Email OSINT
From small to medium-sized custom apps written in PHP, JavaScript or Python, to widely used websites all over the world, including open source ERPs and CRMs. There’s a plethora of websites of all sizes and shapes leaking emails from their databases.

Remember, hackers with enough time and motivation can do some manual pen testing and write their own tools with the clear purpose of identifying emails with behavioral personas.
Automated OSINT with DataSploit
Regarding automated penetration testing tools, DataSploit is a Python OSINT framework that performs automated OSINT on domains, emails, usernames and phones. You can use DataSploit as something to pull from in Python apps or as a standalone tool in the command line.
Here is how to install DataSploit:
git clone https://github.com/datasploit/datasploit /etc/datasploit
cd /etc/datasploit/
pip install -r requirements.txt
mv config_sample.py config.py
If the installation goes okay you will get this output on your console:
python datasploit.py
True

Single target or file input required to run

usage: datasploit.py [-h] [-i SINGLE_TARGET] [-f FILE_TARGET] [-a] [-q]
                     [-o OUTPUT]

  ____/ /____ _ / /_ ____ _ _____ ____   / /____   (_)/ /_
 / __  // __ `// __// __ `// ___// __ \ / // __ \ / // __/
/ /_/ // /_/ // /_ / /_/ /(__  )/ /_/ // // /_/ // // /_
\__,_/ \__,_/ \__/ \__,_//____// .___//_/ \____//_/ \__/
                              /_/

           Open Source Assistant for #OSINT
               www.datasploit.info

optional arguments:
  -h, --help            show this help message and exit
  -i SINGLE_TARGET, --input SINGLE_TARGET
                        Provide Input
  -f FILE_TARGET, --file FILE_TARGET
                        Provide Input
  -a, --active          Run Active Scan attacks
  -q, --quiet           Run scans in automated manner accepting default
                        answers
  -o OUTPUT, --output OUTPUT
                        Provide Destination Directory

              Connect at Social Media: @datasploit
This is how to do basic email OSINT in the command line out of the box:
python emailOsint.py bob@genericdomain.org
[-] Skipping Hacked because it is marked as disabled.
---> Finding Paste(s)..
[-] google_cse_key not configured
[-] google_cse_key and google_cse_cx not configured. Skipping paste(s) search.
Please refer to http://datasploit.readthedocs.io/en/latest/apiGeneration/.
---> Searching Scribd Docs
---> Checking breach status in HIBP (@troyhunt)
Pwned at 4 Instances
Title: Adobe
BreachDate: 2013-10-04
PwnCount: 152445165
Description: In October 2013, 153 million Adobe accounts were breached with each containing an internal ID, username, email, <em>encrypted</em> password and a password hint in plain text. The password cryptography was poorly done and <a href="http://stricture-group.com/files/adobe-top100.txt" target="_blank" rel="noopener">many were quickly resolved back to plain text</a>. The unencrypted hints also <a href="http://www.troyhunt.com/2013/11/adobe-credentials-and-serious.html" target="_blank" rel="noopener">disclosed much about the passwords</a> adding further to the risk that hundreds of millions of Adobe customers already faced.
DataClasses: Email addresses, Password hints, Passwords, Usernames
Title: Dropbox
BreachDate: 2012-07-01
PwnCount: 68648009
Description: In mid-2012, Dropbox suffered a data breach which exposed the stored credentials of tens of millions of their customers. In August 2016, <a href="https://motherboard.vice.com/read/dropbox-forces-password-resets-after-user-credentials-exposed" target="_blank" rel="noopener">they forced password resets for customers they believed may be at risk</a>. A large volume of data totalling over 68 million records <a href="https://motherboard.vice.com/read/hackers-stole-over-60-million-dropbox-accounts" target="_blank" rel="noopener">was subsequently traded online</a> and included email addresses and salted hashes of passwords (half of them SHA1, half of them bcrypt).
DataClasses: Email addresses, Passwords
Title: LinkedIn
BreachDate: 2012-05-05
PwnCount: 164611595
Description: In May 2016, <a href="https://www.troyhunt.com/observations-and-thoughts-on-the-linkedin-data-breach" target="_blank" rel="noopener">LinkedIn had 164 million email addresses and passwords exposed</a>. Originally hacked in 2012, the data remained out of sight until being offered for sale on a dark market site 4 years later. The passwords in the breach were stored as SHA1 hashes without salt, the vast majority of which were quickly cracked in the days following the release of the data.
DataClasses: Email addresses, Passwords
Title: MySpace
BreachDate: 2008-07-01
PwnCount: 359420698
Description: In approximately 2008, <a href="http://motherboard.vice.com/read/427-million-myspace-passwords-emails-data-breach" target="_blank" rel="noopener">MySpace suffered a data breach that exposed almost 360 million accounts</a>. In May 2016 the data was offered up for sale on the "Real Deal" dark market website and included email addresses, usernames and SHA1 hashes of the first 10 characters of the password converted to lowercase and stored without a salt. The exact breach date is unknown, but <a href="https://www.troyhunt.com/dating-the-ginormous-myspace-breach" target="_blank" rel="noopener">analysis of the data suggests it was 8 years before being made public</a>.
DataClasses: Email addresses, Passwords, Usernames
---> Checking Fullcontact..
[-] fullcontact_api not configured
[-] Full-Contact API Key not configured. Skipping Fullcontact Search.
Please refer to http://datasploit.readthedocs.io/en/latest/apiGeneration/.
---> Searching Clearbit
[-] clearbit_apikey not configured
[False, 'INVALID_API']
[-] Clearbit API Key not configured. Skipping Clearbit Search.
Please refer to http://datasploit.readthedocs.io/en/latest/apiGeneration/.
---> Basic Email Check(s)..
[-] mailboxlayer_api not configured
[-] mailboxlayer_api not configured
[-] MailBoxLayer_API Key not configured. Skipping basic checks.
Please refer to http://datasploit.readthedocs.io/en/latest/apiGeneration/.
---> Searching Slideshare
---> Searching Whoismind for associated domains
Fair enough! With a very basic query we could learn that bob@genericdomain.org uses Adobe, Dropbox, LinkedIn and MySpace.
Note that DataSploit heavily relies on third-party services and APIs for reporting. The information above is retrieved through a public service named haveibeenpwned.com (HIBP) which checks if a particular email account is been compromised in a data breach.
As you can see, this is the HIBP section in DataSploit’s report:
---> Checking breach status in HIBP (@troyhunt)
For a more detailed analysis in the other sections it is necessary to get an API key with the corresponding service provider supported by DataSploit:
Then, the environment has to be set up accordingly in the
config.py file.
For further information on how to use DataSploit, don’t hesitate to read the documentation.
Conclusion
Today we brought some awareness on information leaking and OSINT since there are still plenty of applications out there informing about which email account exists in their databases.
Some of them are about dating or gambling, just to give some examples, or are exposed to audiences of a particular religion, sexual orientation or political ideology. Hackers with time and motivation can take advantage of the vulnerability with manual pen testing to an extent that it is even possible to detect behavioral personas.
Also, DataSploit is an OSINT framework that allows to automate the process of email research with
emailOsint.py. More specifically, we showed how easy it is to figure out a bunch of widely-known sites being used by a target email address.Python SMTP User Enumeration for Penetration Testing
Welcome back my fellow hackers! I was thinking recently, and came to the realization that we haven’t really been cooking up any homemade tools here at HackingLoops, so I’ve decided to change that. Today we’re going to be learning about SMTP user enumeration, as well as building an enumeration tool of our very own and taking things further than just using the python smtplib to send emails.
First, we’ll discuss the SMTP protocol, then we’ll follow it with the purposes and potential of this enumeration. Once we’ve covered that, we’ll discuss the methods that we can use to enumerate these users and test smtp. After all that is said and done, we’ll start constructing our own script. So, let’s get started!
The SMTP Protocol and User Enumeration
What is SMTP?
SMTP, short for Simple Mail Transfer Protocol, defines the standards used to transmit e-mail between systems. SMTP is not only used by mail servers for relaying messages to one-another, it is also used by the e-mail client of the end-user in order to transmit a message to the mail server for further relaying.
What is SMTP User Enumeration?
These SMTP servers have users registered on them, and these users have e-mail addresses. By sending probes to the server in the form of certain commands, we can tell if a given user exists. By repeating this process again and again with a list of varying usernames we may be able to identify a multitude of users or e-mail address on the target server. By verifying the existence of these users, we can then proceed to send out phishing attacks directly targeted at them.
How Does SMTP User Enumeration Work?
There are 3 commands in the SMTP protocol that we can use to enumerate a user: VRFY, EXPN, and RCPT TO. The VRFY command is short for verify, and is actually mean’t to validate usernames and addresses. Because of its innate purpose, many administrators disable the VRFY command to stop spammers. The EXPN is very similar to the VRFY command and doesn’t really require extra explaining.
The RCPT TO method is different however. First, we need to discuss the MAIL FROM command. This command identifies the source address of an e-mail being sent. Once we send a MAIL FROM command, we use RCPT TO method to identify the recipients of the e-mail. By repeating RCPT TO commands after the MAIL FROM command, and never actually finishing the started e-mail, we can identify the existence of any user we’d like. Now that we understand SMTP and SMTP user enumeration, let’s get started on building our script!
(Note: the script can be found here on Pastebin. The screenshots here do not have comments, but the Pastebin post does, so I suggest you keep it open and reference it while we go through it here.)
Building the Enumeration Script
Step 1: Beginning the Script and Initializing Class
In order to keep this simple, all our functions will be housed under a single class. Once we’ve completed these functions, we will be able to create an instance of this class and execute the functions as we need. In this step we are first going to set our interpreter path, import a module we’ll need, and initialize our class:

As you can see, we only need a single module at this point, socket. The socket module will allow us to create and utilize network connections. Our class also takes a number of arguments, these being: the target IP address, the file containing usernames to try, the port number to connect to on the target, a scan type, and an address to use if a MAIL FROM command is required (RCPT method). Also, two empty self attributes are created, self.sock will later contain the socket object that connects to the target and self.targetBanner will store the banner from the target server when we connect for the first time.
Step 2: Function to Read List of Users
Next up, we’ll be creating the function that will read the file containing the list of usernames supplied when the object was created. In our init function, we stored the path to the file in self.userlist. Using this, we can read and parse the file, after which we can store the new list in self.userlist, replacing the file path:

Since this function won’t be executed till later, our list of users will remain un-read until we call it. Once it’s called however, the list will be read and stored.
Step 3: Function for Constructing and Handling Sockets
Naturally with a script like this, we’ll be using sockets in order to make and use the connection(s) to the target server. In order to ease the implementation of these sockets, we’ll be building a pair of functions to handle their creation:
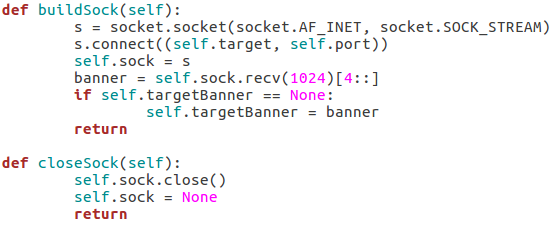
Our first function, buildSock(), follows these steps: create the socket object, connect the socket to the target IP address on the target port number, store this connected socket object in self.sock, receive the server banner, and store the server banner in self.targetBanner (if it hasn’t already been stored there). The closeSock() function is simple and not really necessary, but it does save us from repeating some lines of code later. It simply closes the socket object in self.sock and resets its value to None.
Step 4: Function for Checking Vulnerability to Scan
This function will read the type of scan that was chosen and test the target server to make sure that it’s vulnerable before the enumeration begins. We can do this by attempting to use these commands:
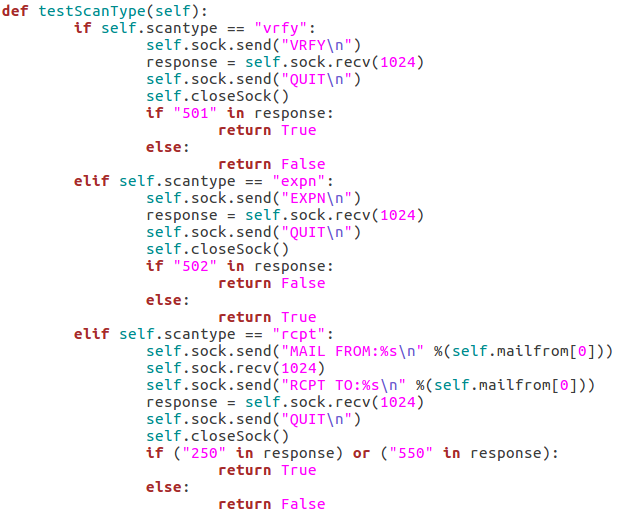
The first test is the VRFY test, which will send an empty VRFY command to the target. If the target responds with 501 (the SMTP reply code for a syntax error), then the VRFY command is available to be used. The second test will check for vulnerability to the EXPN method. This can be accomplished by sending an empty EXPN command, and if the target responds with a 502 (command not recognized) then the EXPN command will not work. The final test is for the RCPT command. We start by sending our MAIL FROM command containing the given/default username. We then send an RCPT TO command targeted at the same user. If the target responds with 250 or 550 (OK or user unknown) then the RCPT TO method is available for use.
Step 5: Functions to Probe Target for Username
These next four functions will all be related to probing the target for a given username. I’ll go ahead and throw up the screenshots, then we’ll discuss them:
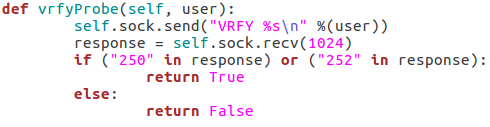
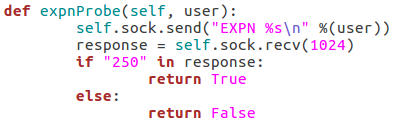
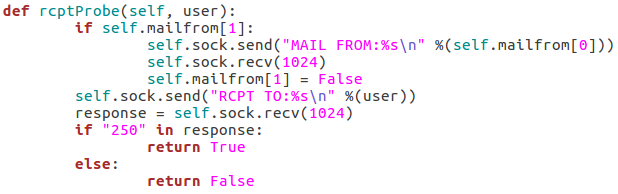
These three functions all behave similarly to each-other and to the function for checking the targets vulnerability to the scan type. The commands are repeated as they were before, but this time we add the username we’d like to enumerate to the command. If the target responds to this with 250 (OK) then this means that user exists (252 is also an acceptable value for the VRFY method). Finally, we have this function:
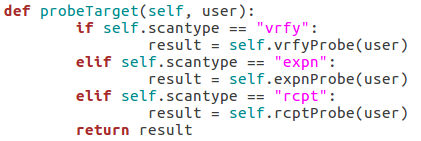
This function simply parses the string that was supplied as the scan type when the class is created and probes the target for a given username using that probe method. This will allow us to supply usernames to a single function while still probing the target using the proper method.
Step 6: Taking and Parsing Arguments
Now that all of our functions are complete, we can start putting together the body of our script. First, we’ll import some other modules and then we’ll set up and parse the arguments for the script:
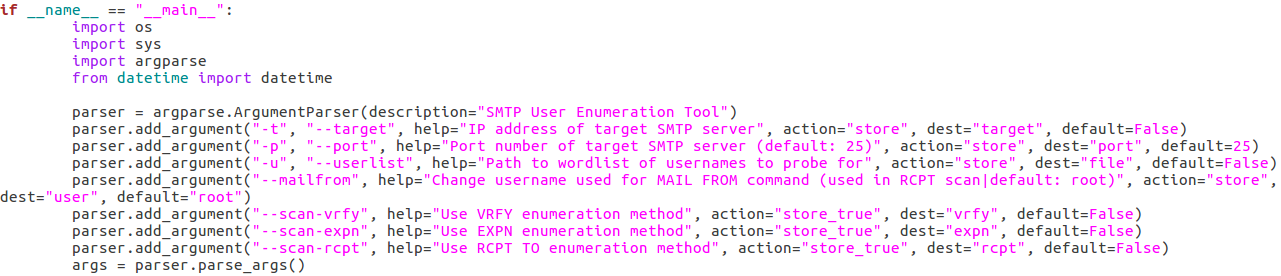 Here we can see that we have seven arguments available when using this script. Firstly, we have the target IP address and port number, then there’s the file path to the word-list containing the usernames to probe for. There is also a switch for each scan type (one of which must be supplied) and finally there is an optional flag to specify the username/e-mail address to use with the RCPT TO method.
Step 7: Detecting and Reporting Bad Input
A big problem in scripting is that invalid user input can really gum up the works. The easiest way I’ve found to combat invalid input, is to make sure you never get invalid input. We can do this by running a series of checks to make sure everything is in order before we continue. First, we’ll validate the target IP address:
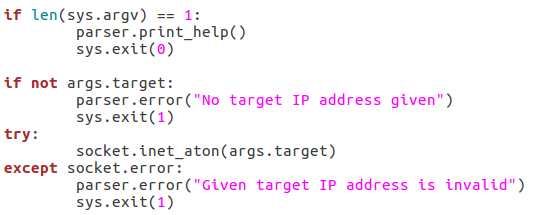
We start by checking to see if a target has even been supplied. If it hasn’t, we can raise an error through the parser to tell the user that one is required. If an address is given, we can run it through the socket.inet_aton function, which will raise an error if the IP address is invalid. Now that we’ve handled the validation of the target IP, we should move on to validating the port number:
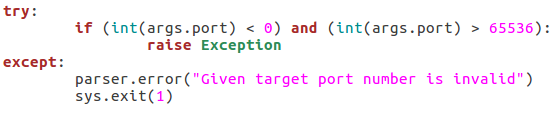
This block of the code will check that the given port number is in the correct range of integers, if it is not, an exception is raised, and the port number is reported as invalid. The try/except block will also give this report if the int() function raises an error (a non-integer value being given). Next up we’ll check that the path for the word list is in order:
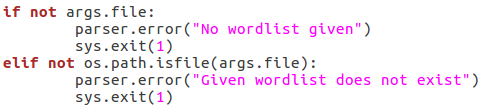
First, we make sure that a file path was given. If a file path was given, we use the os.path.isfile function to evaluate whether or not the file actually exists. If an existent file path was given and the checks are passed, nothing happens. Next up, we will be verifying the chosen scan type:

First, we pull all the scan type values out of the arguments and put them in a list. We then use an if statement to say this: if there is more than one true value or zero true values, return an error. This will allow us to filter out invalid scan type input. Now that all our checks have been completed, we can move on to executing the enumeration.
Step 8: Performing Enumeration
Now that we’re starting our enumeration, we need to create an instance of our SMTPUserEnumerator and pass all the arguments we received:

The if/elif block simply identifies the type of scan that was chosen and stores that value in scantype. Also, before we construct the enumerator object, we print back to the user: the chosen scan type, the target IP, and the target port number. Now that we have our enumerator object, we can run the testScanType() function in order to validate the targets vulnerability before we continue:
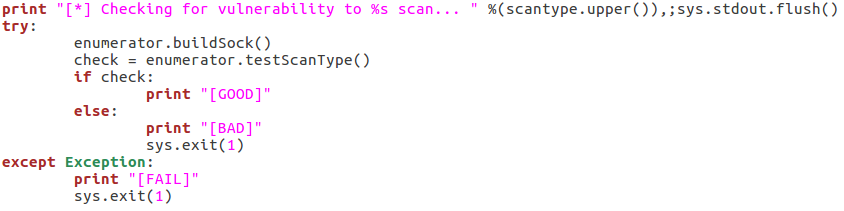
As you can see here there are three possible responses to the vulnerability check: good, bad, and fail. A good result means that the checking function returned true, a bad result is returned for false. Also, if an error is generated, the check is reported as a failure and the script exits. Now that we’ve checked the target, we can parse the list of usernames:

This is fairly self explanatory; we print that we’re parsing the list of users, then call the readUsers() function on our enumerator object. Should this process fail, the script will say so and exit. Once the usernames are read we can move on to the actual enumeration:
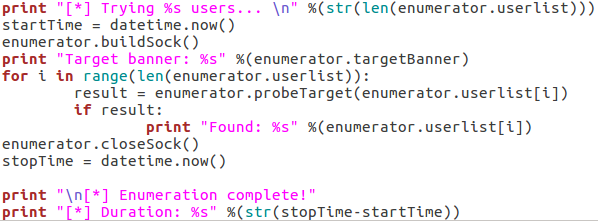
We start our final code block by printing how many usernames we need to try. Once we’ve done that, we use datetime.now() to start the clock for tracking the duration of the scan. We then call buildSock() to re-connect to the target and print the targets SMTP server banner. We then loop through the list of usernames and call the probeTarget() function for each of them. If a username is reported as good, we print it and move on.
Once the enumeration is complete, we call the closeSock() function and stop the clock for the duration. We then print that the scan is complete and print the difference between the two time values we took (resulting in the elapsed time from start to stop). Now that our script is complete, there’s only one thing left to do!
Step 9: Test the Script
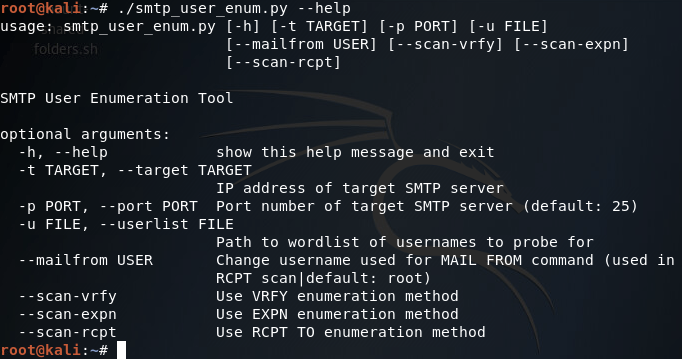
We’ll be testing our script against a Postfix ESMTP server running on an Ubuntu Server 16.04 LTS VM. We’ll start by using the –help flag in order to print the help page for our script (it is automatically generated with argparse):
Our help page is looking good! Before we continue with this enumeration however we’ll need to build a small list of usernames. I’ll be using the cat command in the Kali CLI for this purpose:
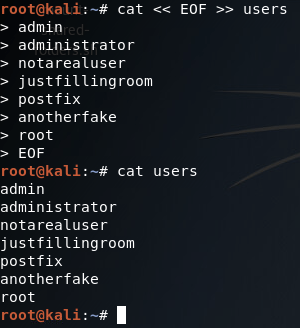
Alright, now we’ve got our list of usernames stored under a file named users. Now that we’ve got that squared away, we can begin testing our different scan types, of which we’ll be starting with the VRFY method:
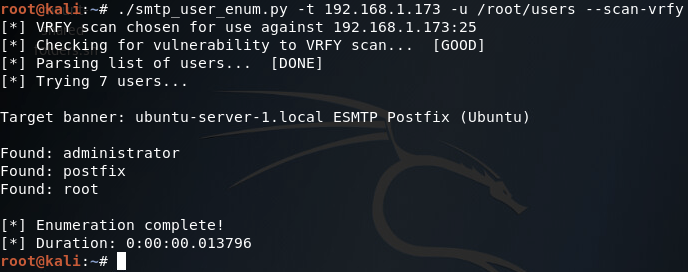
There we go! Our script works! Now let’s move on and test the EXPN scan method:

Our script tells us here that this target is not vulnerable to this type of scan method, which is true (I tried it manually with a telnet session and the command is unrecognized). Finally, we have our RCPT TO method:
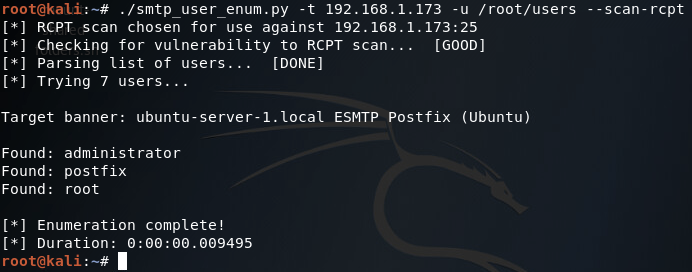
There it is, two of our three scan methods work on this target. Hopefully this helped you learn more about SMTP user enumeration (it definitely helped me), and you can expect to see more home-cooked scripts in the near future!
About Gamemaker gafoor.2


No comments